| Commands | CAPCAD_OFFSET (plain offset) · CAPCAD_OFFSET_ASSISTANT (Offset Assistant) · CAPCAD_OFFSET_VARIABLE (Offset Variable) |
| Shortcuts | none. The O in acad.pgp is the CAD's own OFFSET, not this command |
| Ribbon | CAPCAD_OFFSET: no button — command line only. CAPCAD_OFFSET_ASSISTANT: CapCad tab › Traffic Control panel › Markings split button › Offset Assistant. CAPCAD_OFFSET_VARIABLE: CapCad tab › CAD Utilities panel › Geometry split button › the unlabelled small button whose tooltip reads Offset Variable |
| Category | CAPCAD_OFFSET_VARIABLE: CAD Utils: Segment. CAPCAD_OFFSET and CAPCAD_OFFSET_ASSISTANT: NEW |
| Forms | OffsetAssistantForm — Offset Assistant, modeless, single instance, live preview · OffsetVarForm — Offset Variable, modeless, single instance, two tabs. CAPCAD_OFFSET has no form |
| Hosts | CAPCAD_OFFSET: AutoCAD, BricsCAD, GstarCAD, ZWCAD and ARES Commander — with a different behaviour outside AutoCAD (see below). CAPCAD_OFFSET_ASSISTANT and CAPCAD_OFFSET_VARIABLE: AutoCAD only; on ARES running them shows a notice saying they are not available in this version, and they are not available on the other three |
| Also opened by | none. Offset all, in Curve Utilities, is the batch offset, with a different sign rule |
Three offsets for three different problems: one distance, two distances in parallel, or one distance that opens along the curve. None of them is the CAD's OFFSET under another name — all three work on CapCad's own curve representation, which carries the curvature of every segment.
- The CAD first, CapCad second. The plain offset tries the CAD's own offset and, when it refuses, falls back to CapCad's — and says on the command line which one answered.
- The large-coordinate trick. In real project coordinates, with seven digits, an offset of a few centimetres runs into the precision of the number; the command takes the curve to the origin, offsets it there and brings it back.
- A live preview, not a one-shot result. In the assistant, every value you type redraws the pair of lines at once; nothing is final before Accept.
- Double offset, two arrangements. Two lines measured from one distance, or two lines straddling it — the difference between drawing from the edge and drawing from the centre of a stripe.
- Layer and width in the same pass. The lines are born on the layer you chose, with the polyline width you asked for, with no second pass over properties.
- An offset that varies. The variable offset opens linearly from one distance to another along the curve — the geometry of a widening, a taper or a lay-by.
Plain offset — CAPCAD_OFFSET
What it does
Draws one parallel of a curve, at the distance you ask for. The source curve is not deleted.
- Run
CAPCAD_OFFSET. Unlike the native OFFSET, it asks for the distance before it asks for the curve: Offset value. The suggested value is the one from last time — it is remembered between sessions and survives closing the CAD. On the very first run the default is0. - A value of zero ends the command without drawing anything.
- Select the curve: — a line, polyline or arc. The reject message is Must be a line, polyline or arc.; a curve that cannot be read fails with Could not read the curve.
- The parallel is drawn and the command line reports the result.
The sign
A positive value puts the parallel to the right of the walking direction of the curve — that is, of the order of its vertices; a negative value puts it to the left. Note that it is the opposite of the one the Offset Assistant and the Variable Offset use — see Notes.
Which offset answered
On AutoCAD the command tries, in this order:
- the CAD's own offset, with the curve translated to the origin and the result translated back;
- the same offset without the translation, if the first fails;
- CapCad's own offset, if the CAD refused both times.
The closing message says which one did the work:
Offset by 3.5. (AutoCAD)
Offset by 3.5. (AutoCAD, 2nd attempt)
Offset by 3.5. (CapCad fallback — AutoCAD refused)
When none of them succeeds, the answer is Could not offset that curve at this distance. A refusal is normal: an offset larger than the radius of a concave curve simply has no answer.
On the other CADs (BricsCAD, GstarCAD, ZWCAD, ARES Commander) the command uses CapCad's own offset directly. There is no attempt at the native offset, no translation to the origin and no attribution in the message; the remembered value and the sign are the same. Two other differences worth knowing on those four: the pick prompt is Select the curve, with the reject message Not a curve - pick a line / polyline / arc., and a failure is shown as a dialog rather than a line of command-line text.
Offset Assistant — CAPCAD_OFFSET_ASSISTANT
What it does
A working window for drawing one or two parallels of a stretch of curve, with a live preview: every value you change erases the previous lines and redraws. Nothing is final until you click Aceitar (Accept).
Three ways of choosing the stretch:
| Mode | What the command asks for | What becomes the path |
|---|---|---|
| Geometry and 2 points (default) | the curve, then two points | the stretch between the feet of the perpendiculars of the two points |
| Geometry and 1 point + extent | the curve, then one point | the stretch starting at that point and running for the extent given; Inverter direção makes the extent run backwards |
| Whole geometry | the curve alone | the whole curve |
A closed geometry is refused.
Workflow
- Run
CAPCAD_OFFSET_ASSISTANT. - Choose the mode (2, 3 or 6), the type (12 or 13) and the arrangement (15 or 16), and fill in Offset 1 (14) and, for a double, Offset 2 (17).
- Click the large button (8) — its caption changes with the mode. The window hides and the CAD makes its requests.
- The preview appears. Keep changing values: each change redraws.
- Aceitar (10) makes the preview final. With Deleta input (11) ticked, the source curve is deleted at that moment.
- Reset (9) erases the preview and forgets the path; you have to select again.
The arrangements
Calling d1 the Offset 1 and d2 the Offset 2:
| Type and arrangement | Lines drawn |
|---|---|
| Simple | one only, at d1 |
| Double · Side | two: at d1 and at d1 + d2 — the second measured from the first, as the label Relativo ao offset 1 says |
| Double · Centred | two: at d1 − d2/2 and d1 + d2/2 — the pair straddling the distance d1, with d2 of opening between them |
A positive value puts the lines to the left of the walking direction; Inverte lado (7) swaps both sides at once, multiplying everything by −1.
The form
This form shows the same Portuguese captions in every language, including English. They are quoted below as the software shows them, with an English gloss in brackets. The window title is the exception: it is the literal
Offset Assistantin every language.
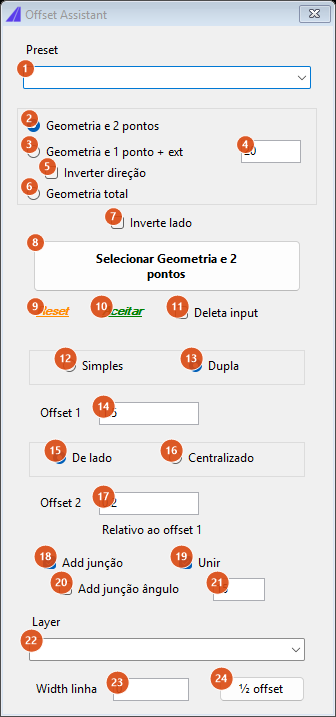
The capture is of a Portuguese session; on this form the English session looks the same, because the captions are not translated.
| # | Control | What it does |
|---|---|---|
| 1 | Preset | Not available in this version. The list is empty. |
| 2 | Geometria e 2 pontos (Geometry and 2 points) | Selected by default. Asks for the curve and two points; the path is the stretch between them. |
| 3 | Geometria e 1 ponto + ext (Geometry and 1 point + extent) | Asks for the curve and one point; the path starts there and runs for the extent in box 4. |
| 4 | (extent) | 20 by default. Only read in mode 3. |
| 5 | Inverter direção (Invert direction) | In mode 3, makes the extent run against the direction of the curve. No effect in the other two modes. |
| 6 | Geometria total (Whole geometry) | The path is the whole curve, with no points. |
| 7 | Inverte lado (Invert side) | Mirrors every line to the other side of the path. Redraws the preview at once. |
| 8 | (selection button) | Hides the window and makes the requests in the CAD. The caption follows the mode: Selecionar Geometria e 2 pontos, Selecionar Geometria e 1 ponto or Selecionar Geometria. |
| 9 | Reset | Erases the preview and forgets the chosen path. |
| 10 | Aceitar (Accept) | The preview becomes final — Reset can no longer reach it. If (11) is ticked, the source curve is deleted. |
| 11 | Deleta input (Delete input) | Unticked by default. Only acts at the moment of Aceitar. |
| 12 | Simples (Simple) | One line only. |
| 13 | Dupla (Double) | Selected by default. Two lines. |
| 14 | Offset 1 | 1.5 by default. The main distance. Positive = left of the walking direction. |
| 15 | De lado (Side by side) | Selected by default. Offset 2 is measured from Offset 1. |
| 16 | Centralizado (Centred) | The pair of lines straddles Offset 1, with Offset 2 of opening. |
| 17 | Offset 2 | 0.2 by default. Only read for type Dupla. |
| 18 | Add junção (Add junction) | Ticked by default; not available in this version. |
| 19 | Unir (Join) | Ticked by default; not available in this version. |
| 20 | Add junção ângulo (Add junction angle) | Not available in this version. |
| 21 | (junction angle) | 15 by default; not available in this version. |
| 22 | Layer | The list carries the layers already in the drawing, sorted alphabetically. It is read once, when the window is created, so layers added later in the session do not appear. A name can also be typed: the layer is created if missing. Empty leaves the lines on the current layer. |
| 23 | Width linha (Line width) | 0 by default. Greater than zero, applies that constant width to the polylines drawn. |
| 24 | ½ offset | Writes half of Offset 1 into box 23. It is the shortcut for drawing the line with the width it represents. |
Remembered between sessions
Nothing. The window is single instance — running the command again only brings back the one already open — but no value is stored: closed and reopened, it comes back to Dupla, De lado, offset 1.5, offset 2 0.2, extent 20, width 0 and an empty layer.
Variable Offset — CAPCAD_OFFSET_VARIABLE
What it does
Draws a parallel whose distance varies linearly along the curve: one value at the start, another at the end. It is the geometry of a widening, an approach taper or the mouth of an access.
The distance is sampled about once per unit of travel, and each sample is thrown perpendicular to the local tangent. The result is therefore always a tessellated polyline, with a vertex roughly every metre, never a sequence of arcs. When the values make the parallel collapse onto a straight line, the result comes out as a two-point line.
Workflow
- Run
CAPCAD_OFFSET_VARIABLE. - On the 2 values tab, type the start distance (1) and the end distance (2).
- Select (5). The window hides and the CAD asks Select the geometry:.
- Where you click matters: if you click on the second half of the curve, it is reversed before the calculation, so the start distance applies at the end you clicked.
- The preview is drawn at once. From then on, every keystroke in boxes 1 and 2 redraws, as long as Auto (14) is ticked; without it, use Update (13) or press Enter.
- Accept (11) makes the preview final; Reset (10) erases it.
A positive value puts the parallel to the left of the walking direction of the curve. The source curve is never deleted.
The form
Unlike the Offset Assistant, this window is translated: outside a Brazilian profile it shows English captions, and the window title reads Offset Variable. The numbering below refers to this window and restarts from 1: it has nothing to do with the Offset Assistant's numbers above.
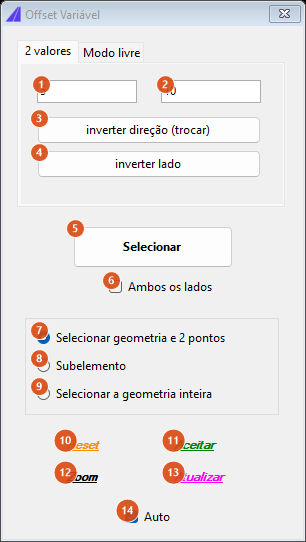
The capture is of a Portuguese session. The controls are the same, and the English captions are the ones in the table.
| # | Control | What it does |
|---|---|---|
| 1 | (start value) | 5 by default. The distance at the start of the walk. The box has no label. |
| 2 | (end value) | 10 by default. The distance at the end. |
| 3 | invert direction (swap) | Despite the name, it swaps the side: it negates both values at once, mirroring the parallel to the other side of the curve (see Notes). |
| 4 | invert side | Despite the name, it reverses the ramp: it swaps the two values with each other, so the distance opens the other way. |
| 5 | Select | Hides the window, asks for the geometry and draws the preview straight away. |
| 6 | Both sides | Also draws the mirrored parallel, with the same ramp on the other side. Ticking or unticking redraws at once. |
| 7 | Pick geometry and 2 points | Selected by default; not available in this version. |
| 8 | Sub-element | Not available in this version. |
| 9 | Pick whole geometry | Not available in this version — the command always works on the whole geometry, whichever radio is selected. |
| 10 | Reset | Erases the drawn preview and forgets the base curve. |
| 11 | Accept | The preview becomes final: Reset can no longer reach it. The source curve is not deleted. |
| 12 | Zoom | Frames the view on the base curve, with 30 % of margin. |
| 13 | Update | Redraws the preview with the current values. |
| 14 | Auto | Ticked by default: every keystroke in boxes 1 and 2 redraws the preview. Unticked, only Update, Enter and box 6 redraw. |
The Free mode tab is not available in this version:
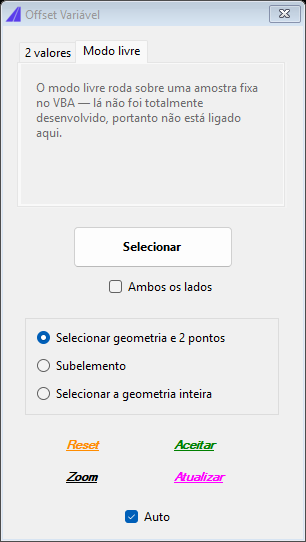
Clicking Select with that tab in front only shows a message asking you to use the 2 values tab.
Remembered between sessions
Nothing. Single instance, no preferences: the values come back to 5 and 10, Both sides comes back unticked and Auto comes back ticked.
Notes
- The three commands use two opposite sign conventions. In
CAPCAD_OFFSETand in Offset all (of the Curve Utilities), positive = right of the walking direction. In the Offset Assistant and the Variable Offset, positive = left. It is not a translation slip: it is what each command does. When the side comes out swapped, use Inverte lado in the assistant or button 3 in the variable offset, rather than guessing at the sign. - The Variable Offset's two invert buttons. invert direction (swap) negates both values, that is, it changes the side; invert side swaps the values with each other, that is, it changes the direction of the ramp.
CAPCAD_OFFSEThas neither a button nor a shortcut. It appears on no panel of the shipped ribbon andacad.pgpdefines no alias for it. Type the command name.- The offset does not trim self-intersections. A curve that folds back on itself can produce loops in the parallel rather than a clean line. Check the result before carrying on, and prefer to trim afterwards with the area trim.
- An offset that splits into several pieces gives back only one. When the parallel of a curve breaks into disconnected stretches, only one of them is drawn — the longest.
- Four boxes of the Offset Assistant are not available in this version. Add junção, Unir, Add junção ângulo and its angle. The first two ship ticked.
- The three mode radios of the Variable Offset are not available in this version either. Pick geometry and 2 points, Sub-element and Pick whole geometry: the command always works on the whole geometry. To offset only a stretch, extract it first with
CAPCAD_SEGMENT(see Polyline and segment tools) or use the Offset Assistant, whose three modes do work. - The Offset Assistant's layer is used as typed. The list shows the layers already in the drawing, and a typed name is created as written, with invalid characters stripped — without the style's prefix, colour or linetype. Create the layer first in Drawing Standards (see Layer Tools) and pick it here by the name shown there in the Layer CAD column.
- The Variable Offset's output is tessellated. A vertex roughly every metre, even over a perfect arc. If the result has to be a curve with arcs, it will have to be rebuilt afterwards.
- The closed contour joining the two parallels is not available in this version. With Both sides ticked, only the two lines are drawn.
- Prompts and messages are in English on every profile — Offset value, Select the curve:, Select the geometry:, Offset by 3.5. (AutoCAD). The Free mode warning is in English too, and refers to the tab as "the 2-values tab".
See also
- Curve Utilities — Offset all, the offset applied to a whole selection.
- Carriageway Helpers — the lane assistant, which also offsets a base line, with the positive = left convention.
- Polyline and segment tools — extracting the stretch to be offset beforehand.
- Curve Assistant — the neighbour on the Geometry split button.