| Command | CAPCAD_STYLE_EDITOR |
| Shortcut | none |
| Ribbon | CapCad tab › Manage panel › Projeto split button › Estilos Editor |
| Category | Manage: style |
| Form | MainFormSingle — CapStyle Editor (modeless, 10 tabs) |
| Hosts | AutoCAD, BricsCAD, GstarCAD, ZWCAD, ARES Commander |
| Command-line commands | -CAPCAD_STYLE_SET (register a style in the drawing), -CAPCAD_STYLE_MIGRATE (migrate the drawing's layers) |
| Also sets the style | CAPCAD_PROJECT_MANAGER, Main tab, Estilo field |
| Withdrawn | CAPCAD_STYLE_TOOLS (Estilos Explorer & Tools) — not available in this version |
A style is the graphic standard of the whole deliverable, and this is where it is opened, edited and applied. Layers, colours, the look of the signs, sheet formats, report columns and property sets in a single file — which you can take ready made from the cloud, adjust and apply to the drawing without leaving the CAD.
- A style library in the cloud. A list with CapCad's public styles and those of your own login, filterable by name, loaded as soon as the editor opens.
- Ten tabs for the whole standard. Layers, layer domains, the appearance and attributes of signs, sheet formats, reports, property sets — plus a raw JSON tab for any field the interface does not show.
- Applying is not migrating. Apply local to DWG registers the style in the drawing and counts from the next command onwards; Update DWG relabels what is already drawn.
- Migration between standards. Tell CapCad which style the drawing was made to and it rewrites the entities' layers to the matching names of the active style, role by role.
- QA before you touch anything. A read-only comparison between the style's layers and the active drawing's, listing what is missing, what is extra and the differences in colour, linetype and plot flag.
- Modeless. The window stays open while you work in the drawing; running the command again brings the existing window to the front.
What it does
CAPCAD_STYLE_EDITOR opens the CapStyle Editor, the window where a .capstyle file is created, opened, edited, saved and pushed to the drawing. It is modeless: the drawing stays live while it is open, and calling the command again just brings the existing window forward instead of opening a second one.
The first tab, Info, is the explorer: beyond the style's name and comments, it shows the online style library — the list is fetched as soon as the editor opens — with a selector between CapCad's public cloud and your own login's, a filter by name and the buttons that load the chosen style into the editor or apply it straight to the drawing. It is also where the base style for the layer migration lives.
The other nine tabs edit the model. None of them touches the disk: the changes sit in an in-memory model (the window title gains a *) until you use Save or Save as….
On the drawing's side there are two different actions, and they are worth not confusing:
| Action | Command fired | What it does |
|---|---|---|
| Apply local to DWG | -CAPCAD_STYLE_SET <path> |
Registers the style in the drawing. Everything drawn from then on comes out to the new standard; what already exists does not move. |
| Update DWG | save → apply → -CAPCAD_STYLE_MIGRATE <base style> |
Relabels the existing drawing: each entity leaves the base style's layer and goes to the matching layer of the active style. |
Workflow
Take a ready-made style and apply it
- Run
CAPCAD_STYLE_EDITOR. - On the Info tab, choose the cloud scope — CapCad (public styles) or User's (your login's) — and filter the list (5) if it is long.
- Select the style and click Load online into the editor (3). The style enters the editor with no local path: Save as… (17) keeps a copy of your own.
- To simply register the style in the drawing without editing it, select it and click Apply online to DWG (11).
Edit and apply a local style
- Open… (14) and choose the
.capstyle. If the drawing already references a style file, the editor asks first whether that is the one you want to open. - Walk the tabs and adjust what you need. The title gains a
*while there is an unsaved change. - Save (16). The editor validates the whole model before writing and refuses the write, listing what is wrong.
- After saving, the editor asks whether you want to apply the style to the current drawing. Answering yes (or clicking Apply local to DWG, 21) registers the style in the dwg.
Bring a drawing from another standard into yours
- Leave the destination style active on the project (the Project Manager's Main tab, or Apply local to DWG here).
- On the Info tab, set Base style for layer migration (9) to the standard the drawing was made to — a cloud name or, through the … button (10), a
.capstylefile. Selecting a style in the online list also fills this field. - Before touching anything, go to the Layers tab and run QA: compare with DWG (54) to see what differs.
- Click Update DWG (12 or 22). The editor saves, applies and only then migrates.
The form
The numbers are the same in every picture on this page. The ten tabs share the bottom bar (14 to 22). The screenshots are of a Portuguese session; the numbering is the same in both editions, and the tables give the English captions.
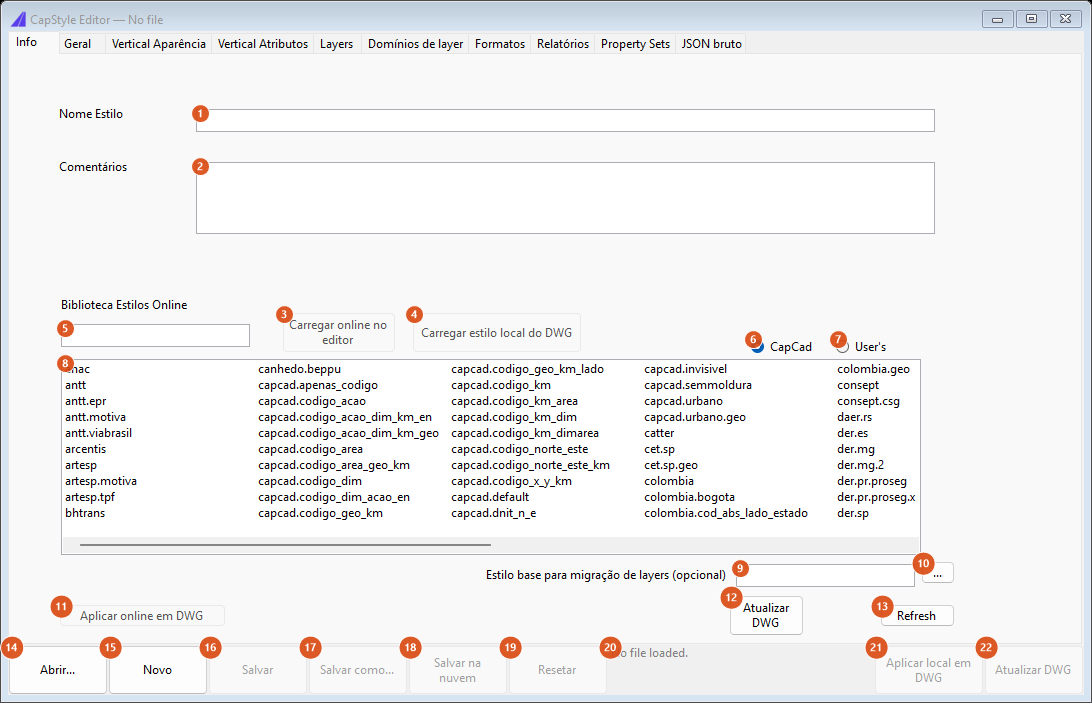
The Info tab with the online library already loaded. With no style open, almost the whole bottom bar is disabled.
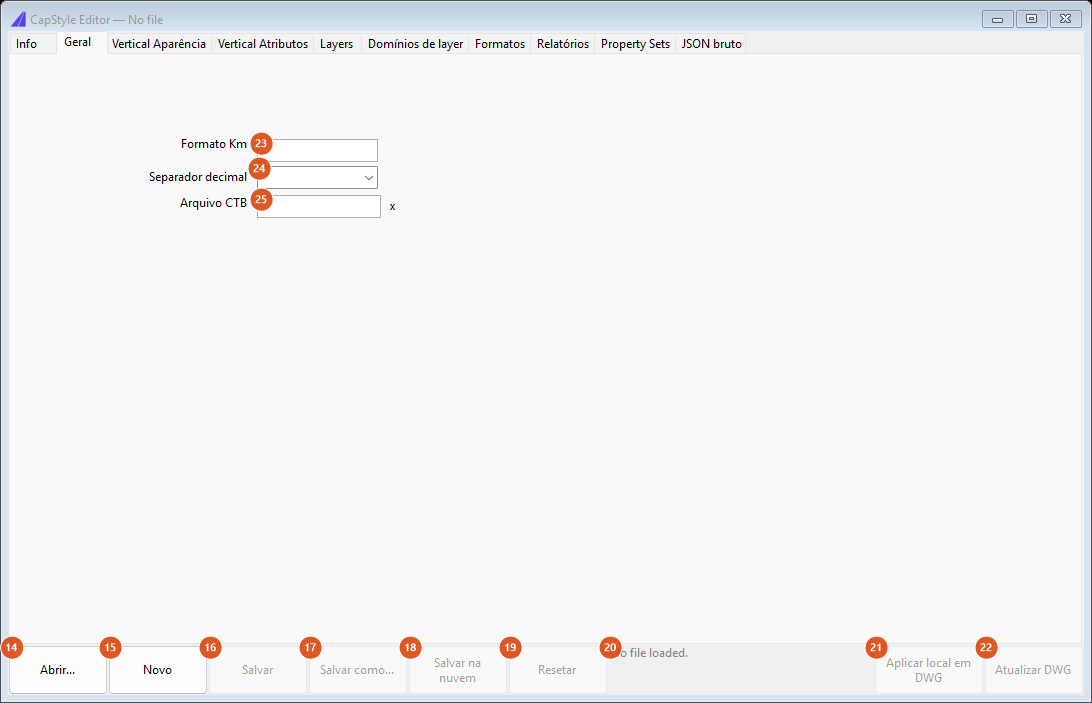
The General tab: in this version it has only three fields; the style's other general items (units, scales, sheets, disciplines) are on the Formats tab.
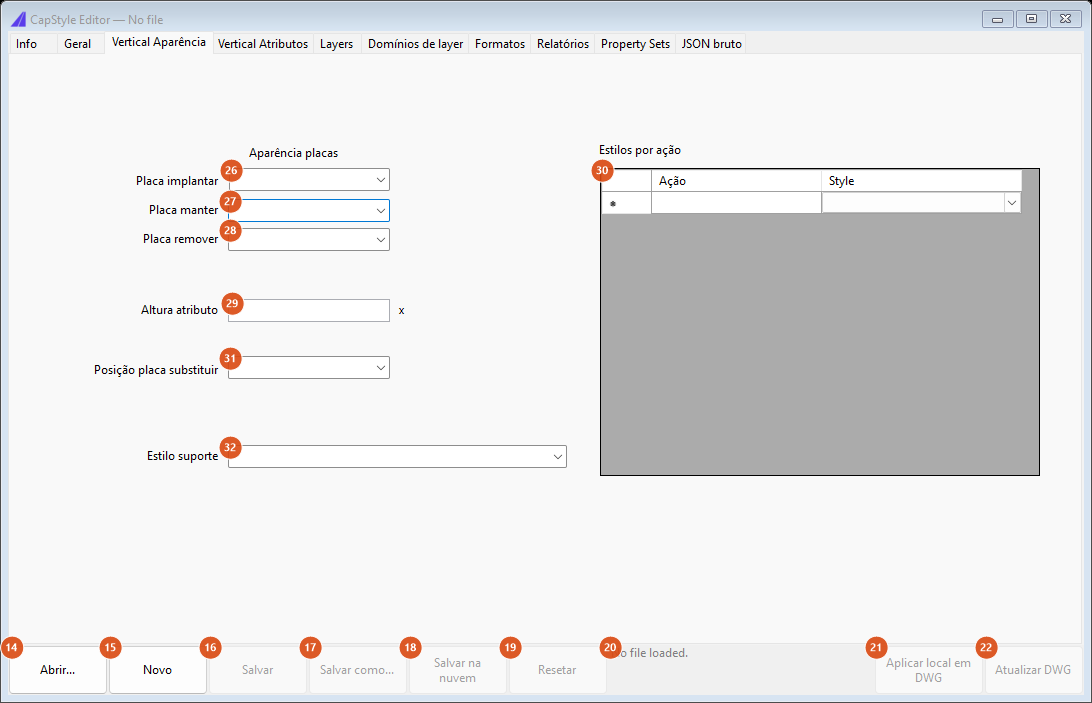
Vertical appearance: the block styles per action, the position of the sign when replacing, and the free action → style grid.
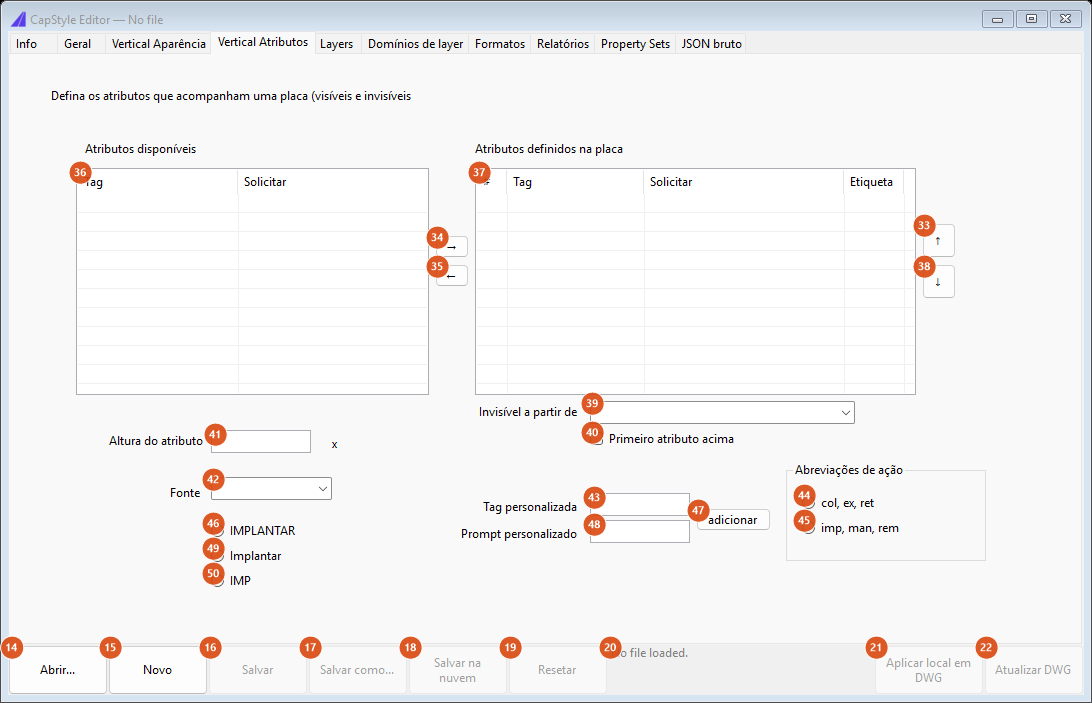
Vertical attributes: the two lists (available / defined on the sign), the order, and the point from which attributes become invisible.
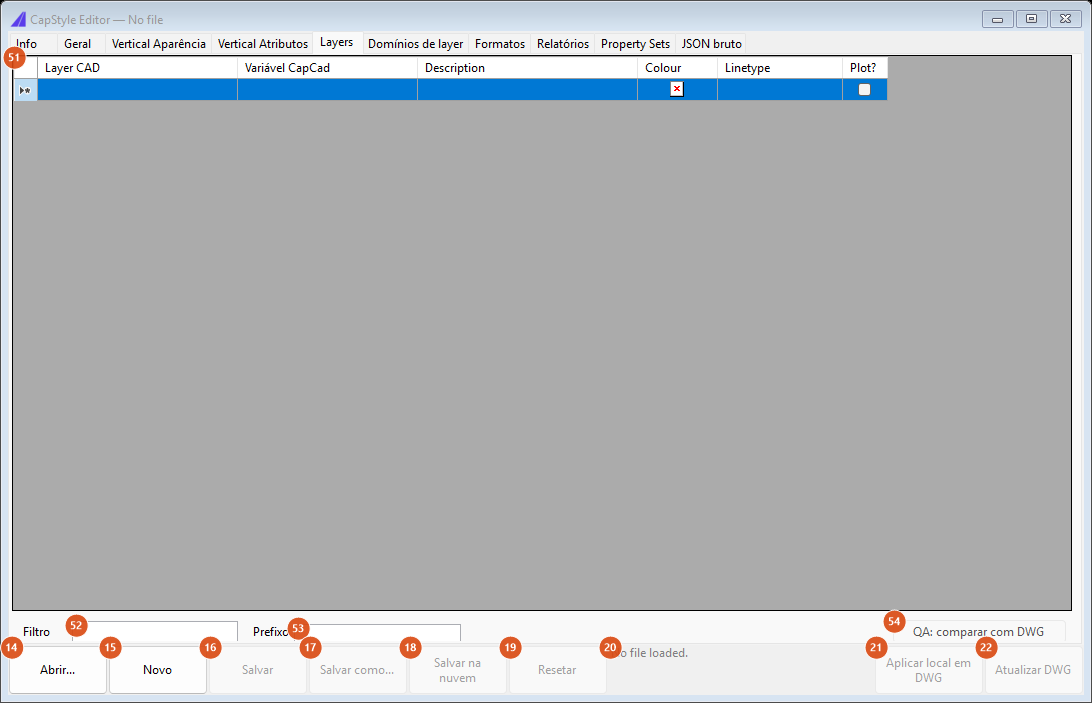
Layers: the style's layer grid, the filter, the prefix and the QA check against the drawing.
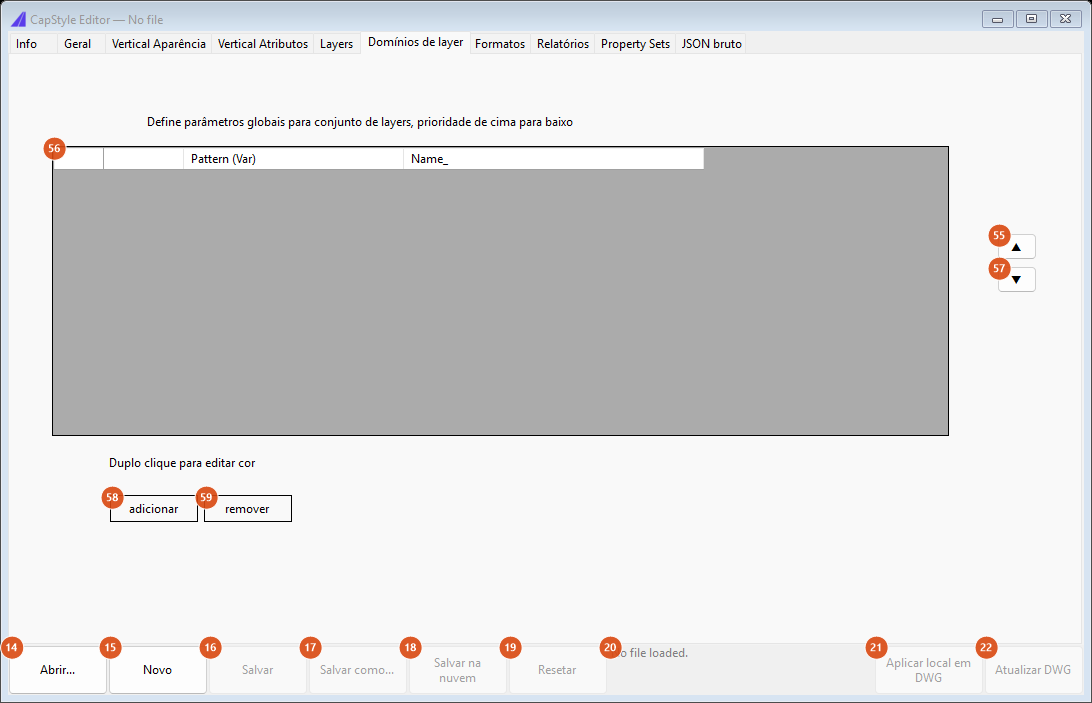
Layer Domains: rules by pattern, priority from top to bottom.
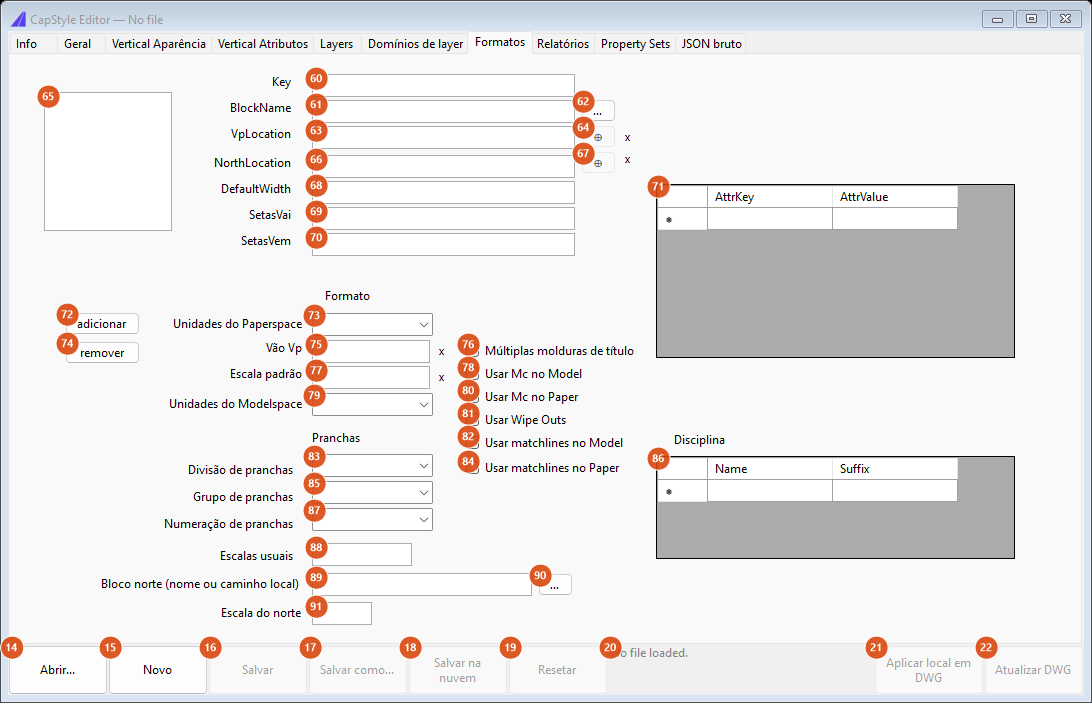
Formats: the selected sheet format on the left, its fields in the middle and, below, the general sheet parameters and the disciplines.
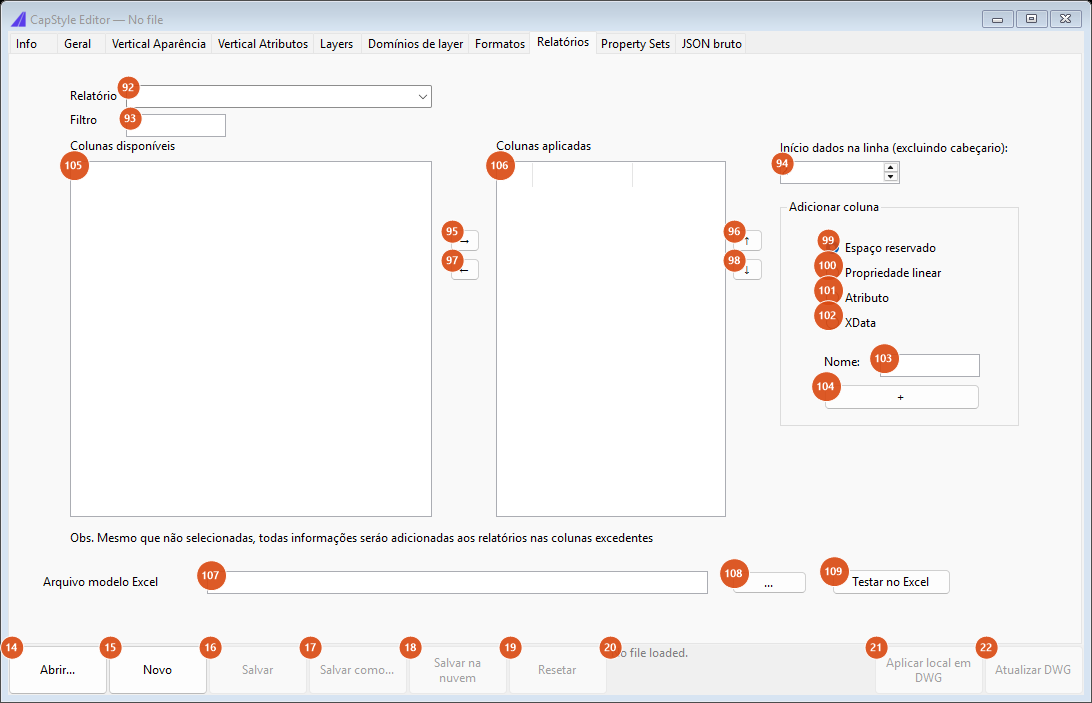
Reports: per report, the available and the applied columns, the Excel template and the first data row.
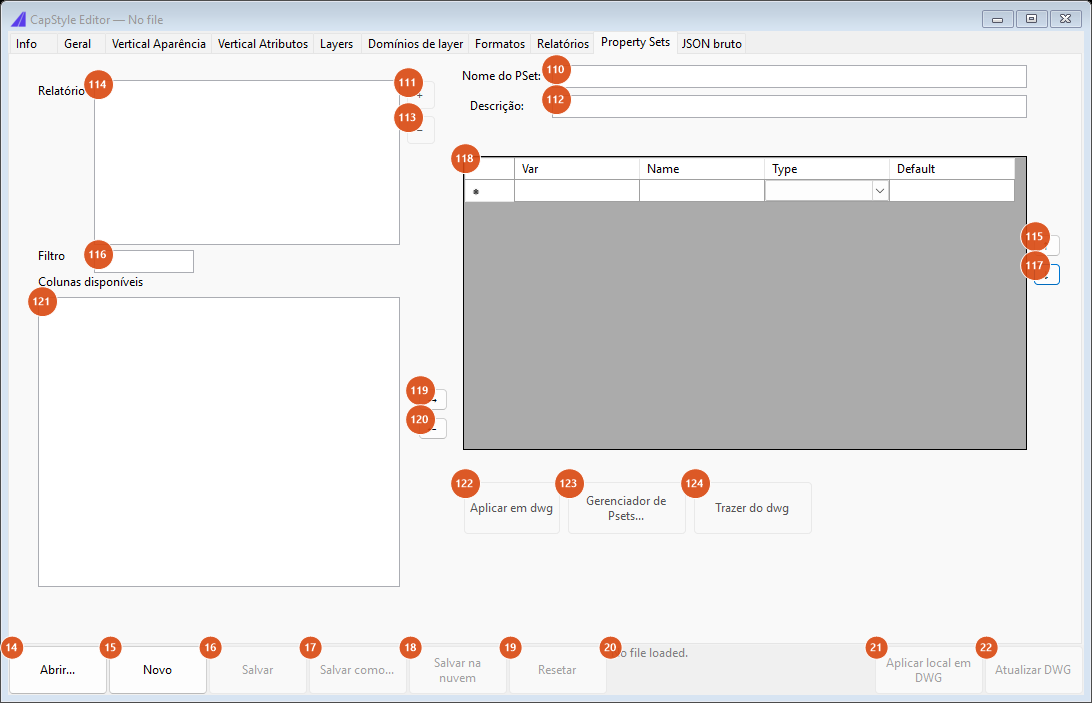
Property Sets: the style's sets, their properties and the three buttons that talk to the drawing.
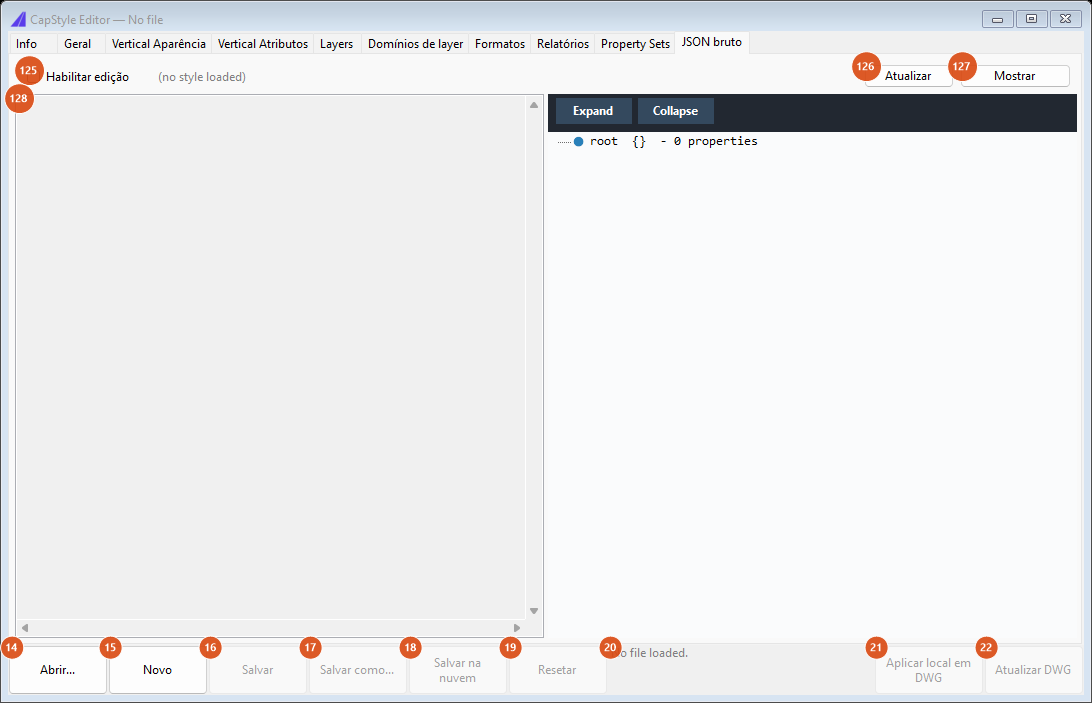
Raw JSON: the whole model as text and as a tree, read-only until editing is enabled.
Common to every tab: the bottom bar
| # | Control | What it does |
|---|---|---|
| 14 | Open… | Opens a .capstyle (or .json). If there are unsaved changes, it asks before discarding them. If the active drawing references a style file different from the one open, the editor shows the path and asks whether that is the one you want to open, with a third option to go to the file picker. |
| 15 | New | Creates a blank style, with no file. |
| 16 | Save | Pulls the changes from every tab into the model, validates tab by tab and then validates the whole model; only then does it write. If the style has no file yet, this becomes a Save as…. After writing, it asks whether to apply the style to the drawing — unless the file saved already is the drawing's local style, in which case it is reapplied without asking. |
| 17 | Save as… | The same, choosing the file. The suggested name is that of the style loaded from the cloud, when that is how it arrived. Validation runs before the file picker, so as not to ask for a file name that could not be written. |
| 18 | Save to the cloud | Sends the style to the cloud of the scope selected on the Info tab. Only the User's scope accepts writing: CapCad's public cloud is read-only. The style must have a name; an existing name asks for overwrite confirmation. At the end, the online list is reloaded. |
| 19 | Reset | Reloads the style from the file, discarding everything unsaved. It only works with a file open. |
| 20 | Status | Status line: what was loaded or saved, the result of the layer QA, the validation errors (in red). |
| 21 | Apply local to DWG | Registers the saved style in the active drawing (fires -CAPCAD_STYLE_SET with the file path). If there are pending changes or the style has no file, it offers to save first; then it confirms "Load style 'X' in \<drawing>?". It redraws nothing: it counts from the next command onwards. |
| 22 | Update DWG | The full sequence: save → apply → migrate. If the save is cancelled, or the application refused, the migration does not run. The migration uses the Base style (9) when it is filled in; otherwise the file just saved. |
With no style open, only Open… and New are enabled. Outside a CAD, the buttons that touch the drawing — 21, 22, the layer QA and the three pset buttons — are disabled.
Tab 1: Info
| # | Control | What it does |
|---|---|---|
| 1 | Style name | The style's name. Mandatory: without it the write is refused and the field turns pink with the message that the style name is required. It is also the name the style is stored under in the cloud. |
| 2 | Comments | Free description text for the style. |
| 5 | Filter | Filters the online list by what you type (case-insensitive). Esc clears the filter. |
| 6 | CapCad | Lists CapCad's public styles. It is the default scope and it is read-only. |
| 7 | User's | Lists the styles in your CapCad login's cloud. It is the only scope where Save to the cloud works. Switching scope reloads the list. |
| 8 | Online style library | The list of styles in the selected scope. Selecting an item enables 3 and 11 and fills field 9 with the selected name. |
| 3 | Load online into the editor | Downloads the selected style and loads it into the editor. It arrives with no local file — use Save as… to keep a copy. Unsaved changes are confirmed before being discarded. |
| 4 | Load the DWG's local style | Opens in the editor the .capstyle file the active drawing already references. It is only enabled when that file really exists; the state is recomputed when the editor opens and on every Refresh (13). Since the open file already is the drawing's, saving it reapplies it without asking. |
| 11 | Apply online to DWG | Registers in the drawing the style selected in the list, by cloud name, without going through the editor. |
| 13 | Refresh | Reloads the online list and recomputes the state of button 4. The button's caption changes to Loading… during the fetch and stays Refresh afterwards. |
| 9 | Base style for layer migration (optional) | The standard the drawing was made to. It accepts a cloud name or a .capstyle path. It is what says what each old layer of the drawing meant; without it the migration uses the open style as its own base, which in practice migrates nothing. |
| 10 | … | A .capstyle file picker to fill field 9. |
| 12 | Update DWG | The same as button 22 on the bottom bar. It is enabled as soon as field 9 has content. |
Tab 2: General
| # | Control | What it does |
|---|---|---|
| 23 | Km format | The station mask used in annotations and reports. It must match the 0+000 format; anything else blocks the write. |
| 24 | Decimal separator | Comma or Period. Only those two are accepted. |
| 25 | CTB File | One or more CTB files, separated by ;. |
The other items the style keeps as "general" — model and paper units, viewport gap, default scale, usual scales, sheet split / group / numbering, north block and disciplines — are edited on the Formats tab (73 to 91), even though the model treats them as part of the same section.
Tab 3: Vertical appearance
The first three fields sit under the Sign appearance heading and offer the same fixed list of block styles: Normal, GrayShaded, BlackAndWhite, XShaped, XShapedGray, ColorLigthen, OuterShape, GrayAndWhite, DeleteHatch, BlackAndWhiteInverted and the catalogue's other variants.
| # | Control | What it does |
|---|---|---|
| 26 | Sign insert | Block style of the signs to be installed. |
| 27 | Sign keep | Block style of the signs to be kept. |
| 28 | Sign remove | Block style of the signs to be removed. |
| 29 | Attribute height | Text height of the sign's attributes. It must be a number greater than zero, otherwise the write is refused with "Must be a positive number.". |
| 31 | Replace sign position | Where the new sign sits relative to the one it replaces. With no list of its own in the style, it offers Detect, AtLeft, AtRigth, Below and Above. |
| 32 | Support style | How the sign is tied to its point. With no list of its own in the style, it offers ParalelaAoEixo_LinhaSuporteQuebrada, ParalelaAoEixo_LinhaSuporteDireta and PerpendicularAoEixo. |
| 30 | Styles per action | A free action → style grid, for the actions that are not the three above (for example TRANSFERIR). The Action column is free text; the Style column is the same fixed list, but values coming from the JSON are tolerated. When deciding an action's appearance, this grid beats the three fields above, including for insert / keep / remove. |
When the style itself carries a value list for Replace sign position or Support style, that list is what appears in those two fields — and the chosen value must belong to it, otherwise the write is refused.
Tab 4: Vertical attributes
| # | Control | What it does |
|---|---|---|
| 36 | Available attributes | The catalogue of sign attributes CapCad knows and that are not in use yet. |
| 37 | Attributes defined on the sign | The attributes this style puts on the sign blocks, in the order they sit in. |
| 34 | → | Moves the selection from available to defined. The available list is re-sorted by tag. |
| 35 | ← | Sends the selection back to available. A custom attribute (one not in the catalogue) does not go back to the list: it simply leaves. |
| 33, 38 | ↑ ↓ | Move the selected attribute up and down the defined list. The order is the order of the attributes in the block. |
| 39 | Invisible from | The cut-off point: from that position onwards the attributes are written as invisible. |
| 43 | Custom tag | The tag of an attribute that is not in the catalogue. It is upper-cased. |
| 48 | Custom prompt | That attribute's prompt text. |
| 47 | add | Creates the custom attribute with the typed tag and prompt and puts it straight into the defined list. The tag is mandatory and must not already exist in either list. |
| 41 | Attribute height | The same height as the previous tab; it must be a number greater than zero. |
| 40 | First attribute above | Not available in this version. |
| 42 | Font | Not available in this version. |
| 44, 45, 46, 49, 50 | Action abbreviations | Not available in this version. |
Tab 5: Layers
| # | Control | What it does |
|---|---|---|
| 51 | Layer grid | One row per layer of the style. The Var column is the role's logical key (for example SINA_HOR_BR_ZPA): choosing one from the catalogue fills the name, description, linetype, colour and plot flag; free vars are accepted and show in orange. Double-clicking the colour cell opens the CAD's colour picker. Layer names with forbidden characters are refused in the cell itself. |
| 52 | Filter | Filters the grid by name or description. |
| 53 | Prefix | The prefix pasted in front of every layer name. In this version the field feeds the grid's preview and the QA comparison, but is not written to the file: a change here is lost on save. To change the style's prefix, use the Raw JSON tab (field LayerPrefix), or set the project override in the Project Manager. |
| 54 | QA: compare with DWG | A read-only check: it pulls the pending changes from the tabs, reads the active drawing's layer table and compares. It reports style layers missing from the drawing, extra layers in the drawing (only when there is a prefix — without one there is no telling CapCad's layers from the drawing's) and differences in colour, linetype and plot flag. Colour and linetype are only compared when the style defines a value, since an empty field means "inherit from the domain". The result opens in a window of its own and the summary goes to the status line. Nothing is changed. |
Each layer needs a name and a linetype for the style to be written; the var is optional (custom layers may have none).
Tab 6: Layer Domains
Rules by pattern that paint whole families of layers with one colour. Priority runs from top to bottom.
| # | Control | What it does |
|---|---|---|
| 56 | Domain grid | One row per rule: name, pattern (for example SINA_HOR_BR*IMP*) and colour. Double-clicking the row opens the colour picker. |
| 58 | add | Appends a new rule (pattern SINA_XXX_*, colour 7) and opens the pattern cell for editing. |
| 59 | remove | Removes the selected rule. |
| 55, 57 | ▲ ▼ | Move the selected rule up and down, changing the priority. |
Tab 7: Formats
The top half edits one sheet format at a time; the bottom half edits the style's general sheet parameters.
| # | Control | What it does |
|---|---|---|
| 65 | Format list | The style's sheet formats. Selecting one loads the fields beside it. |
| 72 | add | Creates a new format with key NewFormatN and selects it. |
| 74 | remove | Removes the selected format, asking for confirmation. |
| 60 | Key | The format's key (the name the rest of CapCad asks for it by). |
| 61 | BlockName | The title block. Mandatory in every format. |
| 62 | … | A .dwg file picker for the title block. |
| 63 | VpLocation | The viewport corners, as four comma-separated numbers. |
| 64 | ⊕ | Picks the two corners in the drawing: the editor minimises, asks for the top-left and the bottom-right corner, and writes the rectangle into the field. |
| 66 | NorthLocation | The north's position, as two comma-separated numbers. |
| 67 | ⊕ | Picks the north point in the drawing. |
| 68 | DefaultWidth | The format's default width. |
| 69, 70 | SetasVai, SetasVem | The format's direction-arrow blocks. |
| 71 | Title block attributes | An AttrKey / AttrValue grid: overrides for the title block's attributes. |
| 73 | Paperspace Units | meters, millimeters or feet. |
| 79 | Modelspace Units | Likewise. |
| 75 | Vp Gap | The spacing between viewports. It cannot be negative. |
| 77 | Scale Default | The default scale, in the form 1:1000. |
| 83 | Sheet Split | none, bottom, double or upper. |
| 85 | Sheet Group | none, custom or byAlignment. |
| 87 | Sheet Numbering | global or withinGroup. |
| 88 | Usual Scales | A comma-separated list of scales. Only positive values are kept. |
| 89 | North block (name or local path) | The north block. |
| 90 | … | A file picker for the north block. |
| 91 | North scale | The scale the north block is inserted at. |
| 86 | Discipline | A Name / Suffix grid. Each discipline needs a name and an alphanumeric suffix of up to 5 characters. |
| 76 | Multiple Title Frames | More than one title-block frame per layout. |
| 78, 80 | Use Mc in Model / in Paper | Where the cut marks (Mc) are drawn. |
| 82, 84 | Use Matchlines Model / Paper | Where the matchlines are drawn. |
| 81 | Use Wipe Outs | Uses wipeouts when assembling the sheets. |
Tab 8: Reports
| # | Control | What it does |
|---|---|---|
| 92 | Report | Chooses which report is being edited. |
| 93 | Filter | Filters the list of available columns. |
| 105 | Available columns | The catalogue of columns (tags) CapCad can extract from the drawing. |
| 106 | Applied columns | This report's columns, in order, with the Excel column letter beside each. |
| 95, 97 | → ← | Move columns between the two lists. |
| 96, 98 | ↑ ↓ | Reorder the selected column; the letters are recomputed. |
| 99, 100, 101, 102 | Placeholder, Linear property, Attribute, XData | The type of the free column that button 104 will add. |
| 103 | Name: | The free column's name. |
| 104 | + | Appends the typed free column to the end of the applied list. |
| 107 | Excel template file | The .xls/.xlsx used as a template. A relative path is resolved from the .capstyle's folder. |
| 108 | … | A file picker for the template. |
| 94 | Data starts on row (excluding the header): | The first data row in the spreadsheet. |
| 109 | Test in Excel | Opens the template with the current columns for checking. It needs a report selected. |
The tab's note reminds you that even when a column is not selected, every piece of information is still added to the reports in the spare columns.
Tab 9: Property Sets
| # | Control | What it does |
|---|---|---|
| 114 | PSet list | The style's property sets. |
| 111 | + | Adds a custom set. |
| 113 | − | Removes the selected set. It only acts on custom sets. |
| 110 | PSet Name: | The set's name as it will be installed in the drawing. |
| 112 | Description: | Free description of the set. |
| 116 | Filter | Filters the list of available properties. |
| 121 | Available columns | The catalogue of properties that can enter the set. |
| 118 | Property grid | The set's properties: Var, Name, Type and Default. The type must be one of the accepted ones (text, real, integer, km, area, geographic, geographic_pair, datetime, filepath) and the default must be compatible with it. |
| 119, 120 | → ← | Move properties between the catalogue and the grid. |
| 115, 117 | ↑ ↓ | Reorder the selected property. |
| 122 | Apply to dwg | Saves the style and installs in the drawing the property set definitions it describes. |
| 124 | Bring from the dwg | The reverse: reads the property set definitions from the drawing and adds them to the style. Sets whose name the style already has are skipped (it never overwrites) and reported at the end. The entries arrive with the var equal to the name — assign the real vars afterwards so that automatic filling by role works. It needs Civil 3D; on plain AutoCAD the command says the read is not available. |
| 123 | Pset Manager… | Opens the host's property set manager. |
Tab 10: Raw JSON
| # | Control | What it does |
|---|---|---|
| 128 | JSON text | The whole model, serialised. It is the emergency exit: every .capstyle field that no tab shows is still editable here. Read-only while 125 is unticked. |
| 125 | Enable editing | Unlocks editing of the text and of the tree. |
| 126 | Refresh | Reloads the JSON from the form's data, discarding the pending text edits (with confirmation). |
| 127 | Show diff | Opens a window with the original and the current JSON side by side. |
Beside the text there is a tree of the same model, with Expand and Collapse buttons to navigate it. On save, the JSON's pending edits are interpreted first; an invalid JSON blocks the write and the error appears on the tab itself.
The command-line commands
-CAPCAD_STYLE_SET — register a style in the drawing
It asks "Load CapStyle by file name or cloud name:" and accepts either the path of a .capstyle or a cloud name. With an active project, the value is written to CapCad.Paradigm in project.config; with no project, it stays in memory for the session. It answers Estilo definido: <value> or Estilo não pôde ser carregado: <value>.
This is the command the Apply local to DWG button fires.
-CAPCAD_STYLE_MIGRATE — migrate the drawing's layers
This is the command the Update DWG button fires, and the one that does the migration proper.
- It resolves the project's active style. If there is none, it refuses with "Current style not set (needed for layer migration reference)".
- It asks for the base style: "Base style reference for the layer migration to active style \<name>:". It accepts a file path or a cloud name. Without one — or if either style fails to load — it answers "Estilo base não provido." and ends.
- It walks every entity of model space, skipping those on layer
0. For each one: - it looks in the base style for the layer entry whose name is the entity's layer and takes its var (the role); if the layer is not known to the base style, the layer name itself is used as the role;
- it looks in the active style for the entry with that var and creates or redefines the matching layer in the drawing, with the style's name, colour, linetype, lineweight, transparency and plot flag;
- if the resolved name differs, it moves the entity to the new layer.
- It reports
Processado — N entidade(s) migradas.
A layer whose var resolves to nothing and whose name follows the SINA_HOR_* grammar still receives its road-marking cadence and colour.
What the migration does and does not do. It relabels entities and creates layers. It does not swap the attributes of the sign blocks, does not redo the property sets and redraws nothing. To swap the signs' attributes after a style change, use Migrar Vertical… (below).
The conversions
The ribbon button Estilos Explorer & Tools runs CAPCAD_STYLE_TOOLS, which is not available in this version: running it shows a warning saying so. The conversion tools are on the Migração Seabra Sinc → CapCad form, opened from the Tools tab of the reports form (CAPCAD_REPORTS, item Migração Seabra Sinc) and also from the 3D form (CAPCAD_3D_ASSISTANT).
That form gathers:
| Action | What it does |
|---|---|
| Migrar Sinc → CapCad | Converts the layers of the sinC standard into CapCad's, in the categories ticked under Converter (vertical, horizontal, restraint, horizontal blocks), over the on-screen selection or the whole drawing, in either direction. On the horizontal side it can include the materials in the layer name, create CapGroups and try to purge the source layers afterwards. |
| Migrar Vertical… | Swaps the attributes of every sign in the drawing for those the active style defines (Placa.Attributes, visible and invisible). Before running, it lists both sets and warns: attributes of the same name keep their value, those that do not exist in the destination are lost, sign blocks that are loaded but not inserted are affected too, and formatted attributes (speed, km, weight) are not touched. This is the operation that adds to the signs the attributes a style change introduced. |
| Migrar MAs/MPs… | Converts the kilometre posts and their kin. |
| Migrar Layers… | The same layer migration as -CAPCAD_STYLE_MIGRATE, with a detailed handle / original layer / new layer report in a text window at the end. It asks for the base style and confirms before running; when the base style equals the active one, the question changes to whether the layers should be redefined if different. |
| Placa avulsa… | Converts one sign at a time, in a loop, until you cancel. |
| Restaurar handles suporte… | Restores the link between signs and supports. |
Remembered between sessions
The editor keeps no preferences: every opening starts with no style open, the cloud scope on CapCad and the online list reloaded from the server. The only state that persists is the drawing's — which style it registers — and the project's, in project.config.
The Seabra conversion form does keep its options between sessions.
Notes
- Applying does not redraw. Registering a style changes what comes next; to relabel what is already in the drawing you have to migrate.
- Migrating with no base style migrates nothing. It is the base style that says what each old layer meant. Fill field 9 in, or give the style when the command line asks.
- The order of Update DWG is deliberate. Save, apply, and only then migrate: migrating against an unsaved or unregistered style would use stale data. If you cancel the save or refuse the application, the migration does not run.
- The layer QA changes nothing. Run it before migrating: it is the cheap way to see what will change.
- The layer prefix is not written by this window. The Prefix field (53) changes the preview and the comparison, but does not enter the file. Edit
LayerPrefixthrough the Raw JSON tab. - The public cloud is read-only. Save to the cloud only works with the User's scope selected; the owner is never sent by the application — the server derives it from the authenticated login.
- Some captions and messages are not translated. The Info tab caption, several cloud and pset messages, the status line and the refusal "Current style not set (needed for layer migration reference)" come out as they are in every language, and two of the command-line answers of
-CAPCAD_STYLE_SETare in Portuguese. - Controls not available in this version: on the Vertical attributes tab, First attribute above (40), Font (42) and the five Action abbreviations options (44, 45, 46, 49, 50).
See also
- Layer tools — listing and creating the catalogue's layers under the style you set here.
- Linetypes — loading, creating and identifying the dash patterns the style's layers point at.