| Commands | CAPCAD_MARKING_INSCRIPTION_SET (the transverse set) · CAPCAD_MARKING_INSCRIPTION (a single block) · CAPCAD_MARKING_INSCRIPTION_LEGEND (words) |
| Shortcuts | IN (CAPCAD_MARKING_INSCRIPTION) · LG (CAPCAD_MARKING_INSCRIPTION_LEGEND) · the transverse set has no shortcut |
| Ribbon | CapCad tab › Traffic Control panel › Symbols split button › Road Sets, Carriage Marking and Word Marking |
| Category | Horizontal |
| Form | TransversalsForm "Pavement legends". Modeless: the drawing stays live while it is open |
| Hosts | AutoCAD. In ARES Commander the three commands exist and say they are not available yet; BricsCAD, GstarCAD and ZWCAD do not register them |
| Also | the three commands open the same form; only the tab it should open on differs |
An arrow on the pavement is not a loose block: it is a row of blocks shared out across the width of the carriageway. Inserting them one at a time with the CAD's INSERT means measuring the lane, dividing the width, turning every block to the tangent and then dimensioning the result. Here the whole carriageway becomes a line, and the line becomes the set.
- The reference line comes from the road, not from a ruler. Kerb to kerb with two clicks, or perpendicular to the alignment with the length you ask for; CapCad projects the point onto the alignment and builds the perpendicular itself.
- It divides the width for you. Up to ten divisions, each with its own block and its own length; leave the length blank and the program shares the total out equally.
- Every block faces where the road points. The rotation comes from the tangent of the reference line itself, point by point, and works the same on a straight and in a curve.
- The height comes from the block. The offset from the line is the height measured off the block itself, not a number you have to remember.
- The dimension comes with it. The set can be drawn dimensioned, with the offset and overhang you set.
- The project action reaches the layer. New work, keep or remove change the layer and the block's representation in the same insertion.
What it does
The three commands open the same form, Pavement legends, and three ways of putting a legend on the pavement live inside it:
- Transverse line (
CAPCAD_MARKING_INSCRIPTION_SET) — the full path: you select a reference line that crosses the carriageway, the program divides it into up to ten stretches and inserts one block in the middle of each, turned to the tangent of the line and offset from it by the height of the block. This is how the lane-selection arrows at a signalised approach are drawn. - Block point (
CAPCAD_MARKING_INSCRIPTION) — a gallery of pictograms (arrows, motorcycle, bicycle, elderly, disabled, electric, ambulance, give way). One click on the picture inserts that block on its own, with no row. - Legends (
CAPCAD_MARKING_INSCRIPTION_LEGEND) — words on the pavement. The word and the text height make up the block name:WORD_MARKING_STOP_2.4in an English session. Two heights of the same word are two different blocks.
The reference line is the input to everything on the first tab. It can come from five routes (the selection "ladder"), and they all go through the same validation: a line of zero length is refused ("o mesmo ponto foi clicado — verifique o osnap", the same point was clicked, check the osnap); above 90,000 units it is refused; above 200 or below 1 the program asks before continuing.
With the line in hand, the drawing is a preview: every change on the form erases the previous result and redraws it. Aceitar (accept) releases the preview and keeps it as ordinary entities; Redefinir (reset) erases everything and forgets the line.
The preview is only redrawn with Dynamic mode (105) on. With it off, Update does nothing.
Workflow
- Run
CAPCAD_MARKING_INSCRIPTION_SET(or the Road Sets button). The form opens beside the drawing, on the Transverse line tab. - Choose how the reference line is obtained (1, 3, 4 or 7) and click the large 2 points: curb to curb button (9). The form hides during the selection.
- Define the set: Divisions (64 or 57), the total Ext. (58), the skew Angle (60) and the Reference (31 to 33), which decides whether the blocks sit on the line or clear of it.
- Choose each row's block in boxes 71, 73, 75… and, if you want, the length of each stretch beside it (72, 74, 76…). A blank length = the total shared out equally.
- Choose the Action (35). It decides the layer suffix and the block's representation.
- Turn the Transverse dimension (95) on or off and set the Dimension offset (98) and the Overhang (111, on the General options tab).
- Click Accept (37) to keep the set. The form stays open for the next one. Reset (36) erases the preview, Update (39) redraws it.
For a single block, switch to the Block point tab and click the picture you want (or choose the name in Others (11) and click insert (12)). For a word, go to the Legends tab, choose the word (18) and the height (22) and click Insert (23).
The form
Numbers are the same in every picture on this page. The form has two sets of tabs: the left one (Transverse line / Block point / Legends) and the right one (Transversal / General options). The right half only exists on the first left tab — on the other two the form shrinks to a little more than the left column, and the ◄ / ► marker (30) switches between the two widths.
The screenshots below were captured in a Portuguese session, so the captions on them are in Portuguese. The control numbering is the same in both editions, and the tables quote the English captions.
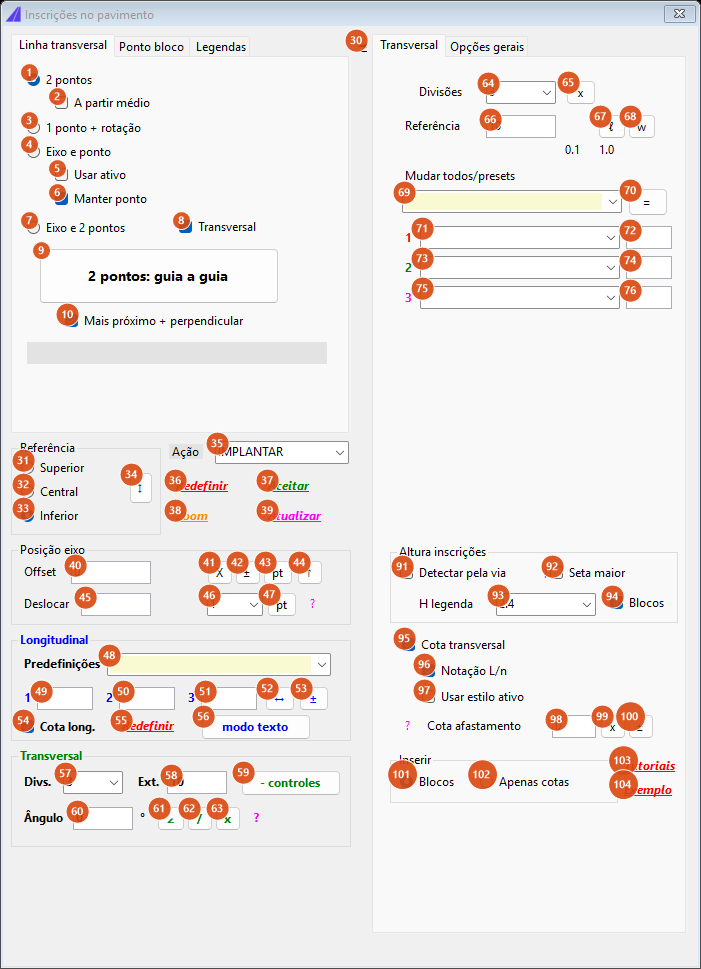
Opening state: left tab "Transverse line", right tab "Transversal", Divisions = 3.
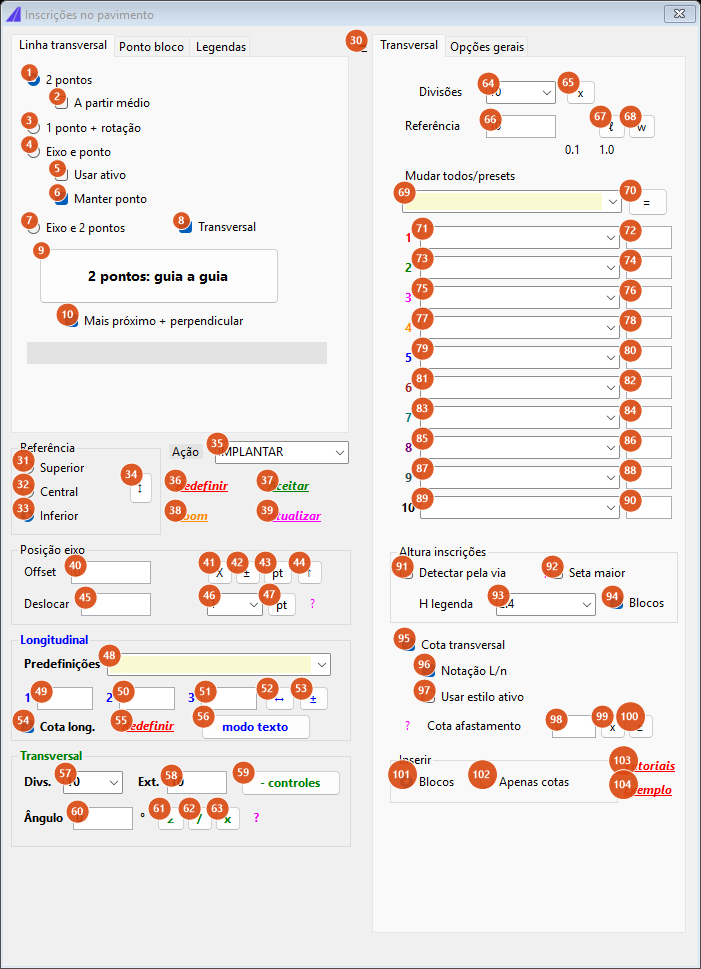
Divisions = 10: the ten block rows appear (71 to 90). With 3, only the first three are visible.
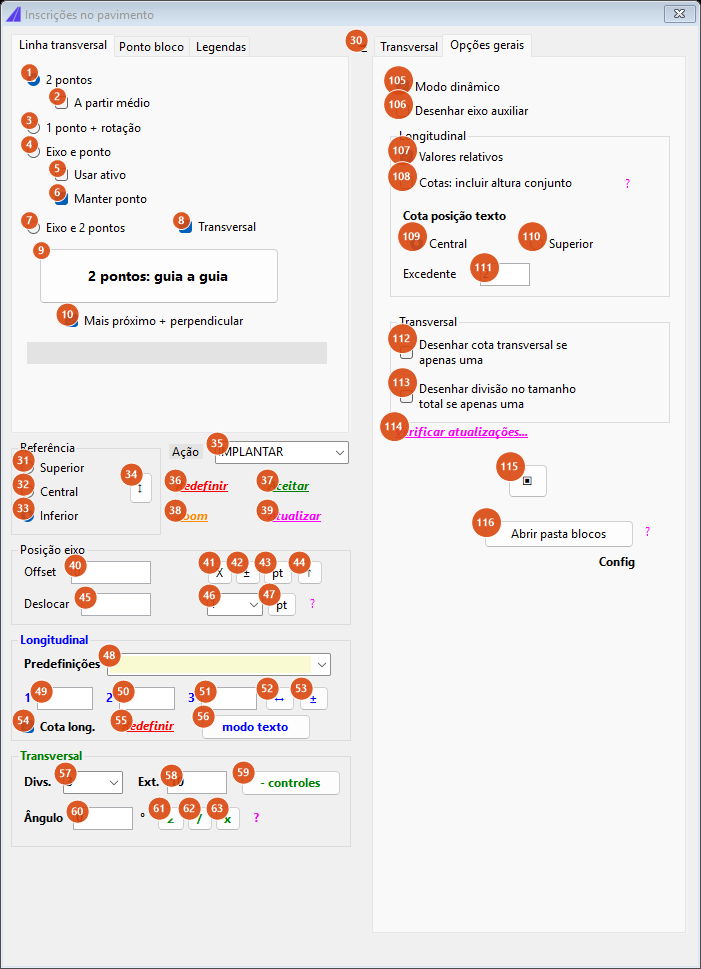
Right tab "General options" (105 to 116).
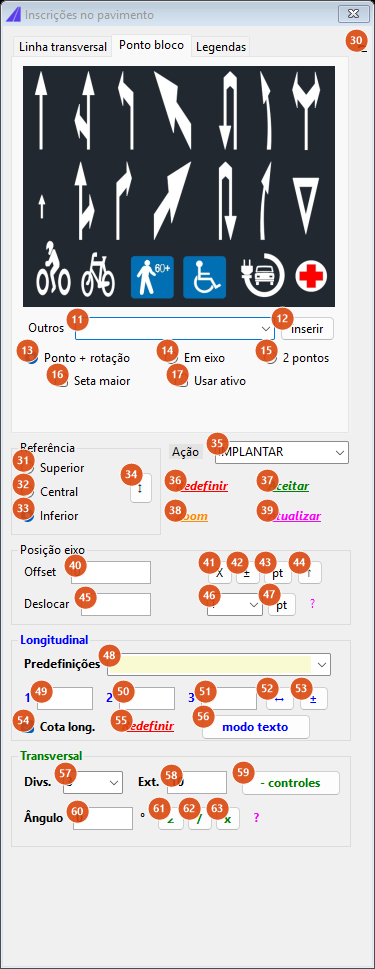
Left tab "Block point", in the narrow layout: the pictogram gallery and controls 11 to 17.
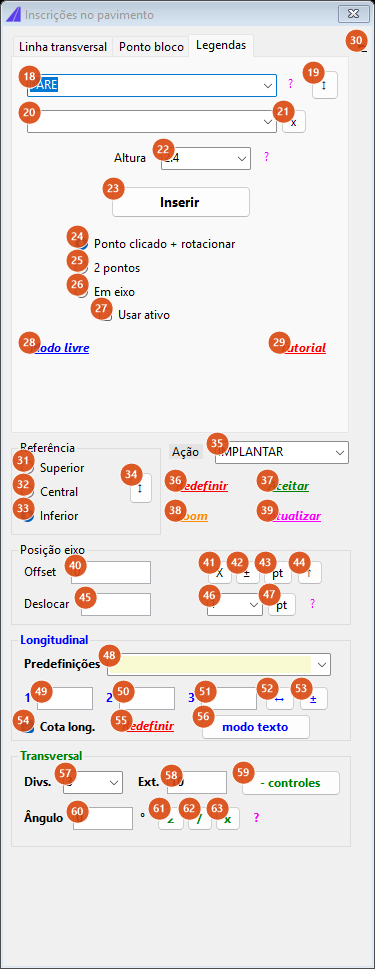
Left tab "Legends", in the narrow layout: controls 18 to 29.
Left tab 1: Transverse line
The four radio buttons are the selection ladder: each asks for something different on the command line and they all end at the same reference line.
| # | Control | What it does |
|---|---|---|
| 1 | 2 points | Asks for Point 1, left kerb and Point 2, right kerb. The straight between the two points is the reference line, walked from the first to the second. This is the opening mode. |
| 2 | From mid point | Only with 1. Instead of running from P1 to P2, the line becomes twice as long and is centred on P1: P1 becomes the middle of the set and P2 only gives the direction and half the length. |
| 3 | 1 point + rotate | Asks for a single point (Point). The program manufactures a second point 5 units east and applies the treatment of 2, giving a horizontal line 10 units long centred on the clicked point. |
| 4 | Alignment and point | Asks for the alignment (Select the alignment) and a point (Point on the alignment). The point is projected onto the alignment and the reference is the perpendicular at that foot, with the length from the Ext. box (58) on each side. Ext. = 0 is refused: "Informe uma extensão para a referência do eixo." (give a length for the alignment reference). |
| 5, 17, 27 | Use active | With 4 or 7, it skips selecting the alignment: the project alignment that passes nearest the clicked point (up to 5,000 units) is identified on its own. If none is found: "Eixo não identificado — esse é mesmo o ponto que você quis clicar?" (alignment not identified — is that really the point you meant to click?). The three Use active boxes on the three tabs are one and the same option: ticking it on any tab turns it on for all. |
| 6 | Keep point | Not available in this version. It is only enabled and disabled together with 5. |
| 7 | Alignment and 2 points | Does the same as 4: the alignment plus one point. |
| 8 | Transversal | Not available in this version. |
| 9 | 2 points: curb to curb | The button that triggers the selection, whichever mode is ticked. The form hides, the line is asked for on the command line and, on the way back, the set is drawn. The button text never changes. |
| 10 | Nearest + perpendicular | Forces the osnap during a point selection: nearest (OSMODE 512) on the first click and perpendicular (128) on the second, restoring your osnap at the end. This is what makes the line come out truly perpendicular from one kerb to the other. The box is only enabled with 1 ticked, but its value still counts in mode 3. |
The grey strip below the button is the status line: it reports how many sets, blocks and dimensions the last pass drew, or why it drew none.
Left tab 2: Block point
The dark picture is one single image with the pictograms in three rows; clicking it inserts the block of the cell you clicked. The rows are, in order:
PEM_F,PEM_FE,PEM_E,CURVA_E,PEM_ED,PEM_D,PEM_FDMOF_F,MOF_E,RET_E,CURVA_D,MOF_D,RET_D,DEPREFMOTO,BIKE,IDOSO,PNE_COLOR,ELETRICO,AMBULANCIA
The cell is worked out from where inside the picture you clicked (three rows, seven columns on the first two and six on the third). A click outside a valid cell inserts nothing.
| # | Control | What it does |
|---|---|---|
| 11 | Others | Name of the block to insert when it is not in the gallery. The list is filled with the names from the block library. |
| 12 | insert | Inserts the block named in 11. Asks Block position and Rotation (degrees). |
| 13, 14, 15 | Point + rotation, On alignment, 2 points | Mirror the first tab's selection ladder for the single block. |
| 16 | Larger arrow | Not available in this version. |
Left tab 3: Legends
| # | Control | What it does |
|---|---|---|
| 18 | legend word | The word to write on the pavement. The box is a typable combo, and its list holds only one entry, PARE — type the word you want (see Notes). |
| 19 | ↕ | Swaps the contents of 18 and 20. |
| 20 | second word | Second line of the legend. Not available in this version: it only takes part in the swap (19) and the clear (21). |
| 21 | x | Empties 20. |
| 22 | Height | Text height of the legend: 2.4 (default), 3.2, 4.0 or 1.6. It goes into the block name. |
| 23 | Insert | Builds the block name from the word and the height and inserts it: the session's legend prefix + _ + word + _ + height, with block-name characters that are not allowed removed and the decimal always a point (WORD_MARKING_STOP_2.4 in an English session). With the word empty: "Escolha uma legenda." (choose a legend). Asks Block position and Rotation (degrees). |
| 24, 25, 26 | Clicked point + rotate, 2 points, On alignment | Mirror the selection ladder for the legend. |
| 28, 29 | Free mode, Tutorial | Not available in this version. |
Below the left tabs: Reference, Action and the four links
| # | Control | What it does |
|---|---|---|
| 30 | ◄ / ► | Opens and closes the right half of the form. On the Block point and Legends tabs there is no right half to open: the click takes you back to the Transverse line tab. |
| 31 | Top | The block is offset from the reference line by the whole height of the block. |
| 32 | Centre | The block is offset by half the height: the line passes through the middle of the block. |
| 33 | Bottom | Default. No offset: the insertion point sits on the line. |
| 34 | ↕ | Cycles the three options: Top → Centre → Bottom → Top. |
| 35 | Action | IMPLANTAR (new work, the default), MANTER (keep), REMOVER (remove) or REMANEJAR (relocate). It decides two things when the set is inserted: the layer suffix (_MAN for keep, _REM for remove, no suffix for new work) and the block's dynamic property Visibility1, which becomes COL (full representation) for new work, keep and remove. Relocate has no suffix of its own and does not touch the visibility: it lands on the same layer as new work and leaves the block's representation as it is. The list is shown with the Portuguese action words. |
| 36 | Reset | Erases the preview and the auxiliary line and forgets the reference line. Status: "Reset." |
| 37 | Accept | Releases the preview: what is drawn stays, and the next pass no longer erases it. Status: "Aceito." |
| 38 | Zoom | Not available in this version: the status line says "Zoom: ainda não ligado nesta versão." |
| 39 | Update | Redraws the set with the current values. It is what almost every control on this page triggers by itself when it changes. |
Alignment position frame
This frame is not available in this version. The longitudinal shift of the set is always zero (see Notes).
| # | Control | What it does |
|---|---|---|
| 40 | Offset | Not available in this version. |
| 41 to 44 | X, ±, pt, ↑ | Not available in this version. |
| 45 | Shift | Not available in this version. |
| 46, 47 | step (1 / 0.5 / 0.1 / 5 / 10), pt | Not available in this version. |
Longitudinal frame
The transverse set can be repeated along the road. The three numbers are the shifts of the repetition, not a text.
| # | Control | What it does |
|---|---|---|
| 48 | Presets | Writes the values of 49 and 50 in one go. Outside a Brazilian profile the list carries three speed-band pairs named after their numbers — 45/30, 60/40, 75/50 — plus FLECHA/BICI/SOLO. H4 and H1 are on the list too and do a different sum: they write a single value, legend height × (n + 1) — with a legend height of 2.4, H4 gives 12 and H1 gives 4.8. With the legend height at zero, nothing is written. Any choice clears the three boxes before filling them. (The Brazilian profile's own speed bands are listed on the Portuguese page.) |
| 49, 50, 51 | 1, 2, 3 | The shifts of the repetition. The filled boxes are joined into a list separated by , where the decimal is a point (; in a Brazilian profile) and each value produces one repetition of the set. Empty boxes are skipped: filling 1 and 3 gives two repetitions, not three with a hole. |
| 52, 53 | ↔, ± | Not available in this version. |
| 54 | Long. dim. | Not available in this version. |
| 55 | Reset | Empties 49, 50 and 51 and redraws. |
| 56 | text mode | Not available in this version. |
Transversal frame (left column)
| # | Control | What it does |
|---|---|---|
| 57 | Divs. | How many divisions the set has, from 1 to 10 (3 is the default). It is the same value as Divisions (64): changing one writes into the other, shows or hides the matching block rows and redraws. |
| 58 | Ext. | The total length of the set (10 is the default). It serves two purposes: it is the length of the perpendicular in the Alignment and point / Alignment and 2 points modes, and it is the total that is shared out equally between the rows whose length (72, 74, 76…) is blank. |
| 59 | - controls | Not available in this version. |
| 60 | Angle | Skew, in degrees. It is added to the rotation of every block in the set, after the tangent. |
| 61, 62, 63 | ∠, /, x | Not available in this version. |
Right tab 1: Transversal
| # | Control | What it does |
|---|---|---|
| 64 | Divisions | The same value as 57. |
| 65 | x | Not available in this version. |
| 66 | Reference | Not available in this version: the length is governed by the Ext. box (58). |
| 67, 68 | ℓ, w | Not available in this version. |
| 69 | Change all/presets | The block to apply to every row at once. |
| 70 | = | Writes the block from 69 into all ten rows and redraws. With 69 empty: "Escolha o bloco a aplicar em todas as linhas." (choose the block to apply to every row). |
| 71, 73, 75, 77, 79, 81, 83, 85, 87, 89 | block for rows 1 to 10 | The block inserted in the middle of the matching stretch. The boxes are filled with the names from the library. A row with no block draws its reference stretch but inserts nothing. |
| 72, 74, 76, 78, 80, 82, 84, 86, 88, 90 | length for rows 1 to 10 | The length of that row's stretch along the reference line. Blank (the default) = Ext. divided by the number of divisions. |
| 91 | Detect from the road | Not available in this version. |
| 92 | Larger arrow | Not available in this version. |
| 93 | Legend H | 2.4 (default), 3.2, 4.0 or 1.6. This is the height used to offset the blocks from the line when the block cannot be measured; when the CAD can open the block, the height measured off the block itself wins. It is also the value the H4 / H1 presets (48) start from. |
| 94 | Blocks | On by default. Off, the pass draws only the reference stretches and the dimensions — no block is inserted. |
| 95 | Transverse dimension | On by default. Draws a dimension between the start of the first stretch and the end of the last. |
| 96 | L/n notation | Not available in this version. |
| 97 | Use the active style | Not available in this version. |
| 98 | Dimension offset | Added to the offset of the dimension line from the set. Negative values are accepted. |
| 99, 100 | x, ± | Not available in this version. |
| 101 | Blocks (Insert frame) | Default: inserts the blocks. |
| 102 | Dimensions only | Draws the reference stretches and the dimensions, without blocks. The status line adds "(apenas cotas)". |
| 103, 104 | Tutorials, Sample | Not available in this version. |
Right tab 2: General options
| # | Control | What it does |
|---|---|---|
| 105 | Dynamic mode | On by default. With it off, nothing is redrawn: Update and every value change stop having an effect, and even selecting a new line draws nothing. |
| 106 | Draw auxiliary line | Draws (and erases) a copy of the selected reference line on the AUX_DASHED layer, so you can check where it landed. |
| 107 | Relative values | Not available in this version. |
| 108 | Dimensions: include set height | Not available in this version. |
| 109 | Centre (dimension text position) | Default. The base offset of the dimension line is zero: the dimension sits over the set, and only the Overhang (111) and the Dimension offset (98) move it. |
| 110 | Top | The base offset becomes half the length of the reference line, plus the overhang and the offset. |
| 111 | Overhang | 2 by default. Added to the offset of the dimension line. |
| 112 | Draw the transverse dimension when there is only one | Not available in this version. |
| 113 | Draw the division at full size when there is only one | Not available in this version. |
| 114 | Check updates... | Not available in this version. |
| 115 | ▣ | Not available in this version. |
| 116 | Open blocks folder | Not available in this version: the status line says "Abrir pasta blocos: ainda não ligado nesta versão." |
How the options combine
The figures below were produced by the command's own engine on a straight reference line 10 units long, walked left to right, with a block height of 2.4. The grey dashed line is the reference line; each coloured stretch is one row's division, and the arrow is that row's block, at its real point and rotation.
Divisions and lengths
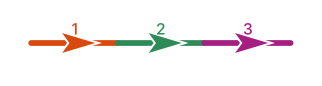
Divisions = 3, Ext. = 10, Reference = Bottom: three stretches of 3.33 and one block in the middle of each, on the line. The third stretch ends 0.01 before the end of the line (see Notes).
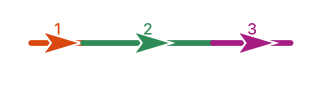
The same three blocks with the lengths 2, 5 and 3 typed into the row boxes: the stretches stop being equal.
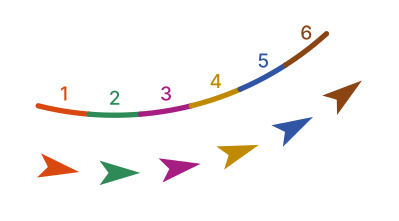
Divisions = 6 on a curved reference line: each block takes the tangent of its own stretch.
Reference
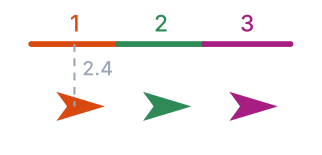
Reference = Top: the blocks are moved off the line by the whole height of the block (2.4).
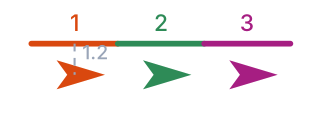
Reference = Centre: half the height (1.2) — the line passes through the middle of the block.
Angle
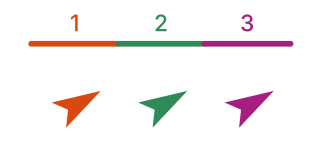
Angle = 30°, Reference = Top: the skew is added to the tangent on every block, without changing where they sit.
How the reference line is obtained

2 points between P1 and P2 (orange, 8 units) and the same pair with From mid point (grey): the line becomes 16 units centred on P1.
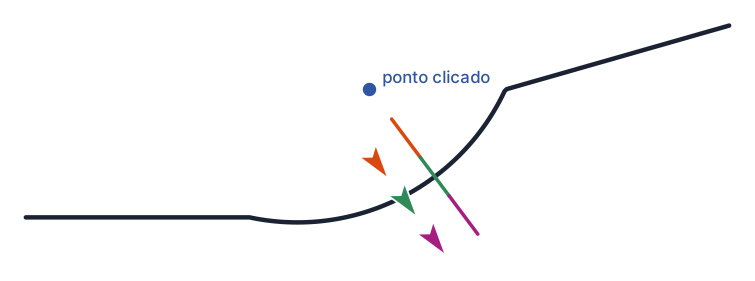
Alignment and point, Ext. = 9: the clicked point is projected onto the alignment and the reference is the 9-unit perpendicular at that foot, here already divided into three with the blocks offset.
Remembered between sessions
Nothing. This form does not save its options: every control goes back to its default when it is opened again (Divisions 3, Ext. 10, Action IMPLANTAR, Reference Bottom, Legend H 2.4, Overhang 2, Dynamic mode on).
Notes
- Where the blocks are inserted. On the manual road-marking layer of the active layer catalogue (
ROAD_MARK_WH_MANUALin an English session) with the action suffix (…_MAN,…_REM; new work and relocate get no suffix). Every block of one pass gets the same identifier in the XData (CapCad.Selection, withCapCad.Selection.Type=TRANSVERSAL), so the set can be recognised as a group afterwards. - The loose insertions do not use that layer. The block from the Block point tab and the word from the Legends tab are inserted on the drawing's current layer and get neither the action (35) nor the group identifier. Set the layer before inserting them.
- The legend prefix follows the session. The block name is built with
WORD_MARKINGin an English session,LEYENDAin a Spanish one andLEGENDAin a Brazilian one. The blocks in your library have to carry the matching prefix. - The legend word list holds one entry. The combo holds
PAREonly; type the word you want — the box is editable and any word is accepted. - The last stretch is 0.01 shorter. When the lengths add up to the end of the reference line, the division point is pulled back to
length − 0.01, otherwise the last division degenerates. That is why the third stretch in the figure measures 3.32 and not 3.33. - The longitudinal repetition is not available in this version. The shifts in boxes 49, 50 and 51 each produce one repetition of the set, drawn on top of the first; the status line counts the sets.
- "Top" is not the top of the screen. The offset is made towards the right of the reference line's direction (P1 to P2). On a line selected left to right, Top throws the blocks downwards. If they land on the wrong side, select the line the other way round.
- The height comes from the block, when it can. The offset from the line is the height measured off the block in the drawing. If the block cannot be measured, Legend H (93) applies; if that is zero too, the program uses 5 units.
- A block the library cannot find. The command line reports
Block '<name>' not found in the project block folders.and the set comes out without that block (the reference stretches and the dimensions are still drawn). - The shortcuts
INandLGare defined in CapCad'sacad.pgp, butINis also AutoCAD's native alias forINTERSECT. If the shortcut does not open the form, type the full command name. - Many controls are not available in this version. The whole Alignment position frame (40 to 47), the calculator buttons of the Transversal frame (59, 61 to 63) and of the Longitudinal one (52, 53, 56), Reference (66) and the
ℓ/wbuttons (67, 68), Detect from the road (91), Larger arrow (16, 92), L/n notation (96), Use the active style (97), Long. dim. (54), Transversal (8), Keep point (6), Relative values (107), Dimensions: include set height (108), the two "when there is only one" options (112, 113), Free mode (28) and every tutorial link (29, 103, 104, 114). - Some texts are Portuguese in every language. The status texts and refusal messages quoted above, and the Action list, are shown in Portuguese even in an English session; the captions are translated.