| Commands | CAPCAD_BATCH_BLOCK_GRID (blocks by coordinate) · CAPCAD_BATCH_DEVICE (road items by station) · CAPCAD_BATCH_SIGN (traffic signs) · CAPCAD_BATCH_BLOCK (a whole folder onto a grid) · CAPCAD_BATCH_MARKING (not available in this version) |
| Shortcuts | none. There is no alias in CapCad's acad.pgp for any of the five |
| Ribbon | CapCad tab › CAD Utilities panel › Tools split button › Block Batch Insert (CAPCAD_BATCH_BLOCK_GRID); Roadway panel › Library split button › Alignment Item Batch Insert (CAPCAD_BATCH_DEVICE); Road Signing panel › Signs split button › Sign Batch Insert (CAPCAD_BATCH_SIGN); Traffic Control panel › Markings split button › Road Lines Batch Insert (CAPCAD_BATCH_MARKING). CAPCAD_BATCH_BLOCK has no button |
| Category | NEW (CAPCAD_BATCH_BLOCK_GRID, CAPCAD_BATCH_BLOCK) · Horizontal: tools (CAPCAD_BATCH_DEVICE, CAPCAD_BATCH_MARKING) · Vertical (CAPCAD_BATCH_SIGN) |
| Forms | BatchBlockInsertForm — Block Batch Insert, modeless · BatchAlignmentItemsForm — Batch alignment items, modal · VerticalBatchForm — Signage Batch Insert, modeless · BlocksUtilitiesForm — Blocks Utilities, Insert tab, modeless |
| Hosts | CAPCAD_BATCH_BLOCK_GRID and CAPCAD_BATCH_DEVICE: AutoCAD, BricsCAD, GstarCAD, ZWCAD and ARES Commander. CAPCAD_BATCH_BLOCK, CAPCAD_BATCH_SIGN and CAPCAD_BATCH_MARKING: AutoCAD only |
| Also opened by | the Options/Utils tab of the Road Library, whose Block batch insert and Block batch alignment insert buttons run CAPCAD_BATCH_BLOCK_GRID and CAPCAD_BATCH_DEVICE; and CAPCAD_BLOCK_TOOLS, which opens the same form as CAPCAD_BATCH_BLOCK on the Export tab |
A survey becomes a drawing without a single insertion click. The spreadsheet that came from the GPS, the asset register or the field report is pasted into the form, each column is given a role, and CapCad inserts one entity per row — in the right place, at the right rotation, with the attributes already filled in.
- The spreadsheet is the source. Paste straight out of Excel with Ctrl+V; the columns become A, B, C… and you say which is which.
- Three input geometries. Projected coordinates, latitude/longitude converted by the project's coordinate system, or station + offset measured along an alignment.
- Attributes filled at insertion. A tag → column table writes each cell's value into the block's matching attribute; dynamic blocks get properties too.
- Rehearse before you insert. The test-points button draws only the points, on the check layer, and offers to zoom to them — that is how you find a swapped LAT/LON before scattering hundreds of blocks.
- A row-by-row report. Each row comes out as OK or FAIL in a report carrying the row's original text, so you can fix the spreadsheet and run again.
- Nothing is typed twice. The last spreadsheet loaded comes back on the next open, and the column roles are stored in the preferences.
What it does
There are four batch-insert commands, each with its own form, and a fifth that is not available in this version.
| Command | What it inserts | Where |
|---|---|---|
CAPCAD_BATCH_BLOCK_GRID |
one block per row, resolved by the project's library | the row's point (X/Y or Lat/Lon) |
CAPCAD_BATCH_DEVICE |
one block per row | station + offset + side along a chosen alignment, or coordinates |
CAPCAD_BATCH_SIGN |
one traffic sign per row, with its post | the active alignment (linear chainage) or coordinates |
CAPCAD_BATCH_BLOCK |
every file in a folder, one per file | a regular grid from the drawing origin |
CAPCAD_BATCH_MARKING |
— | — |
The first three share a model: one spreadsheet row is one entity, and one column is one role. You point at the column that carries the block name, at the X, at the Y, at the angle, at the scale, and at those that feed attributes. What you do not point at is simply not used.
CAPCAD_BATCH_BLOCK is different: there is no spreadsheet. It sweeps a folder and lays out what it finds on a grid, so you can look at a whole library at once.
CAPCAD_BATCH_MARKING (Road Lines Batch Insert) is not available in this version; running it shows a dialog saying so. The button is on the ribbon.
Where the blocks come from
CAPCAD_BATCH_BLOCK_GRID and CAPCAD_BATCH_DEVICE resolve the block name through the same loader the Road Library uses, in this order: a definition already in the drawing → the Support/Dwg folder installed with CapCad → the project's pavement-inscription folder (and its viario sub-folder) → the project's library folder (and its viario sub-folder) → the immediate sub-folders of the library. The .dwg found is imported as a block definition, with the units locked to metres.
CAPCAD_BATCH_SIGN does not use that loader: every row goes through the same sign insertion as Insert Vertical, which resolves the sign code, assembles the post and applies the action.
Workflow
- Build the spreadsheet with one row per entity and one column per piece of information. Leave the header out — every row is treated as data.
- Run the command and paste the spreadsheet into the form (Ctrl+V in the grid, or the paste button).
- Point at the columns: the block (or a fixed name), the X and the Y — or the station, the offset and the side.
- Build the attribute table, one row per block tag.
- Click Test points and check in the drawing where the points landed. Swapped coordinates show up here.
- Click Insert. At the end, read the report: each row appears as
OKorFAIL, with its original text beside it.
How the columns are read
The grid's columns are lettered A, B, C… as in Excel, and the role fields hold the letter.
- On the
CAPCAD_BATCH_BLOCK_GRIDandCAPCAD_BATCH_SIGNforms only the first character counts:AAis read as column A, andSIMPLESas column S. - The
CAPCAD_BATCH_DEVICEform reads the full letter (AAis the 27th column). - Numbers are read with a dot or a comma decimal separator; anything else is worth zero.
- A row with no tab is silently ignored by all three. Pasting a single column inserts nothing.
CAPCAD_BATCH_BLOCK_GRID — blocks by coordinate
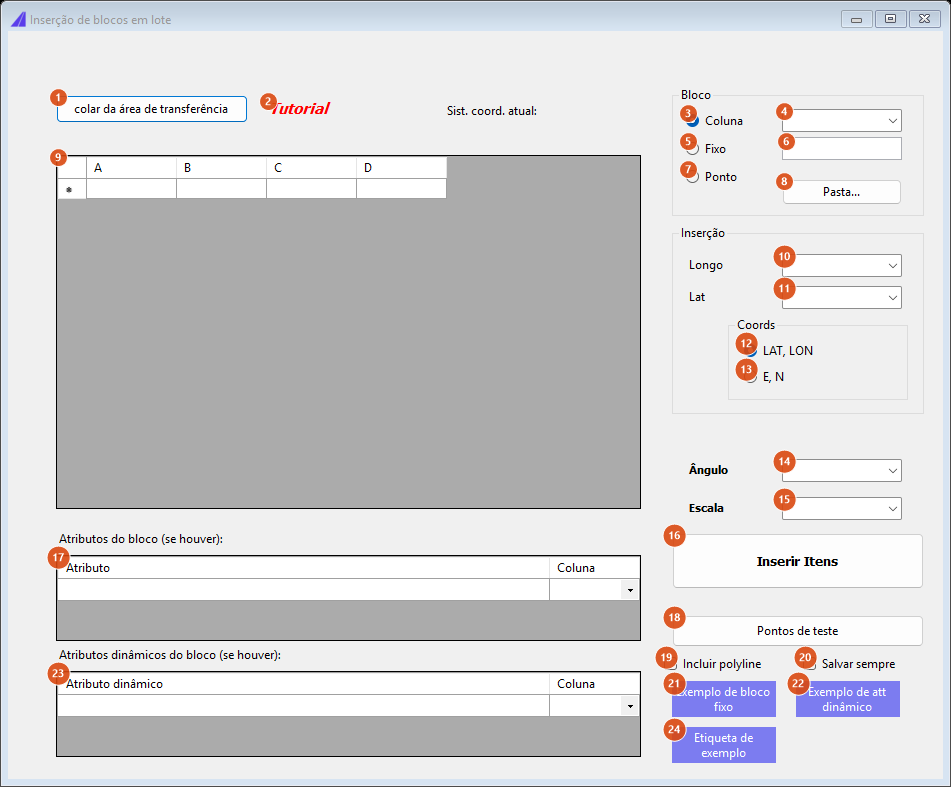
The screenshots on this page are of a Portuguese session; the numbering is the same in both editions, and the tables give the English captions. The grid opens empty with four columns; pasting creates whatever is missing.
Data
| # | Control | What it does |
|---|---|---|
| 1 | paste form clipboard | Replaces every row of the grid with the clipboard's contents (cells separated by tabs, rows by line breaks). It says how many rows came in and writes the result to the last-load file. Ctrl+V inside the grid does the same, but appends instead of replacing. |
| 2 | Tutorial | Opens the command's video in the browser. |
| 9 | data grid | The spreadsheet. Columns are A, B, C… and can be typed by hand. Only rows with at least one filled cell are considered. |
The Block frame
| # | Control | What it does |
|---|---|---|
| 3 | Column | The block name comes from the column chosen in 4, row by row. |
| 4 | block column | The letter of the column holding the block name. |
| 5 | Fixed | The same block for every row, typed in 6. |
| 6 | fixed block name | The name used when 5 is ticked. |
| 7 | Point | Not available in this version. Selecting it clears 3 and 5, but the insertion still reads the block name from the column in 4; only the role label shown above that column changes. |
| 8 | Folder... | Opens the project's library folder in Explorer, so you can check whether the .dwg you are after is there. |
The Insertion and Coords frames
| # | Control | What it does |
|---|---|---|
| 10 | Long / X | The longitude column (or the X). The label changes with 12/13. |
| 11 | Lat / Y | The latitude column (or the Y). |
| 12 | LAT, LON | Both columns are geographic and go through the project coordinate system's converter. With no coordinate system set, the run stops with a "coordinate system not found, needed for this option" message. |
| 13 | E, N | The columns are already in the drawing's system and go in as they are. |
The Current coord sys: label on the left shows the project's coordinate system, read when the form opened. In LAT, LON mode the two labels read Lat and Long; in E, N mode they read Y and X.
Angle, scale and running
| # | Control | What it does |
|---|---|---|
| 14 | Angle | The column carrying each block's rotation. The cell value goes raw into the rotation, in radians — see the notes. Empty: rotation zero. |
| 15 | Scale | The column carrying each block's scale, applied in X, Y and Z. A cell worth zero becomes 1 and, at the end of the run, a warning appears that there were invalid scale values. |
| 16 | Insert items | Runs. The form hides, a progress bar follows the rows, and at the end the Block insert report: appears with one OK or FAIL line per row. A block the library cannot find opens a three-way question — Continue (records the row as FAIL and goes on), Cancel (ends the run there) and Folders… (opens the project's library folder in Explorer and ends). |
| 18 | Test points | Inserts no blocks: it resolves every row's point, draws a POINT at each on the layer catalogue's test-point layer, sets PDMODE to 3 and asks whether you want to zoom to them. With no point resolved, it says the points could not be defined. |
| 19 | Include polyline | Only applies in test-point mode: as well as the points, it draws a polyline joining them in row order. Useful for seeing whether the spreadsheet is out of order. |
| 20 | Save each time | Saves the drawing after every block inserted. A drawing that has never been named is never saved this way, and a row whose block was not found does not trigger a save. |
Attributes
| # | Control | What it does |
|---|---|---|
| 17 | Block attributes (if present): | One row per attribute: the Attribute and the Column letter that feeds it. A column can feed an attribute and be the X or the Y at the same time — that is what the label sample does. |
| 23 | Block dynamic attributes (if present): | The same for dynamic block properties: the property name and the column. Read-only properties are skipped. |
Above each grid column there is a role selector: choosing a role there is the same as choosing the letter in the field at the side, and vice versa. A column with more than one role shows <varies>. The main roles (X, Y, Block, Angle, Scale) are exclusive: giving a column a role that already belonged to another takes the role off the previous one.
Samples
| # | Control | What it does |
|---|---|---|
| 21 | Sample fixed block | Loads a benchmark spreadsheet (index, N, E, level, name), ticks Fixed with block BM, points X = C and Y = B in E, N mode and builds the attributes COTA = D and BM = E. |
| 22 | Sample dynamic att | Loads a barrier-terminal spreadsheet, ticks Column with the block in C, points Lat = A and Lon = B in LAT, LON mode, the attribute DEF_TRAMO = E and the dynamic property Terminal = D. |
| 24 | Sample label | Loads a notable-points spreadsheet, ticks Fixed with block INFO, points Lat = A and Lon = B in E, N mode and feeds INFO_ITEM = C, INFO_LAT = A and INFO_LON = B. |
All three samples replace the grid's contents and both attribute tables. Load them in a scratch drawing.
CAPCAD_BATCH_DEVICE — road items by station
This is the only one of the four whose form is modal: it closes when you confirm, the alignment is then asked for on the command line, and the insertion happens in one pass.
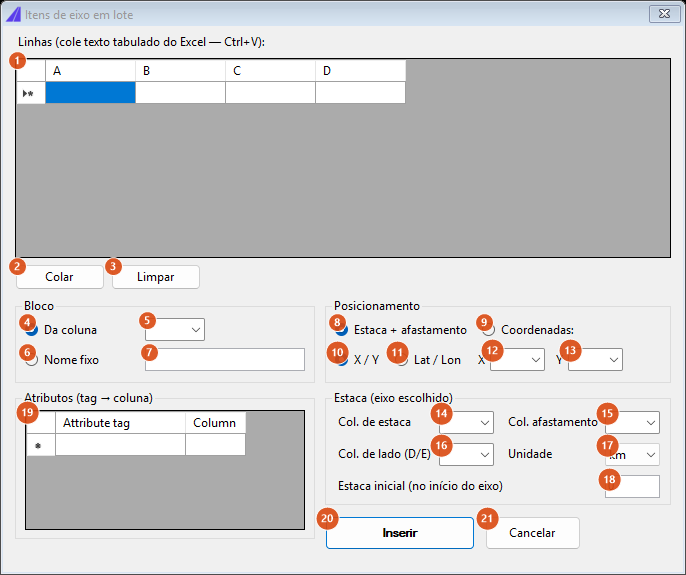
Note that Station + offset and X / Y both appear ticked — see the notes.
| # | Control | What it does |
|---|---|---|
| 1 | row grid | The spreadsheet, columns A, B, C… Ctrl+V pastes tabbed text from Excel, appending rows. |
| 2 | Paste | The same as Ctrl+V: appends the clipboard's rows to what is already there. It does not replace. |
| 3 | Clear | Empties the grid. |
| 4 | From column | The block name comes from the column chosen in 5. |
| 5 | block column | The letter of the column holding the block name. Without it, the run stops asking you to choose the block-name column. |
| 6 | Fixed name | The same block on every row, typed in 7. |
| 7 | fixed block name | Empty with 6 ticked: the run stops asking for the fixed block name. |
| 8 | Station + offset | The rows carry a station, and the command asks for an alignment (Select the alignment:) before inserting. |
| 9 | Coordinates: | The rows carry coordinates and no alignment is asked for. |
| 10 | X / Y | The coordinates in 12 and 13 are in the drawing's system. |
| 11 | Lat / Lon | The coordinates are geographic and go through the project coordinate system's converter. Without a system set: "Coordinate system not found — needed for the Lat/Lon option." |
| 12 | X | The X column — or, in Lat/Lon, the longitude. |
| 13 | Y | The Y column — or, in Lat/Lon, the latitude. Without 12 and 13, the run stops asking you to choose the X and Y columns. |
| 14 | Station col | The column with each row's station. Without it, the run stops asking you to choose the chainage column. |
| 15 | Offset col | The column with the offset perpendicular to the alignment, in metres. With no column, the offset is zero. |
| 16 | Side col (D/E) | The column with the side. A cell starting with E, with L, or equal to - puts the item on the left; anything else (including empty) puts it on the right. |
| 17 | Unit | km (the default) or m. Multiplies the station value to reach the distance measured along the alignment. |
| 18 | Initial station (at alignment start) | The station that corresponds to the start of the chosen alignment, in the same unit. The measured distance is (station − initial station) × unit. |
| 19 | Attributes (tag → column) | One row per block attribute: the tag and the column letter. Rows with an empty tag or an invalid letter are dropped. |
| 20 | Insert | Closes the form and starts: in station mode, the alignment is asked for first. |
| 21 | Cancel | Closes without inserting. |
The block is born rotated to the alignment's tangent at the resolved station, and the offset is measured perpendicular to that tangent. In coordinate mode the rotation is always zero. The scale is always 1 — there is no scale column in this command.
A station off the alignment does not stop the pass: the row goes into the failure report with the valid range, for example row 7: station 34,2 is outside the alignment (0 … 22.415). At the end, the command line reports N block(s) inserted. and, if there were failures, opens a Batch insert — failures window with one line per problem.
CAPCAD_BATCH_SIGN — signs in batch
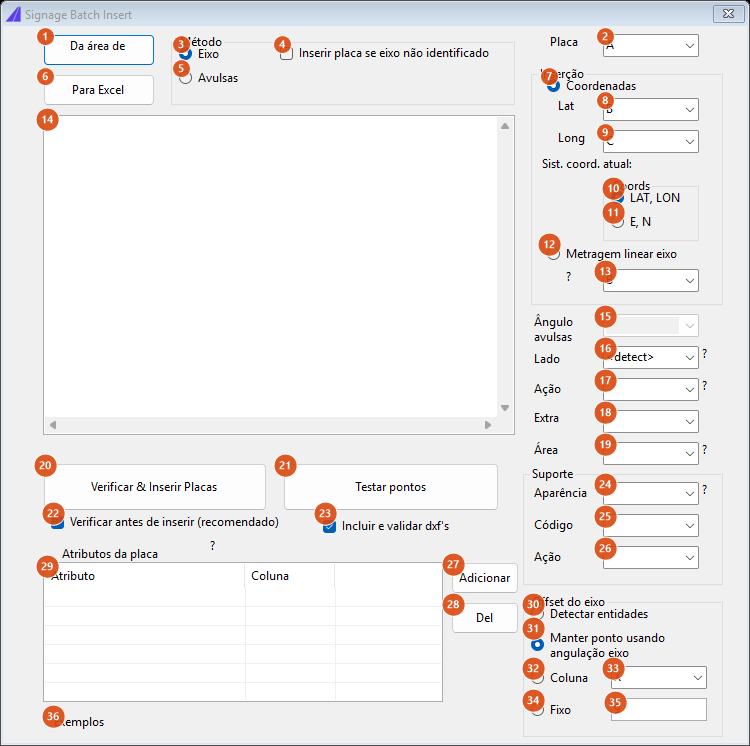
Most of this form's captions are in Portuguese in every language of the product. Below, a caption in italics is the Portuguese the form shows, with the English meaning after the dash; a caption in bold is genuine English shown by the software.
Data
| # | Control | What it does |
|---|---|---|
| 1 | From clipboard | Replaces the data box's contents with the clipboard, says how many rows came in and writes the spreadsheet to Exports\vert_batch_last.txt. |
| 6 | Para Excel — to Excel | Opens the pasted spreadsheet in Excel, with no header. |
| 14 | data box | The spreadsheet, as tabbed text. Unlike the other two forms, there is no grid here: the text is pasted raw. A row with no tab is ignored. |
The label on the left below the box says the spreadsheet came from the last run when that file was recovered on opening; the one on the right shows progress and the result.
The Método (method) frame
| # | Control | What it does |
|---|---|---|
| 3 | Eixo — alignment | The signs are positioned relative to the project's active alignment (there is no alignment picker here). With no alignment set, the run stops saying so. |
| 4 | Inserir placa se eixo não identificado — insert the sign even if the alignment is not identified | When a sign fails, it tries again with no offset and no side, as a standalone sign. At the end a notice says some signs were inserted as standalone. |
| 5 | Loose (Avulsas — standalone) | The signs rest on no alignment at all. Ticking this forces Coordinates mode (7), disables the station column, the side and the whole offset frame, and enables the angle (15). |
The Inserção (insertion) frame
| # | Control | What it does |
|---|---|---|
| 7 | Coordinates | Each sign's point comes from columns 8 and 9. |
| 8 | Lat / Y | The latitude column (or the Y). Default: B. |
| 9 | Long / X | The longitude column (or the X). Default: C. |
| 10 | LAT, LON | The columns are geographic and go through the project's coordinate system. |
| 11 | E, N | The columns are already in the drawing's system. |
| 12 | Metragem linear eixo — linear chainage along the alignment | The point comes from column 13, read in the active alignment's normalised chainage — with station equations and kilometre posts already applied. It is the only mode in which the side column (16) is read. |
| 13 | chainage column | The column with the chainage. Default: B. A column beyond the row: the row goes into the report as an invalid km column; a station off the alignment: point not resolved. |
The Lat/Long and Y/X labels swap name and position with 10 and 11 — the two lines literally invert on screen.
Content columns
| # | Control | What it does |
|---|---|---|
| 2 | Placa — sign | The column with the sign code. Default: A. A cell containing a comma is read as code, set. |
| 15 | Ângulo avulsas — standalone angle | The rotation, in degrees, of standalone signs. It can be a column letter or one of the fixed values 0 and 90. It is ignored in the Eixo method. The command also subtracts 90° from whatever is resolved — see the notes. |
| 16 | Lado — side | <detect> (the default) or a column letter. With <detect> the side is discarded, whatever the cell says. With a column chosen, a cell starting with E, L, I or DECR is the left side; D, R or CRES is the right. Read only in Eixo + linear-chainage mode. |
| 17 | Ação — action | The sign's action: install, keep or remove. It accepts a column letter, and the list offers the three Portuguese words (Manter, Implantar, Remover) as a default for every row. See the trap in the notes. |
| 18 | Extra | The column with the sign's extra text (the variable legend). |
| 19 | Área — area | Saved with the form; not used by this version. |
The Suporte (post) frame
| # | Control | What it does |
|---|---|---|
| 24 | Aparência — appearance | The column with the post type. A cell starting with SI or 1 becomes SIMPLES (single); with D or 2, DUPLO (double); with T or 3, TRIPLO (triple). Any other text passes through as it is. Note that this box is itself a column selector read by its first character, so typing the word SIMPLES here points at column S. |
| 25 | Código — code | Saved with the form; not used by this version. |
| 26 | Ação — action (of the post) | Saved with the form; not used by this version. |
The Offset do eixo (offset from the alignment) frame
| # | Control | What it does |
|---|---|---|
| 30 | Detect entities | Not available in this version: the run uses the fixed value in 35. |
| 31 | Manter ponto usando angulação eixo — keep the point, using the alignment's angle | The default. Offset zero: the sign stays at the resolved point and only rotates with the alignment. |
| 32 | Column | The offset comes from the column chosen in 33, in metres. |
| 33 | offset column | The letter of the offset column. Default: X. |
| 34 | Fixed | The offset is the value typed in 35, the same for every row. |
| 35 | fixed offset value | Default 9. |
Attributes and running
| # | Control | What it does |
|---|---|---|
| 29 | Atributos da placa — sign attributes | The Attribute → Column list. Saved with the form; not used by this version — see the notes. |
| 27 | Add | Asks for the Excel column and then for the attribute name, in that order, and adds the row. |
| 28 | Del | Removes the selected row. |
| 20 | Verificar & Inserir Placas — check and insert signs | Runs. The form hides, each row becomes a sign (with its post), and at the end a report window opens with one line per record: number, OK/FAIL, reason, sign id, post id and the original row. |
| 21 | Testar pontos — test points | Only resolves the points and draws a POINT at each, on the test-point layer. It writes neither preferences nor the last-load file. |
| 22 | Verificar antes de inserir (recomendado) — check before inserting (recommended) | Changes button 20's caption between Verificar & Inserir Placas and Inserir Placas; the verification step is not available in this version. |
| 23 | Include and validate dxf's | Saved with the form; not used by this version. |
| 36 | Exemplos — samples | Not available in this version: it only toggles the form's height, revealing an empty strip. |
CAPCAD_BATCH_BLOCK — a whole folder onto a grid
Opens the Blocks Utilities form already on the Insert tab. It is the same form as CAPCAD_BLOCK_TOOLS, which opens it on the Export tab; the other tabs belong to those other commands and are covered in Blocks, attributes and relative placement.
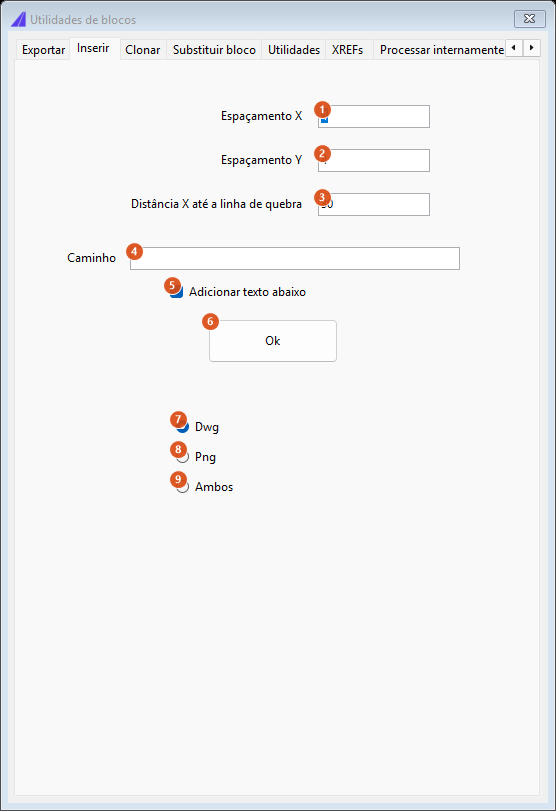
The "Insert" tab: no spreadsheet and no insertion point, just the folder and the grid pitch.
| # | Control | What it does |
|---|---|---|
| 1 | X spacing | Distance between one item and the next, horizontally. Default 4. Zero or negative stops with an invalid-data message. |
| 2 | Y spacing | Distance between one grid row and the next. Default 4. |
| 3 | X distance to break line | The grid's width: once that X is reached, the command goes back to the start and drops one Y spacing. Default 30. |
| 4 | Path | The folder to sweep. First level only — sub-folders are not visited. An empty or non-existent path asks for a valid one. |
| 5 | Add text below | On by default: writes the file name under each item, in text of a fixed height of 0.15 (not editable). |
| 6 | Ok | Runs and says how many files came in. |
| 7 | Dwg | Inserts only the .dwg files, each one as a block definition of the same name. The default. |
| 8 | Png | Attaches only the .png files, as raster images forced square at 0.9 × the X spacing. |
| 9 | Both | Does both in the same sweep. |
The grid starts at the drawing origin (0,0) and grows to the right and downwards. There is no insertion point: run it in a scratch drawing, or move the result afterwards.
Remembered between sessions
CAPCAD_BATCH_BLOCK_GRIDstores, in the user preferences, the block, latitude and longitude columns, the LAT/LON × E,N choice and both attribute tables, as well as the radio buttons of the Block, Insertion and Coords frames. The last spreadsheet goes toExports\item_batch_block_last.txtand comes back on the next open.CAPCAD_BATCH_SIGNstores every role column (including the two post columns), the radio buttons and checkboxes, the attribute table and the km × coordinates choice. The spreadsheet goes toExports\vert_batch_last.txt. The preferences are written when you insert and when you close the form — not when you test points.CAPCAD_BATCH_DEVICEandCAPCAD_BATCH_BLOCKstore nothing: both forms open with the factory values on every run.
Notes
CAPCAD_BATCH_BLOCK_GRID's angle is in radians. The cell value goes raw into the block's rotation, with no conversion from degrees. A spreadsheet holding90turns the block 90 radians (≈ 5157°). For 90° write1.5708. The column is called Angle and nothing warns you. A non-numeric cell in that column aborts the whole run with a format error.- The point and the block name carry over between rows. In
CAPCAD_BATCH_BLOCK_GRID, a row whose X and Y cells are zero (or are not numbers) reuses the previous row's point, and a row with no block name reuses the previous name. The result is a block on top of the previous one, counted asOK. Check the spreadsheet with Test points before inserting. - A zero in either coordinate is enough. The carry-over test requires X and Y to be non-zero, so a legitimate point with X = 0 or Y = 0 cannot be expressed — that row silently takes the previous row's position. On the very first row it lands at the drawing origin.
- An empty role field means column A. In
CAPCAD_BATCH_BLOCK_GRID, leaving the block, X or Y boxes empty does not switch the role off: they fall to column A. Only Angle and Scale accept empty as "no column". - Coordinate columns beyond the row stop everything. In
CAPCAD_BATCH_BLOCK_GRID, if a row has fewer columns than the letter pointed at in X or Y, the run stops with an invalid-coordinate-columns message and, on the insert path, the form does not come back — it stays hidden until you run the command again. Rows already inserted stay in the drawing. CAPCAD_BATCH_DEVICEopens with two radio buttons ticked. Station + offset, Coordinates:, X / Y and Lat / Lon sit in one frame and form a single group; the form opens showing two of them ticked, and clicking any one clears the other three. In practice: on a freshly opened form the mode is decided by Coordinates: alone, so the command works in station mode; to work by coordinates, tick Coordinates:, and then X / Y and Lat / Lon untick. Lat / Lon mode is not available in this version: ticking Lat / Lon unticks Coordinates: and returns the command to station mode. Use projected coordinates, or convert beforehand.CAPCAD_BATCH_SIGN's attribute mapping is not available in this version. The sign is born with the attributes derived from its code, and the mapped columns are discarded. The Área column, the post's Código and Ação columns and the Include and validate dxf's box are not used either.CAPCAD_BATCH_SIGN's action list mixes words and letters. Because only the first character is read, choosing Manter points at column M, Implantar at column I and Remover at column R. The word only works as a default when the row has fewer columns than that letter; otherwise the command reads that column. To fix an action safely, point at a column of your own carryingI,MorRon every row.- Sign rotation always loses 90°. The command subtracts 90° from the resolved angle on every row, in both methods. In the Eixo method the typed angle is not read: the rotation is always −90° before the sign's own rotation is applied.
- After one sign falls back to standalone, every later
OKrow carries the "alignment not identified, inserted standalone" reason — even the ones that went in normally over the alignment. CAPCAD_BATCH_BLOCK's grid reuses existing definitions. If the drawing already has a block with the file's name, it is the drawing's definition that is inserted, not the file's. Run it in a new drawing when you want to see the folder's real contents.CAPCAD_BATCH_MARKINGis not available in this version. The Road Lines Batch Insert button is on the ribbon and answers with a dialog saying so.- On the other CADs,
CAPCAD_BATCH_BLOCK_GRIDis a reduced version. BricsCAD, GstarCAD, ZWCAD and ARES Commander open the same form, but they do not reproduce the point and name carry-over between rows. - Several texts are in English in the Portuguese product, and correspondingly several are in Portuguese in the English one:
CAPCAD_BATCH_SIGN's form is mostly untranslated, its report headers are English (LINE,STATUS,INFO,ID SIGN,ID POST,LINE DEFINITION), and the Block insert report:, Batch insert — failures and command-line counts are English everywhere.
See also
- Blocks, attributes and relative placement — the other tabs of the same Blocks Utilities form.
- Insert Vertical — the sign insertion
CAPCAD_BATCH_SIGNruns once per row. - Road Library — the block loader and the folder order the batch commands share.
- Batch Script — repeating a routine of commands rather than a table of rows.