| Commands | CAPCAD_ROAD_LANE (lane assistant), CAPCAD_ROAD_CYCLEWAY (Cycle Lane), CAPCAD_ROAD_KERB_DRAW (draw the alignment's kerbs), CAPCAD_ROAD_ACCESS_ASSISTANT (interchange guide), CAPCAD_ROAD_DRAWORDER (carriageway and shoulder to the back) |
| Shortcuts | none of the five has a shortcut in acad.pgp. The kerb ribbon button announces [BORDO]; that alias is not available in this version (see Notes) |
| Ribbon | CapCad tab › CAD Utilities panel › Geometry split button › Geometry Tools (tooltip Lanes; the command is CAPCAD_ROAD_LANE) · Roadway panel › Templates split button › Cycle Lane (CAPCAD_ROAD_CYCLEWAY) · Project panel › Design split button › Geometric Assistant (CAPCAD_ROAD_ACCESS_ASSISTANT) · Traffic Control panel › Markings split button › Carriageway & Shoulder to Back (CAPCAD_ROAD_DRAWORDER) · CAPCAD_ROAD_KERB_DRAW has no button on the CapCad tab |
| Category | CAPCAD_ROAD_DRAWORDER: Horizontal: tools. The other four: NEW |
| Forms | CAPCAD_ROAD_LANE opens LanesForm — Lane assistant, modeless, single instance. CAPCAD_ROAD_CYCLEWAY opens CicloviaForm — Ciclovias, modeless, single instance, four tabs. The other three have no form |
| Hosts | AutoCAD. In ARES Commander the five are not available in this version and say so; BricsCAD, GstarCAD and ZWCAD do not have them |
| Also | CAPCAD_ROAD_KERB_DRAW is the Bordos definidos [BORDO] box on the Actions tab of the Alignment Manager. CAPCAD_ROAD_DRAWORDER runs by itself on every trim of Clean Carriageway and has a button on that form's Util tab |
These are the five helpers that tidy the road around the marking. None of them draws marking: they prepare the base, bring into the drawing what the alignment already knows, or put the carriageway behind everything so the marking shows again.
- Offsets by the CAD and by CapCad. The lane assistant tries the CAD's own offset and falls back on CapCad's own when it refuses — arcs and closed polylines included.
- One side or both, in the same pass. The new line can inherit the source line's layer instead of landing on the current one.
- The cycle-lane panel is a shortcut board. Crossings, pictograms along the alignment, a cycle lane along the alignment, signs: each button opens the right command already set up, with the right block and the right angle.
- The kerbs are already on the alignment. Left kerb, right kerb and auxiliary kerbs are properties of the alignment; one command brings them into the drawing on the active style's layers.
- The carriageway to the back, in one go. Carriageway, shoulder, bridge, central reserve and the red markings drop to the bottom of the draw order, and the marking becomes visible again.
- A learning area built in. Rural and urban examples, solved and unsolved, downloaded from the CapCad server and opened on the spot.
Lane assistant — CAPCAD_ROAD_LANE
What it does
It asks for a base line in the drawing and creates parallel copies of it. There are two behaviours, not three:
- Offset (4): the copies sit at the distance in the Offset box (5).
- Lane: the copies sit at a distance derived from the Width box (16). This is what runs when Extract segment (1) or Create intermediate divisions between 2 entities (12) is ticked.
Before anything else the command sets LTSCALE to 1. Then it asks for the base — Selecione a linha base: — accepting any curve; anything else is refused with Selecione uma linha ou polilinha.
The sign. A positive value puts the copy on the left of the base line's walking direction, that is, of its vertex order. Both sides (8) draws both: one at +value, one at −value.
The offset is tried first by the CAD and, if it refuses, by CapCad itself — which is why arcs and polylines that the CAD's OFFSET rejects usually come out anyway. Whatever does not come out is reported on the command line (Lanes: offset 3,5 falhou (…)).
Workflow
- Run
CAPCAD_ROAD_LANE. The form opens beside the drawing. - Choose Offset (4) and type the distance (5), or leave Extract segment (1) and type the Width (16).
- Choose 1 side continuous (7) or Both sides (8), and the output layer (18 or 19).
- Click Create (14) — or press Enter in one of the text boxes. The form hides, the CAD asks for the base line and the copies are drawn.
- The window title reports the result: Lane assistant — 2 linha(s) in Offset mode, — 2 faixa(s) in lane mode.
The form
The screenshot was captured in a Portuguese session; the control numbering is the same in both editions, and the table quotes the English captions.
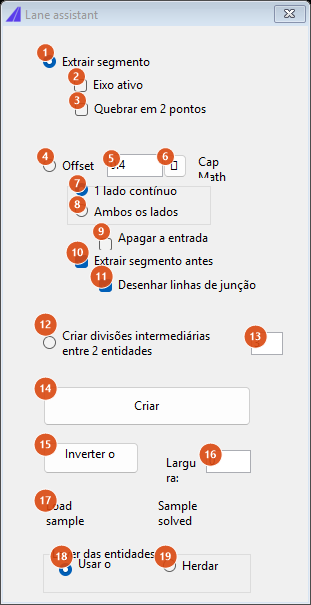
The form as it opens: "Extract segment" ticked, offset 0.4, width 0. Several controls are not used by this version — see the right-hand column.
| # | Control | What it does |
|---|---|---|
| 1 | Extract segment | Ticked by default. It falls into lane mode: the copies come from the Width box (16); the base is the whole curve. |
| 2 | Active alignment | Only enabled when the drawing has a project alignment, and it is ticked on its own when there is one. Not used by this version: Create always asks for a curve in the drawing, even with the box ticked. |
| 3 | Break 2 points | Not used by this version. |
| 4 | Offset | Offset mode. Entering box 5 selects this button on its own. |
| 5 | Offset (value) | The distance. 0.4 out of the box; comma or point accepted. Zero answers Offset zero. and draws nothing. Enter runs it. |
| 6 | ! | Asks for a curve (Selecione a curva:) and writes its length into the Width box (16) — not into the offset box. |
| 7 | 1 side continuous | Ticked by default. One copy only. In offset mode it sits at +offset, on the left; in lane mode, at +width — the whole width, not half of it (see Notes). |
| 8 | Both sides | Two copies. In offset mode at ±offset; in lane mode at ±width/2, one on each side of the base. |
| 9 | Erase input (undoable) | Not used by this version: the source line is never erased. |
| 10 | Extract segment before | Ticked by default. Saved with the form; not used by this version. |
| 11 | Draw joining lines | Ticked by default. Saved with the form; not used by this version. |
| 12 | Create intermediate divisions between 2 entities | Falls into the same lane mode as button 1; the divisions between two entities are not available in this version. |
| 13 | number of divisions | Not used by this version. Entering the box selects button 12. Enter runs it. |
| 14 | Create | Runs the chosen mode. |
| 15 | Reverse created | Not available in this version. |
| 16 | Wdith | The lane width, in lane mode. 0 out of the box — and with zero the command answers Largura inválida. and draws nothing, so the first Create of a new session needs you to fill this box in. It is also the box that the ! button (6) fills. Enter runs it. |
| 17 | Load / Sample | Downloads sample-uk.dwg from the CapCad server and opens it. |
| 18 | Use current | Ticked by default. The copies come out on the drawing's current layer. |
| 19 | Inherit | The copies come out on the source curve's layer. |
The Cap Math label beside the offset box is only a hint that the field accepts arithmetic expressions; it has no action. The Sample solved label beside Load sample is not available in this version.
Remembered between sessions
Four values, in the user preferences: the chosen mode, the offset value and the two boxes Extract segment before and Draw joining lines — both not used by this version. Width, the side and the layer go back to their defaults every time it opens.
Cycle Lane — CAPCAD_ROAD_CYCLEWAY
What it does
The Ciclovias form draws nothing itself: it is, in the panel's own words, a set of "shortcuts to existing CapCad commands, configured for cycle lanes". Each button opens another CapCad command with the fields already filled in.
There are four tabs: Ciclovia (cycle lane), Ferrovia (railway), Rotatória (roundabout; not available in this version) and Zona de aprendizagem (learning area).
This form has no English captions: every label is quoted below in Portuguese as the software shows it, with a gloss. The screenshots were captured in a Portuguese session; the control numbering is the same in both editions.
Ciclovia tab
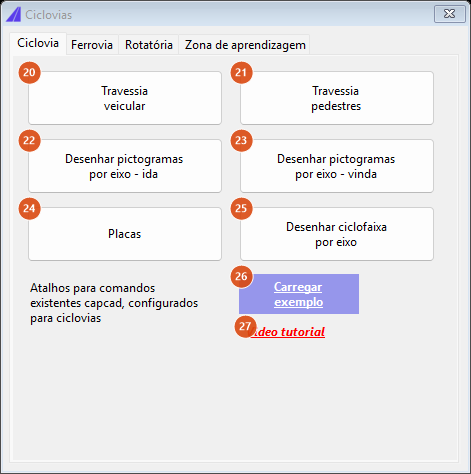
| # | Control | What it does |
|---|---|---|
| 20 | Travessia veicular (vehicle crossing) | Opens Crossings with the Ciclovia padrão 1 preset applied. |
| 21 | Travessia pedestres (pedestrian crossing) | Opens Crossings with the Faixa de pedestres preset. |
| 22 | Desenhar pictogramas por eixo — ida (draw pictograms along the alignment, outbound) | Warns Selecione um caminho, confira o valor de "offset" (destacado). (select a path, check the highlighted offset value); makes sure the block ciclofaixa-grupo.dwg is in the project's pavement-legend folder, downloading it from the CapCad server if it is missing, without overwriting; and opens the Divider with the CICLOVIA preset: block ciclofaixa-grupo, angle +90° added, offset +0.5 (to the left of the walking direction), scale 1, rotating with the path. The Divider's block list carries Ciclovia_1.95, Ciclovia_1, Ciclovia_2.9 and ciclofaixa-grupo. |
| 23 | Desenhar pictogramas por eixo — vinda (inbound) | The same, with angle −90° and offset −0.5 (to the right of the walking direction). |
| 24 | Placas (signs) | Opens Insert Sign. The cicl search filter is not available in this version, and the command says so. |
| 25 | Desenhar ciclofaixa por eixo (draw the cycle lane along the alignment) | Warns Pasta 'ciclovias' selecionada. Selecione um tipo e aplique a um path. and opens the Linear Set asking for the CICLOVIA folder. That folder is served by the CapCad server; when it is not available, the form opens on whatever folder was selected. |
| 26 | Carregar exemplo (load sample) | Downloads sample-ciclovia.dwg from the CapCad server and opens it. |
| 27 | Video tutorial | Opens the video in the browser. |
Ferrovia tab
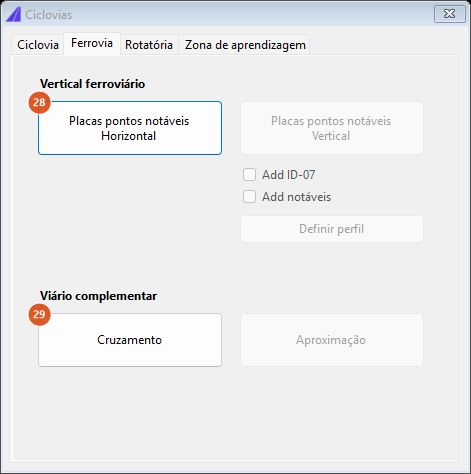
The five greyed controls are not available in this version.
| # | Control | What it does |
|---|---|---|
| 28 | Placas pontos notáveis — Horizontal (signs at notable points, horizontal) | Asks Deseja inserir placas nos pontos notáveis? and, on Yes, runs the horizontal pass over the alignment's notable points from the Civil 3D utilities: it inserts the signs, without the point markers. |
| 29 | Cruzamento (level crossing) | Opens Crossings with the Apenas retenções preset and turns on two-way plus channelisation at the entry and the exit. |
| — | Placas pontos notáveis — Vertical, Add ID-07, Add notáveis, Definir perfil, Aproximação | Not available in this version. |
Rotatória tab
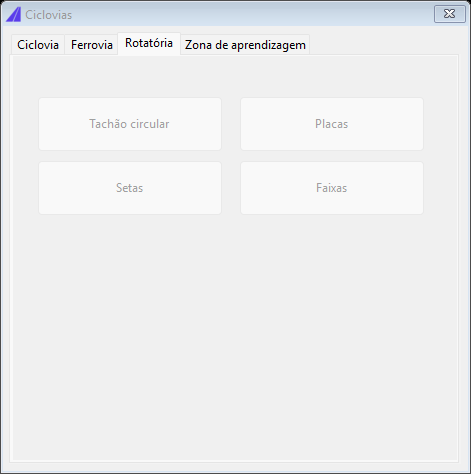
The four buttons — Tachão circular, Placas, Setas and Faixas — are not available in this version and are shown disabled.
Zona de aprendizagem tab
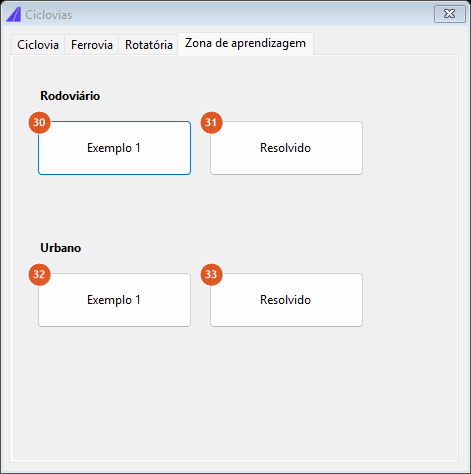
| # | Control | What it does |
|---|---|---|
| 30 | Rodoviário › Exemplo 1 (rural › example 1) | Downloads and opens exemplo1.dwg. |
| 31 | Rodoviário › Resolvido (rural › solved) | Downloads and opens exemplo1-resolvido.dwg. |
| 32 | Urbano › Exemplo 1 (urban › example 1) | Downloads and opens projeto-urbano-1.dwg. |
| 33 | Urbano › Resolvido (urban › solved) | Downloads and opens projeto-urbano-1-resolvido.dwg. |
All four hide the form while the drawing downloads and show it again afterwards. The file is downloaded from the CapCad server each time and goes to CapCad's exports folder.
Drawing the kerbs — CAPCAD_ROAD_KERB_DRAW
The project alignment stores, as properties, up to three sets of kerb curves: left kerb (capcad.alignment.bordo.esq), right kerb (capcad.alignment.bordo.dir) and auxiliary kerbs (capcad.alignment.bordo.aux). They are written by the Alignment Manager and the alignment properties editor; this command only brings them into the drawing.
There is no form and no selection: the command works on the project's current alignment.
- With no alignment defined, the command asks whether you want to open the Alignment Manager and stops.
- With an alignment, each of the three sets is drawn on its layer:
| Set | Role in the layer catalogue | Name in the factory style | Colour (ACI) |
|---|---|---|---|
| Left kerb | BORDO_LINES_ESQ |
BORDO_LINES_ESQ |
1 (red), non-plotting |
| Right kerb | BORDO_LINES_DIR |
BORDO_LINES_DIR |
5 (blue), non-plotting |
| Auxiliary kerbs | EIXOS_BORDOS_AUX |
EIXOS_BORDOS_AUX |
83 |
The names above are the factory style's. The name that reaches the drawing comes from the active style's layer catalogue, which may add a prefix, rename the layer and change the colour; missing layers are created on the spot. Never type these names by hand.
- If the alignment has none of the three properties, the command warns Nenhuma das 3 propriedades de eixos definidas para bordos: bordo esquerdo, direito e auxiliares (none of the three kerb properties is defined on the alignment) and draws nothing. Having just one of the three is enough for the command to work.
A set drawn twice becomes two overlapping copies: the command does not erase what it drew before.
Interchange guide — CAPCAD_ROAD_ACCESS_ASSISTANT
This command is not available in this version. Running it — or clicking the Geometric Assistant button on the Project panel — shows a notice saying so.
The kerbs of an access or an interchange are handled through the alignment's auxiliary alignments (see Draw and edit the alignment) and through the kerb drawing above.
Carriageway and shoulder to the back — CAPCAD_ROAD_DRAWORDER
What it does
It sends to the back of model space's draw order everything on the layers of the road platform, so that the marking, the signs and the hatches drawn on top show again. It is the cure for the solid carriageway that has "eaten" the marking after a fill or a hatch.
The layers it handles, in the order it walks them:
| Role in the layer catalogue | Name in the factory style | What is usually there |
|---|---|---|
ACOSTAMENTO_LAYER |
ACOSTAMENTO |
shoulders |
PISTA_LAYER |
PISTA |
the carriageway |
PONTE |
PONTE |
bridges and structures |
canteiro |
CANTEIRO |
central reserve |
SINA_HOR_VERMELHA |
SINA_HOR_VM |
generic red marking |
SINA_HOR_VERMELHA_CICLOVIA |
SINA_HOR_VM_CICLOVIA |
the red background of cycle lanes |
The names come from the active style's layer catalogue — the style may prefix them, rename them and translate them. The command never creates a layer: a layer that does not exist in the drawing is simply skipped, and so is one that exists but is empty.
It works in model space only. Entities in layouts are not reordered.
Workflow
- Run
CAPCAD_ROAD_DRAWORDER. There is no selection and no question. - The command line reports how many entities went down and across how many layers —
128 entities sent to back across 3 layer(s).
The same step runs by itself on every trim of Clean Carriageway, and that form's Util tab has a button for it.
Notes
- The lane assistant's ribbon button reads Geometry Tools, on the CAD Utilities panel; its tooltip reads Lanes.
- One side only, in lane mode, uses the whole width. With 1 side continuous (7) ticked, the copy comes out at
+widthfrom the base; with Both sides (8), the two come out at±width/2. It is not half on one side and half on the other: it is the whole width on one side, or half on each. If you want a 3.5 m lane with the base on its centre line, tick Both sides. - Several of the lane assistant's controls are not used by this version. Break 2 points, Erase input, Extract segment before, Draw joining lines, Reverse created and the number of divisions have no effect on the drawing; nor does Active alignment, although it enables and ticks itself when there is an alignment. Two of them are saved with the form.
- The
!button fills the width, not the offset. It measures a curve's length and writes it into the Width box (16). - The two forms are only half translated. The lane assistant's title (Lane assistant) and its check-box captions are in English, but its status messages are Portuguese. The Ciclovias form has no English captions at all.
- The
[BORDO]shortcut is not available in this version. Type the command name, or use the Bordos definidos [BORDO] box in the Alignment Manager. - The kerb button is not on the ribbon. The route is the Alignment Manager, or the command name on the command line.
- The draw order only holds until someone draws on top. Any new entity on the carriageway layers is born at the top of the order; run
CAPCAD_ROAD_DRAWORDERagain after finishing the platform. - The
CICLOVIAfolder comes from the CapCad server. When it is not available, the Desenhar ciclofaixa por eixo button opens the Linear Set where it was. The Ciclovía preset of the Compositor is an alternative: it already carries the red lane, the centre line, the two edge lines and the grass. - The kerbs, the carriageway and the draw order do not talk to the lane assistant. The lanes this command creates are loose polylines: they do not become alignment properties and they do not land on the platform layers. To draw the platform from the alignment — carriageway, shoulder, kerbs and lane divisions in one go — use Pista e faixas in the Alignment Manager or the carriageway width editor.