| Command | CAPCAD_MARKING_CONTRAST_BACKING |
| Shortcut | none |
| Ribbon | CapCad tab › Traffic Control panel › Markings split button › Contrast Backing |
| Category | Horizontal |
| Form | ContrasteForm "Contrast", tabs Main, Options, Tools and Info, over a fixed frame carrying the offset and the contrast layer. Modeless: the drawing stays live while it is open |
| Hosts | AutoCAD, BricsCAD, GstarCAD, ZWCAD, ARES Commander |
| Also | CAPCAD_MARKING_HUB can dock this form in the horizontal-marking hub; while it is docked, running the command brings the hub's tab forward instead of opening a second window |
Select the marking you have already drawn and it gets its black band behind it, with the right cadence and in the right draw order. By hand this is copying every line, widening it, creating the black layer, rebuilding the linetype so the dashes still line up, and sending it all to the back — line by line.
- One selection, two kinds of element. Lines (continuous, dashed, closed areas) and legend blocks in the same pass.
- The cadence is rebuilt, not copied. A black dash wider than the white one needs a linetype of its own; CapCad builds the black layer that matches the source line's cadence.
- Optional overhang. The backing can be longer than the white dash, and the black layer's cadence is recomputed for it.
- Draw order resolved. The bands go behind the paint and then carriageway, shoulder, bridge and central reserve go behind everything.
- Reversible. Reset erases exactly what the last run created.
- Maintenance tools. Reorder the drawing, select all the contrast paint already there, or back one loose element.
What it does
The contrast backing (the black band behind the paint) is what makes road marking readable on light pavement. This command draws no new marking: it reads what is already in the drawing and produces the matching band.
You select in the drawing, and for every selected object:
- A curve on a road-marking layer, closed and with no width → treated as an area: the outline is offset outwards by Offset and drawn filled, on the contrast layer.
- Any other curve on a road-marking layer → treated as a line: the width becomes the original plus 2 × Offset (the backing has to show on both sides) and the result goes to the contrast layer, with the cadence resolved according to the options.
- A block → CapCad measures the bounding box of the block definition (ignoring hatches, texts and points), applies the reference's scale and rotation, offsets the box outwards by Offset and draws the filled rectangle behind it.
Objects already on a contrast layer are skipped, and objects outside the road-marking layers are not touched. A progress bar follows the two passes (lines and blocks), and a message box reports how many items were created. Anything that could not be backed is listed on the command line by handle, layer, the phase that failed and the reason — with the reminder that (handent "<handle>") finds the entity.
Polylines longer than 500 m get a linetype scale of 1.000333 so the backing's cadence does not drift out of step with the paint's — which is what the Info tab explains.
Workflow
- Draw (or already have) the road marking.
- Run
CAPCAD_MARKING_CONTRAST_BACKING. The form opens beside the drawing. - Check the Offset (28) and the Layer (30) in the fixed footer frame — they apply on every tab.
- On the Main tab, choose whether to back Lines (2), Blocks (3) or both, and how dashed lines are to be treated (6 or 7).
- On the Options tab, decide whether the backing joins a selectable group (15, 16, 18) and whether the draw order is processed (21).
- Click Apply (1). The form hides, CapCad asks for the selection and draws.
- If the result is wrong, Reset (10) erases exactly what that run created.
The form
Numbers are unique and continuous across the four tabs; the Contrast footer frame (28 to 30) shows on all of them and keeps the same numbers.
The screenshots below were captured in a Portuguese session, so the captions on them are in Portuguese. The control numbering is the same in both editions, and the tables quote the English captions.
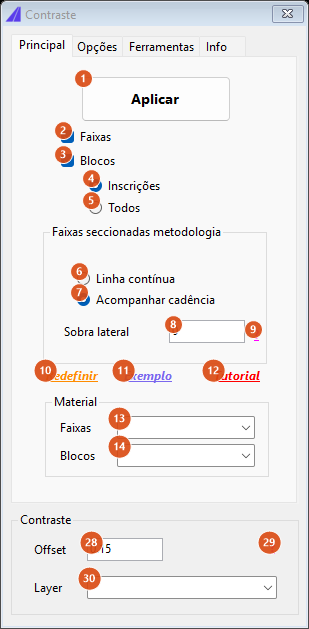
Tab 1: Main — what to back, and how.
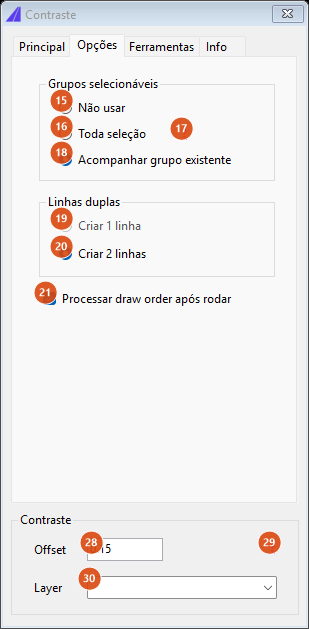
Tab 2: Options — selectable groups and draw order.
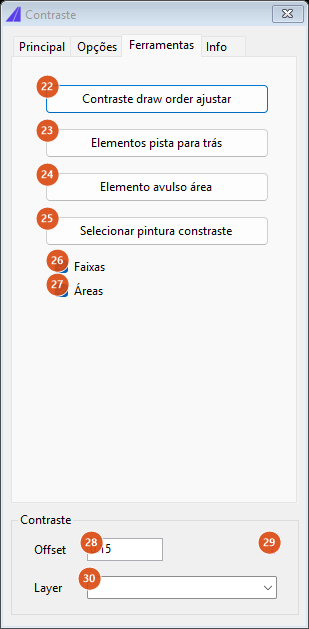
Tab 3: Tools — reorder, back a loose element, select the existing paint.
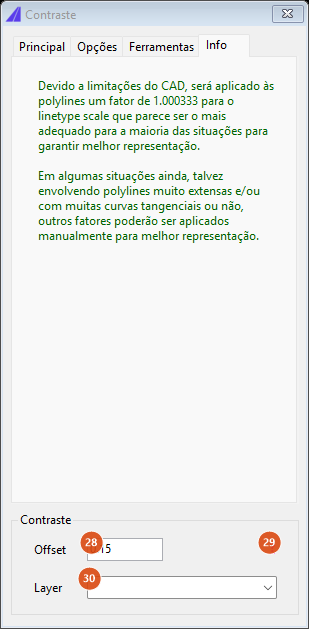
Tab 4: Info — the note about the 1.000333 factor applied to the linetype scale.
Tab 1: Main
| # | Control | What it does |
|---|---|---|
| 1 | Apply | Hides the form, asks for the selection and draws the backing. It refuses before asking for the selection if neither Lines nor Blocks is ticked ("Selecionar opção") or if the Offset is zero ("Valor de largura do contraste tem que ser maior que zero"). A negative offset is treated as zero, and so is refused too. |
| 2 | Lines | Include the curves of the selection. |
| 3 | Blocks | Include the block references. Unticking it disables 4 and 5. |
| 4 | Legends | Only the pavement-legend blocks. |
| 5 | All | Every block in the selection, legend or not. |
| 6 | Continuous line | When backing a dashed line, do not rebuild the cadence: the band comes out as one continuous line. |
| 7 | Follow the cadence | Rebuild the contrast layer with the same cadence as the source line, so the black dash tracks the white one. When the source layer does not allow that reconstruction, the backing goes to the plain contrast layer. |
| 8 | Side overhang | How much longer the black dash should be than the white one. With a non-zero value each dash is lengthened about its middle by that amount, and the black layer's cadence is recomputed by adding twice the overhang to the dash; the final width still gains twice the original width on top. When the source layer has no cadence to resize (a continuous line, for instance), the item is reported on the command line and drawn on the plain contrast layer. |
| 9 | ? | Explanatory note: "Para correto funcionamento, este método precisa que a sinalização ou seja retilínea, ou seja ajustada para uma extensão que seja múltipla do espaçamento. Uma nova linetype será automaticamente criada para correto espaçamento." (the marking must be straight, or adjusted to a length that is a whole multiple of the spacing; a new linetype is created automatically). |
| 10 | Reset | Erases what the last run created — lines and rectangles. What the Standalone area element button (24) drew is not part of that set. |
| 11 | Sample | Downloads the sample drawing sample-contrast paint.dwg from the CapCad server and opens it. The file is always downloaded again, even when it is already in the exports folder. |
| 12 | Tutorial | Opens the command's video in the browser. |
| 13 | Lines (material) | The material written into the contrast layer name for lines and areas. Empty leaves the layer without a material. The list carries three materials. |
| 14 | Blocks (material) | The same, for the block rectangles. |
Tab 2: Options
| # | Control | What it does |
|---|---|---|
| 15 | Do not use | The backing gets no group mark. |
| 16 | Whole selection | Every piece of backing created by that run gets one group mark, so CAPCAD_SELECT_GROUP reselects the whole set. |
| 17 | ? | Explanatory note: "Elementos gerados serão computados como sinalização horizontal manual em seleção única" (the generated elements count as manual road marking in a single selection). |
| 18 | Follow the existing group | Each band inherits the group of the entity that produced it, with the suffix _black. This is the default. |
| 19 | Create 1 line | Disabled; not available in this version. |
| 20 | Create 2 lines | The normal behaviour, and the only one: the Double lines frame exists only to say that this is how the backing is made. |
| 21 | Process draw order after running | On by default. After drawing, it sends the bands and rectangles to the back and then runs the same thing as the Send carriageway elements back button (23). If the CAD refuses the reordering, the drawing is kept and the problem is reported on the command line — geometry is never discarded over a cosmetic step. |
Tab 3: Tools
| # | Control | What it does |
|---|---|---|
| 22 | Adjust contrast draw order | Sends to the back everything on a layer whose name contains the contrast layer chosen in 30, then regenerates. Reports how many entities were moved. |
| 23 | Send carriageway elements back | Sends to the back, in this order, whatever is on the shoulder, carriageway, bridge, central-reserve, red road-marking and red cycleway layers — skipping the ones that do not exist. Because each layer is processed after the previous one, the last ends up at the very bottom. |
| 24 | Standalone area element | Asks for one curve, closes it if it is open, offsets it outwards by Offset, draws it filled on the line contrast layer and sends the result to the back. It is not part of the set that Reset erases. |
| 25 | Select contrast paint | Selects everything in the drawing on layers whose name starts with the contrast layer name, filtered by 26 and 27. If there is nothing, it says "Não encontrada". |
| 26 | Lines | In the filter of 25, keeps only the polylines with width. |
| 27 | Areas | Keeps the hatches and the polylines without width. With both boxes ticked the selection is the whole set, unfiltered. |
Footer (all tabs)
| # | Control | What it does |
|---|---|---|
| 28 | Offset | The half-width of the backing, in metres: how far the band shows past the paint on each side. On a line the final width is the original + 2 × Offset; on an area and on a block it is how far the outline is offset outwards. It must be greater than zero. |
| 29 | ? | Explanatory note: "Layer podem ser digitados, e serão definidos ou criados se não existirem. Se o layer não for do tipo faixa, os contrastes em linhas cadênciadas serão sempre uma linha contínua." (layer names can be typed and are created if missing; on a layer that is not a marking layer, the backing of a dashed line is always continuous). |
| 30 | Layer | The base contrast layer. The list carries the generic black layer, the shoulder and carriageway layers and the red, blue and orange road-marking layers, under the real names the active layer catalogue gives them; you can also type another name. This is also the layer used as the default by the "is it already backed?" test and by the selection and draw-order tools. |
How the options combine
The two figures below show what Offset does in the two cases, with the default value 0.15.
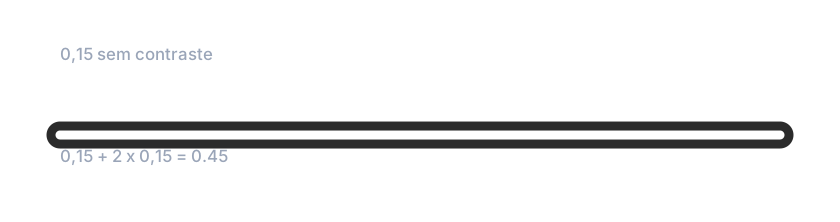
Open line: above, the 0.15 white line with no backing; below, the same line over a black band of 0.15 + 2 × 0.15 = 0.45. The backing shows 0.15 on each side.
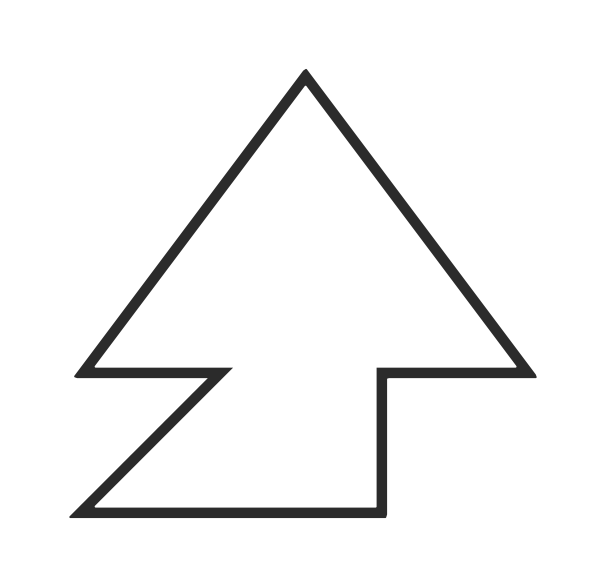
Closed area (a legend): the outline is offset 0.15 outwards and drawn filled in black; the white paint sits on top.
Remembered between sessions
Every control on the form is saved when it closes and restored when it opens — both option tabs and the footer frame. That includes the offset, the layer, the materials, the side overhang and the group and draw-order choices.
Notes
- Apply works in two stages: the lines are computed first, the blocks are drawn first, and the lines are drawn last. That is what leaves the line bands above the block rectangles before the draw-order pass.
- The command walks the selection backwards, for lines as well as for blocks.
- A dynamic block without the
Visibility1parameter is skipped, and the reason is reported. The bounding box is read from the reference itself, with the visible entities only. - A failure in the draw-order pass does not undo the backing: the drawing is committed and the error goes to the command line.
- Some texts are Portuguese in every language. The status and refusal texts quoted above, the three explanatory notes (9, 17, 29) and the Info tab are shown in Portuguese even in an English session; the tab, button and check-box captions are translated.