| Commands | CAPCAD_DEVICE_INSERT (the form) · -CAPCAD_DEVICE_INSERT (command line) |
| Shortcuts | BV and II |
| Ribbon | CapCad tab › Roadway panel › Library split button › Blocks Library; the same split button carries Road Library Command Line for the command-line version |
| Category | Horizontal (CAPCAD_DEVICE_INSERT) · Command Line Command Versions (-CAPCAD_DEVICE_INSERT) |
| Form | ItemInsertForm "Dwg Library". Modeless: the drawing stays live while it is open, and it stays up between one insertion and the next |
| Hosts | AutoCAD, BricsCAD, GstarCAD, ZWCAD, ARES Commander |
| Also | CAPCAD_DEVICE_TRAFFIC_LIGHT opens the same form with the traffic-signal category already selected; the + button of the Divider opens it with Apenas carregar (load only) ticked |
The CapCad library is not a folder of blocks: it is a catalogue that already knows how to measure from the alignment. With the CAD's INSERT you find the file, insert it and then correct the position; here you choose the offset and the rotation before the click, and the item lands in the right place first time.
- A catalogue with search and preview. The library folders become categories, the
.dwgbecomes an item, and the drawing's thumbnail appears before you insert. - Measured from the alignment, not from the screen. The clicked point is projected onto the alignment and the item is offset perpendicular to it, by the value you type.
- Rotation comes from the road. The item can be born aligned with the alignment's tangent instead of horizontal in the drawing.
- Move it forward or back without clicking again. The shift moves the item along the alignment, with a step you pick on the spin buttons.
- Loading only is an option too. It brings the block definition into the drawing without inserting anything — which is how other CapCad commands get the blocks they are going to use.
- The same tool in five CADs. AutoCAD, BricsCAD, GstarCAD, ZWCAD and ARES Commander.
What it does
The command opens the project's block library and inserts one of its items into the drawing.
The catalogue is built from two project roots — the library folder and the pavement-legend folder. Each sub-folder of those roots becomes a Categoria (category), and each .dwg file inside it becomes an Item. There is no list built into the program: what you see is what is in the project's folders.
Once an item is chosen, the form decides three things before the insertion:
- Where the point comes from — a clicked point projected onto the alignment, the clicked point as it is, the midpoint of a selected line, or the endpoint of a curve.
- Where it is pushed to — the Offset moves it perpendicular to the alignment and the Deslocamento (shift) moves the station forward or back along it.
- How it is rotated — aligned with the alignment's tangent or horizontal, plus the extra rotation you typed.
Only then is the block loaded from the library (if it is not already in the drawing) and inserted, with the chosen scale. The command line confirms: Inserted. (handle 2A7F).
The form stays open between insertions: it hides during the clicks and comes back afterwards.
Workflow
- Run
CAPCAD_DEVICE_INSERT(or typeBV). The "Dwg Library" form opens beside the drawing. - Choose the Categoria (5) and the Item (8). Use the search box (6) to filter by name and the 2D / 3D / All buttons (9 to 11) to separate the variants. The thumbnail appears on the right.
- Choose the insertion mode in the Inserção frame (20 to 30).
- Set Offset (33), Deslocamento (40), Rotation (44) and Scale (47). The pt button (36) measures the offset by clicking a point in the drawing.
- Click Inserir em eixo ativo (16) — or double-click the item in the list. The form hides; the command line asks for the alignment and then for the point.
- Repeat for the next item: the form stays open and the values stay where they were.
The form
Numbers are the same in both pictures on this page. The form has two tabs: Main (the catalogue and the insertion options) and Options/Utils (shortcuts to related commands and library tools).
The form is only half translated: its title and several captions are already in English (Dwg Library, Main, Options/Utils, Step, Rotation, Scale, Reset, Update, Accept, Read-only, In block and the second tab's buttons), while the rest is Portuguese in every language. Portuguese captions are quoted below as the software shows them, with a gloss. The screenshots were captured in a Portuguese session; the control numbering is the same in both editions.
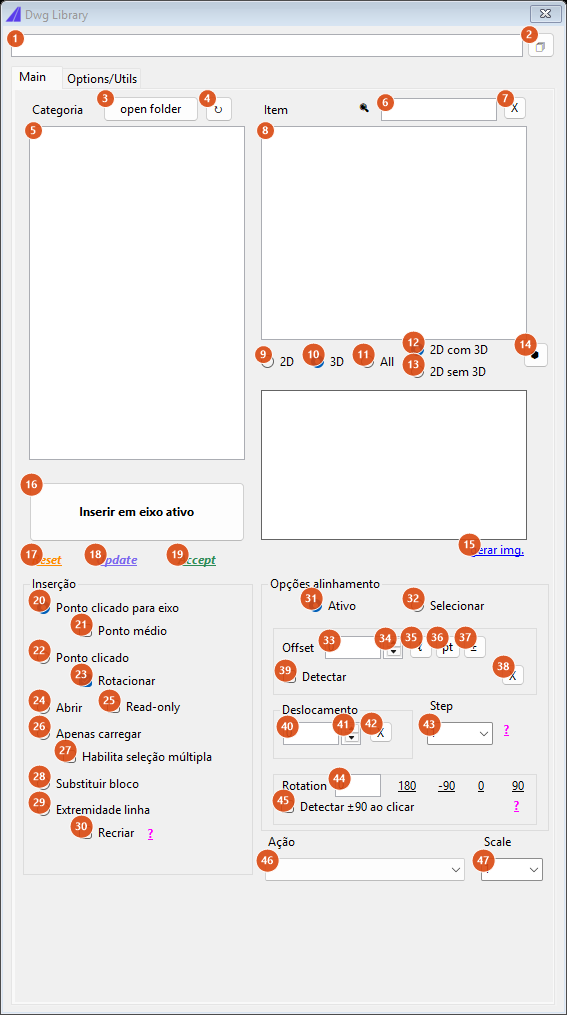
Tab "Main". The lists are empty outside the CAD: they are filled from the folders of the active project's library.
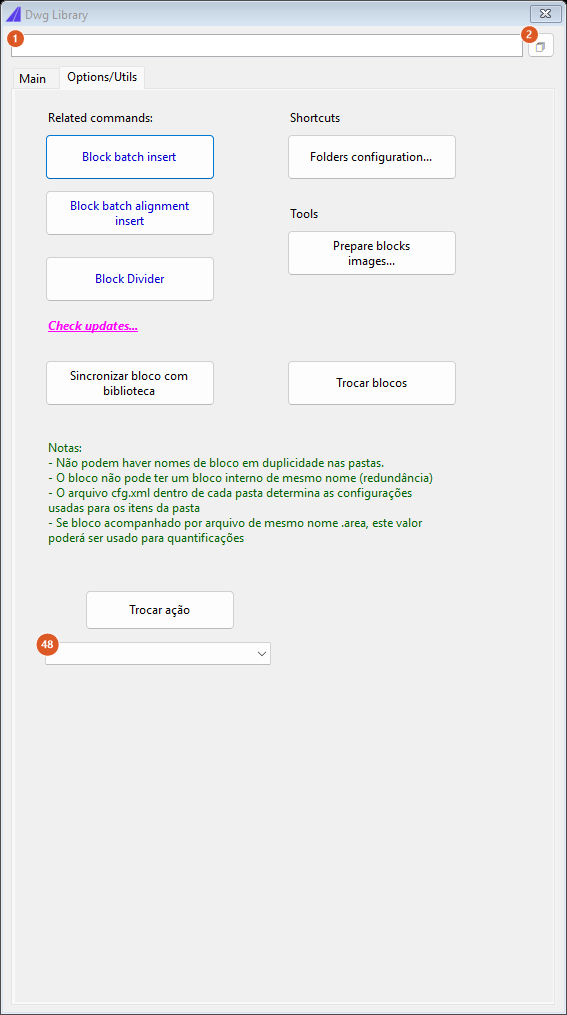
Tab "Options/Utils": shortcuts to related commands, library tools and the action box (48).
Top (both tabs)
| # | Control | What it does |
|---|---|---|
| 1 | item name | Shows the name of the item selected in the list. Whatever is written here is what gets inserted when nothing is selected in 8, so you can type a block name straight in. |
| 2 | 🗇 | Copies the contents of 1 to the clipboard. |
Tab 1: Main. Catalogue
| # | Control | What it does |
|---|---|---|
| 3 | open folder | Opens the selected category's folder in Explorer. |
| 4 | ↻ | Re-reads the folders and rebuilds the category list, keeping the selection. |
| 5 | Categoria (category) | The sub-folders of the project's two library roots, in alphabetical order. Selecting one loads that folder's .dwg files into the item list. |
| 6 | search box | Filters the item list to the names that contain the typed text, case-insensitively. |
| 7 | X | Clears the search. |
| 8 | Item | The .dwg files of the category, without the extension. Selecting one writes the name into 1 and loads the thumbnail; double-clicking inserts. |
| 9, 10, 11 | 2D, 3D, All | Filter the list on the -3D name suffix: 2D hides the names ending in -3D, 3D shows only those, All shows everything. The default is 3D, so a library with no 3D twins opens with an empty item list — switch to All. |
| 12, 13 | 2D com 3D, 2D sem 3D (2D with / without 3D) | Not available in this version. |
| 14 | ⬢ | Selects the 3D filter (10). |
| 15 | gerar img. (generate image) | Not available in this version; a dialog says so. |
The white box above the link is the preview: the thumbnail stored inside the item's own .dwg.
Tab 1: Main. Insert and links
| # | Control | What it does |
|---|---|---|
| 16 | Inserir em eixo ativo (insert on the active alignment) | Performs the insertion. The form hides, the alignment is asked for, then the point (according to the mode). With no item chosen the title becomes Dwg Library — pick an item first. |
| 17 | Reset | Zeroes the Offset box (33). It does not undo insertions. |
| 18 | Update | Re-reads the library folders — the same as 4. It redraws nothing in the CAD. |
| 19 | Accept | The same as 16: performs the insertion. |
Tab 1: Main. Inserção (insertion) frame
| # | Control | What it does |
|---|---|---|
| 20 | Ponto clicado para eixo (clicked point onto the alignment) | Default. Asks for a point (Insertion / reference point:), projects it onto the alignment and uses the resulting station — this is the mode in which Deslocamento (40) and Offset (33) make sense. |
| 21 | Ponto médio (midpoint) | With 20 selected, it changes the prompt: instead of a point, the command asks for a line (Select a line (its midpoint is used):) and uses its middle. |
| 22 | Ponto clicado (clicked point) | The clicked point is used as it is, without projecting onto the alignment. The offset is still applied if there is an alignment. |
| 23 | Rotacionar (rotate) | On by default. On, the item is born aligned with the tangent of the alignment at the station; off, it is born horizontal in the drawing (0°). In both cases the rotation from 44 is added. |
| 24 | Abrir (open) | Does not insert: it opens the item's .dwg in the CAD (._OPEN). With no item chosen, or with the file missing: pick an item first. |
| 25 | Read-only | Not available in this version: the file is opened normally. |
| 26 | Apenas carregar (load only) | Brings the block definition into the drawing without inserting anything. This is how the Divider's + button opens this form. |
| 27 | Habilita seleção múltipla (enable multiple selection) | Not available in this version. |
| 28 | Substituir bloco (replace block) | Not available in this version; a dialog says so. |
| 29 | Extremidade linha (line endpoint) | Asks for a curve (Select a curve (its endpoint is used):) and uses its last vertex as the point. |
| 30 | Recriar (recreate) | Not available in this version. The help text beside it reads: "Recria o bloco a partir da biblioteca antes de inserir, em vez de reutilizar a definição já presente no desenho." (recreate the block from the library before inserting, instead of reusing the definition already in the drawing). |
Tab 1: Main. Opções alinhamento (alignment options) frame
| # | Control | What it does |
|---|---|---|
| 31, 32 | Ativo, Selecionar (active, select) | Not used by this version: the alignment is always asked for at insertion time (Select the alignment (or Esc to place freely):). Ticking Selecionar writes that into the form's title. If you refuse the selection with Esc, the item is inserted with no alignment: no offset, no shift and no rotation from the tangent. |
| 33 | Offset | Perpendicular offset from the alignment, at the resolved station. |
| 34 | Offset spin button | Writes the counter's value into box 33. The step is the one chosen in Step (43). |
| 35 | ℓ | Not available in this version. |
| 36 | pt | Measures the offset on screen: asks for a point (Point for the offset:) and for the alignment, projects the point onto the alignment and writes the distance into box 33, negative when the point fell on the left of the alignment. |
| 37 | ± | Flips the sign of the value in 33. |
| 38 | X | Zeroes 33. |
| 39 | Detectar (detect) | Not available in this version. |
| 40 | Deslocamento (shift) | Moves the station forward (positive) or back (negative) along the alignment, before the offset is applied. It only counts in Ponto clicado para eixo mode (20). |
| 41 | Shift spin button | Writes the counter's value into box 40, with the step from Step (43). |
| 42 | X | Zeroes 40. |
| 43 | Step | 0.1, 0.5, 1 (default), 5 or 10. Sets the step of the spin buttons 34 and 41. The ? beside it explains: "Passo dos botões de incremento do Offset e do Deslocamento." (the step of the Offset and Shift spin buttons). |
| 44 | Rotation | Extra rotation in degrees, added to whatever 23 decided. The four links beside it (180, −90, 0, 90) write those values into the box. |
| 45 | Detectar ±90 ao clicar (detect ±90 on click) | Not available in this version. The ? beside it explains the intention: "Ao clicar, decide automaticamente entre +90 e −90 conforme o lado do eixo em que o ponto caiu." (on the click, choose between +90 and −90 according to which side of the alignment the point fell on). |
Tab 1: Main. Action and scale
| # | Control | What it does |
|---|---|---|
| 46 | Ação (action) | Not available in this version: the item is inserted with no action suffix on the layer and with its representation unchanged. Use the action commands after inserting. |
| 47 | Scale | 0.5, 1 (default), 2, 5 or 10. Applied in X and Y (and in Z, with the X value). A non-numeric or zero value becomes 1. |
Tab 2: Options/Utils
The buttons on this tab get no number because the form gives them no internal name.
| Button | What it does |
|---|---|
| Block batch insert | Runs CAPCAD_BATCH_BLOCK_GRID, the grid batch insertion of blocks. |
| Block batch alignment insert | Runs CAPCAD_BATCH_DEVICE, the batch insertion of road items along the alignment. |
| Block Divider | Runs CAPCAD_DIVIDER. |
| Check updates... | Re-reads the library folders (the same as 4). |
| Sincronizar bloco com biblioteca (sync block with library) | Not available in this version. |
| Folders configuration... | Not available in this version. |
| Prepare blocks images... | Not available in this version. |
| Trocar blocos (swap blocks) | Runs CAPCAD_BLOCK_TOOLS, which carries the block-definition swap. |
| Trocar ação (swap action) | Not available in this version: the dialog points at the action commands as the alternative. |
| # | Control | What it does |
|---|---|---|
| 48 | action box | Not available in this version. |
The green notes in the middle of the tab are the form's own text, and they are the rules for building a library: there must be no duplicate block names across the folders; a block must not contain an inner block of the same name; the cfg.xml file inside each folder sets the configuration of that folder's items; and an .area file with the same name beside the block supplies the value to use in quantity take-offs.
The command-line version
-CAPCAD_DEVICE_INSERT performs the same insertion without a form, in four questions:
Block name:— the block name. The last name inserted successfully is offered between<>; Enter accepts the suggestion.Point (or type a station):— the reference point.Lado offset or [Left/Right/Detect]:— which side to offset to. Enter = Detect.Valor numérico para afastamento do eixo ou [Detectar]:— the offset. Empty, or any answer beginning withD, means detect: the offset becomes the distance from the clicked point itself to the alignment (and, with the side on Detect, the side comes from there too).
The alignment is asked for right after the point. In this version the rotation is always orthogonal to the alignment, and the station comes from the clicked point projected onto it. With no alignment: No alignment — cannot place.
How the options combine
The figures below were produced by the command's own engine on an alignment with a curve, with the clicked point always in the same place (the grey dot). Each arrow is the item, in its real position and rotation.
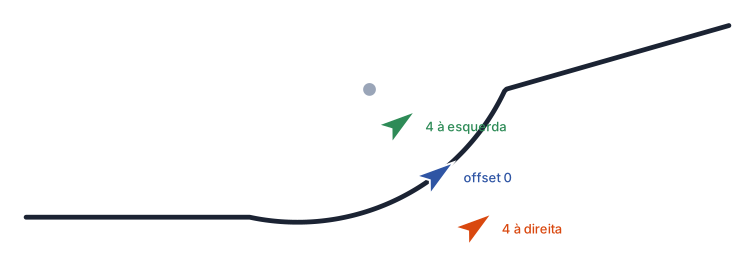
Offset 0, 4 to the right and 4 to the left, in "clicked point onto the alignment" mode: the clicked point drops to the alignment and the item is offset perpendicular to the tangent at that station.
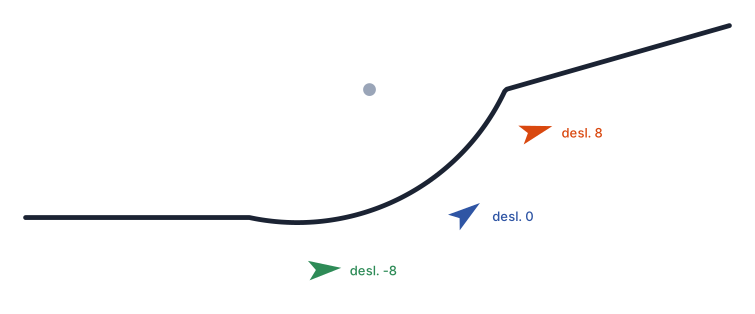
Shift 0, +8 and −8, with offset 3: the station is moved forward or back along the alignment before the offset is applied, and the rotation follows the tangent at the new point.
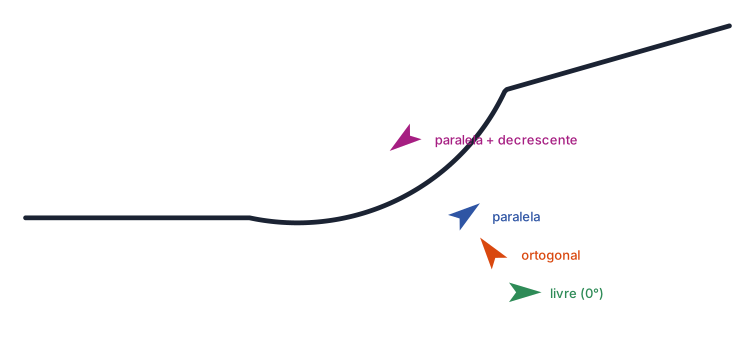
The rotations. "paralela" is what the form gives with Rotacionar on; "livre (0°)" is what it gives with Rotacionar off. "ortogonal" is what the command-line version uses.
Remembered between sessions
Almost everything that is not a list. When the form closes, the check boxes, radio buttons, text boxes and combo boxes are written to the user preferences and restored the next time it opens: the insertion mode, Rotacionar, the 2D/3D/All filters, the search text, Offset, Shift, Rotation, Step, Action, Scale and the item name at the top. The category and item lists are not saved: they are rebuilt from the project's folders on every opening.
The command-line version separately keeps the last block name inserted successfully.
Notes
- A negative offset lands on the same side as a positive one. An offset of −4 lands in the same place as +4, so the ± button (37) and the pt measurement (36), which writes negative values for the left side, do not take the item to the other side of the alignment. To place it there, select the alignment the other way round, or move the block afterwards.
- The item list opens filtered to 3D. The default filter is 3D, which only shows names ending in
-3D. In a library with no three-dimensional twins the list looks empty; click All (11). - The alignment is always asked for. The Ativo / Selecionar buttons (31, 32) are not used by this version: the command asks for the alignment at every insertion. If you do not want to measure from an alignment, answer with Esc — the item is then inserted at the clicked point, with no offset and no rotation from the tangent.
- The layer is not changed. The item is inserted on the drawing's current layer. Set the layer before inserting, or use the action commands afterwards.
- A block the library cannot find. The insertion fails silently in the drawing and the command line writes
Block <name> could not be inserted.(command-line version) orHost failed to insert.(form). Check that the.dwgis in one of the project's library folders. - Not available in this version: 2D com 3D / 2D sem 3D (12, 13), gerar img. (15), Read-only (25), Habilita seleção múltipla (27), Substituir bloco (28), Recriar (30), ℓ (35), Detectar (39), Detectar ±90 ao clicar (45), Ação (46, 48) and, on the Options/Utils tab, Sincronizar bloco com biblioteca, Folders configuration..., Prepare blocks images... and Trocar ação.
- The shortcuts
BVandIIare defined in CapCad'sacad.pgp. If they do not open the form in your installation, type the full command name.