| Commands | CAPCAD_ROAD_SET (the form), -CAPCAD_ROAD_SET (command line), CAPCAD_ROAD_SET_COMPOSITOR (the definition compositor) |
| Shortcuts | DC for CAPCAD_ROAD_SET. The other two have no shortcut in acad.pgp |
| Ribbon | CapCad tab › Roadway panel › Templates split button: the main button is Linear Set (CAPCAD_ROAD_SET), and the list carries Linear Set: Compositor (CAPCAD_ROAD_SET_COMPOSITOR) and Linear Set: Command Line (-CAPCAD_ROAD_SET) |
| Category | Horizontal (CAPCAD_ROAD_SET, CAPCAD_ROAD_SET_COMPOSITOR) · Command Line Command Versions (-CAPCAD_ROAD_SET) |
| Forms | CAPCAD_ROAD_SET opens DesenhaConjuntoForm — Draw Set, modeless, single instance. CAPCAD_ROAD_SET_COMPOSITOR opens CompositorForm — Linear Set: Compositor, modeless, single instance. -CAPCAD_ROAD_SET has no form |
| Hosts | CAPCAD_ROAD_SET: AutoCAD, BricsCAD, GstarCAD, ZWCAD, ARES Commander. -CAPCAD_ROAD_SET and CAPCAD_ROAD_SET_COMPOSITOR: AutoCAD (in ARES running the compositor shows a notice saying it is not available in this version) |
| Also | CAPCAD_ROAD_SET opens exactly the same form as the Marking Strip — the only difference is that it does not pre-select the road-marking folder. The Draw cycle lane along the alignment button of Cycle Lane opens it too, asking for a CICLOVIA folder |
A type section is a line of text, not a block. A road's cross section — edge lines, lane lines, contrast backing, studs, central reserve — fits in half a dozen lines of definition; applying it to an alignment draws all of it at once, and changing one number redraws all of it again.
- The same definition serves any alignment. It is parametric:
larguraTotal,largura,afastamentoBordoare variables, not measurements frozen into a block. - Three ways to run it. The form, to tune it live; the command line, for a script or a macro; the Compositor, to write the definition without memorising the grammar.
- The grammar becomes fields. In the Compositor you pick colour, cadence, device, offset and width from combos, and the line
F, SINA_HOR_AM_4x8_LFO2, 0.15, 0.10comes out ready. - Testing is one key. Test in dwg draws a 3000-unit straight and puts the definition on a 200-unit stretch of it — with Dynamic, on every keystroke.
- A definition is a file. Save it in the project's
DesenhaConjuntofolder and it shows up in the Draw Set's Local library, beside the built-in definitions. - A picture becomes a definition. The AI button reads a photo or a clipping of a norm and returns a draft definition in CapScript.
What it does
The three commands all revolve around the same thing: a linear-set definition (the dctext, also called CapScript), the short text describing what should be drawn along a path.
;@description Single carriageway, edge lines and a double centre line
var larguraTotal = 7
var largura = 0.10
F, SINA_HOR_AM_LFO3, -0.15, largura
F, SINA_HOR_AM_LFO3,  0.15, largura
F, SINA_HOR_BR_LBO,  larguraTotal/2 - 0.1, largura
F, SINA_HOR_BR_LBO, -larguraTotal/2 + 0.1, largura
CAPCAD_ROAD_SET(DC) applies the definition: it opens the Draw Set, you choose the definition, choose the base line in the drawing and the command draws every line on its layers.-CAPCAD_ROAD_SETdoes the same without a form: you give the path of a file or a URL, click two points, and the stretch of the alignment between them receives the definition.CAPCAD_ROAD_SET_COMPOSITORwrites the definition: an editor with five tabs — one per line type of the grammar — plus a button that tests it in a proof drawing.
How the definition is read, the grammar of the SINA_HOR_… layers (and how those names are written in an English session) and the offset conventions are documented in detail on the Marking Strip page, which describes the same form control by control. This page covers what is specific to these three commands.
CAPCAD_ROAD_SET and the Marking Strip are the same form
DesenhaConjuntoForm is single-instance per session. CAPCAD_MARKING_STRIP opens it with the road-marking folder already selected in the folder list (ROAD MARKING in an English session). CAPCAD_ROAD_SET opens it with no folder pre-selected, with the list as it was left last time. Beyond that there is no difference: the same input modes, the same offset, the same Apply.
That is why the command is called linear set and not marking: nothing in the library forces a definition to hold only marking lines. It can also hold signs (P) and, in the full grammar, blocks (B) and transverse elements (T) — see the limits in Notes.
The sign of the offset
Three places in this family take an offset, and they do not use the same convention. Getting the sign wrong throws the marking to the other side of the carriageway, so it is worth memorising:
| Where | Positive goes | What it moves |
|---|---|---|
The third field of an F statement (the definition) |
to the right of the walking direction | that line only |
| The Offset box of the Draw Set | to the left of the walking direction | the whole base line, before the definition is drawn |
| The extra offset box (12) of the Compositor | to the left of the walking direction | the test's base line, before the definition is drawn |
The walking direction is the vertex order of the base line; Invert, in the Draw Set, reverses that order and with it every side. A non-zero offset inside an F statement is measured to the near edge of the stripe, not to its centre: half the width is added to the value you typed.
Workflow
Applying an existing definition
- Run
CAPCAD_ROAD_SET(or typeDC). The Draw Set form opens beside the drawing. - Choose the source (CapCloud, Local or All countries), the folder and the definition. The variables appear in the right-hand panel.
- Adjust the variables —
larguraTotalis the commonest, because it is the one that places the edge lines. - Choose how the base line is obtained: a stretch of the alignment between two points, the selected entities, a polyline drawn on the spot, or two edge points on the Transversal tab.
- Click Apply (select base). The form hides, the CAD asks for the base, and the lines are drawn.
- Landed on the wrong side? Invert. Not wide enough? Change the variable and Update. Not right at all? Reset erases the preview.
Running it from the command line
- Have a project alignment loaded —
-CAPCAD_ROAD_SETworks only on the active alignment. With none, it answersSem eixo ativo.and stops. - Run
-CAPCAD_ROAD_SET. It asksEntre com caminho do DC texto, URL ou arquivo local:— paste the path of a.txtfile or anhttp(s)address. Quotes around the path are accepted and removed. - Click the first and the second point. They are projected onto the alignment and the stretch between the two stations is the base line.
- The definition is drawn over the whole stretch and the command line closes with
DC processado., preceded by warnings for any statement that could not be drawn.
Composing a new definition
- Run
CAPCAD_ROAD_SET_COMPOSITOR. The form opens with an empty definition, in text mode. - Start from a preset if there is a similar one: choose one in 26. Or click List (3) to work line by line.
- Fill in the tab of the line type you want — Faixa for a marking line, Placa for a sign, Var for a variable — and click Add definition (9). The composed line goes to the end of the definition.
- To correct a line, show the list (3) and click it: the Compositor opens the right tab already filled in, and button 9 changes to Update definition.
- Click Test in dwg (13) and confirm the warning. Careful: the test erases everything in model space. Use a scratch drawing.
- Save with Save (11 or 27), inside the project's
DesenhaConjuntofolder, so the definition shows up in the Draw Set's Local library.
The Compositor form
Numbers are the same in every picture in this section. The right half (1 to 28) does not change from tab to tab; the left half (29 to 62) is the selected tab.
The screenshots below were captured in a Portuguese session, so the captions on them are in Portuguese. The control numbering is the same in both editions, and the tables quote the English captions where there are any — the five tab names (Faixa, Placa, Bloco, Transv, Var) and a handful of labels are not translated in any language (see Notes).
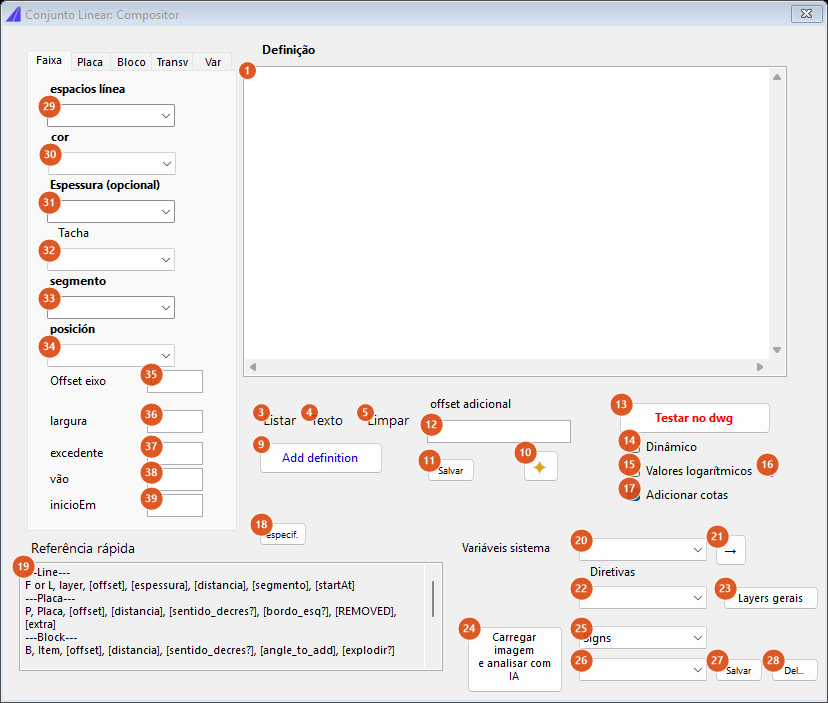
As the command opens it: tab "Faixa", empty definition, text mode.
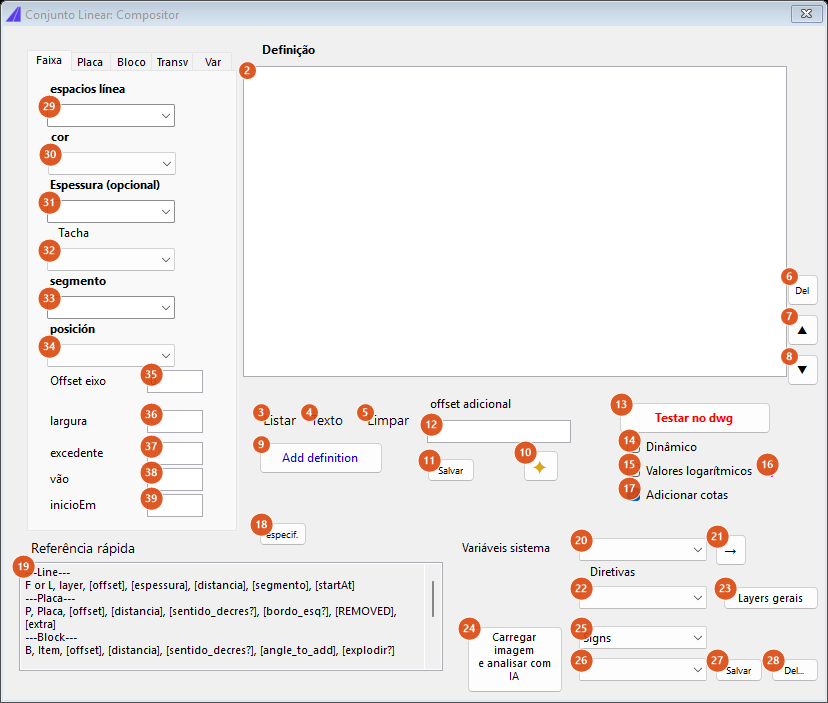
After clicking "List" (3): the text box (1) gives way to the row list (2) and the buttons "Del" (6), ▲ (7) and ▼ (8) appear. Clicking a row in the list opens the matching tab, already filled in.
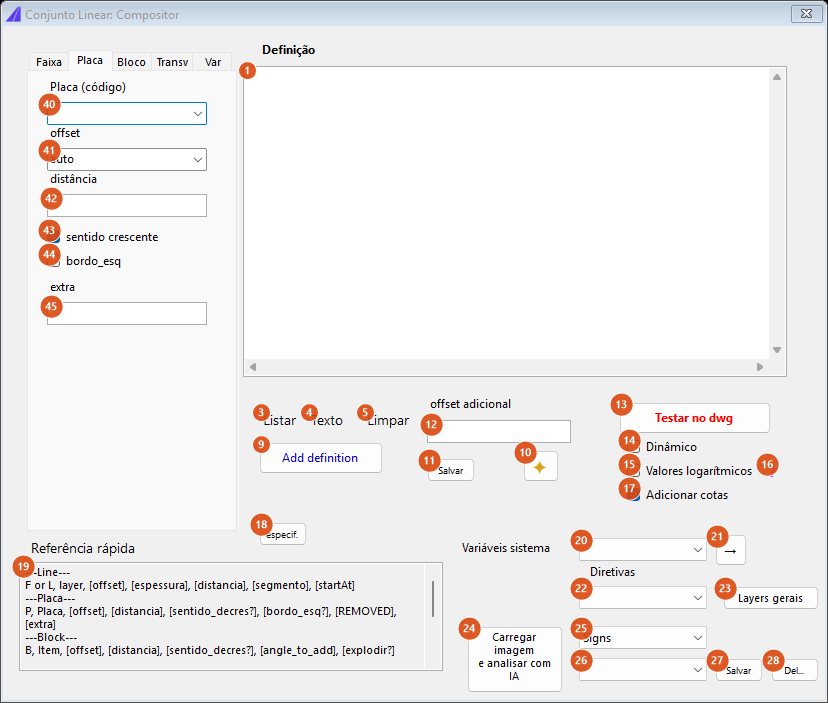
Tab "Placa": composes a P line.
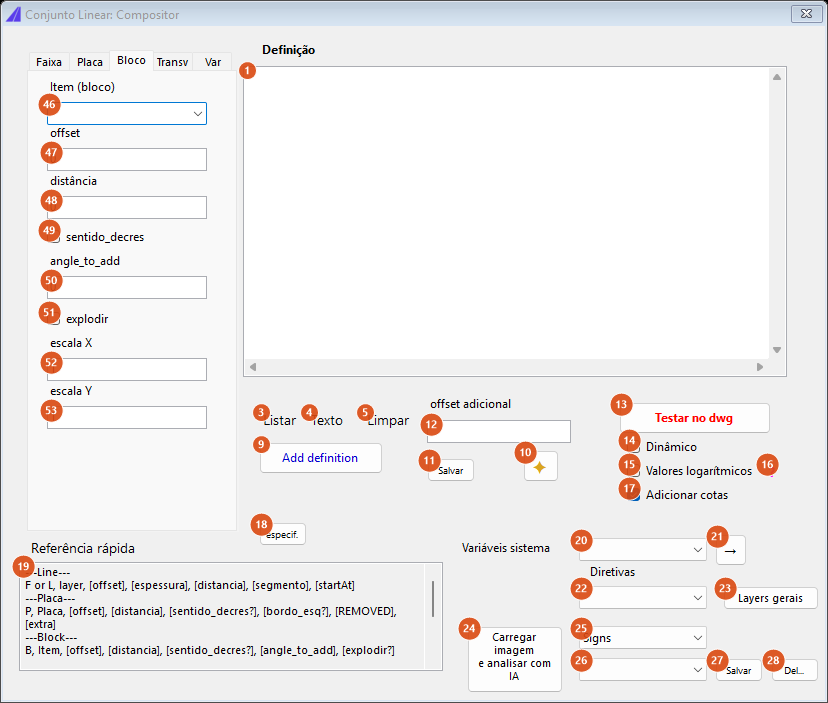
Tab "Bloco": composes a B line.
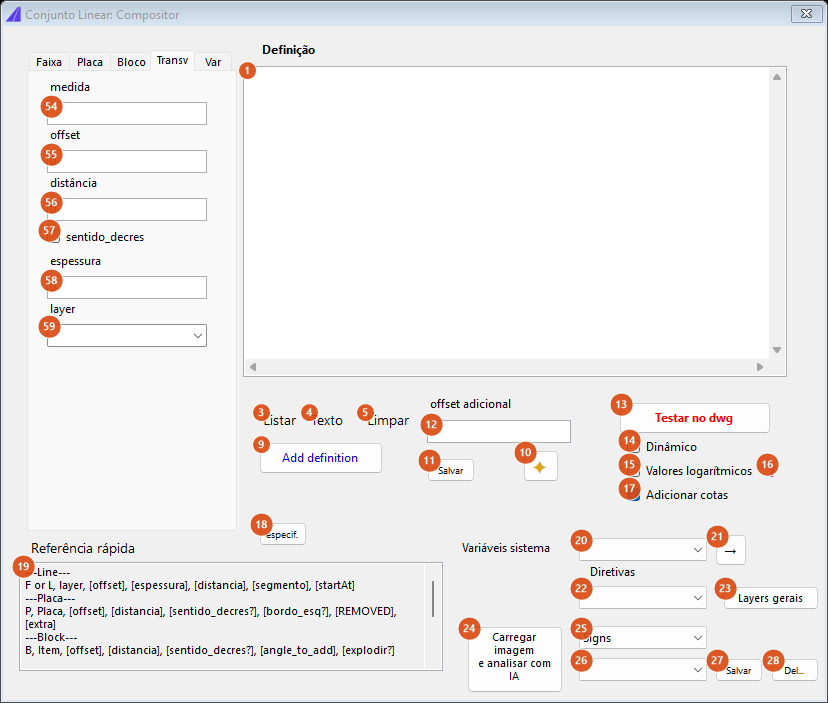
Tab "Transv": composes a T line.
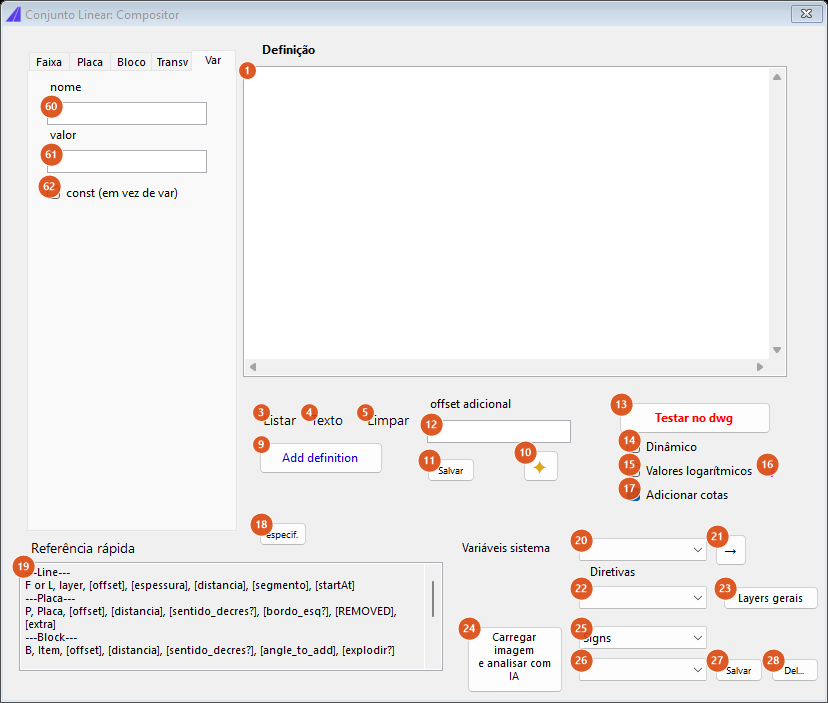
Tab "Var": composes a var or const declaration.
The definition
| # | Control | What it does |
|---|---|---|
| 1 | definition box | The dctext as free text. This is the mode the form opens in. With Dynamic (14) on, every keystroke reschedules the test in the drawing 0.4 s after you stop typing. |
| 2 | definition list | The same definition, one row per line. Selecting a row sends it to the tab of its type (F/L → Faixa, P → Placa, B → Bloco, T → Transv, var/const → Var) and button 9 becomes Update definition. Comments, directives and metadata open no tab. |
| 3 | List | Switches to list mode. |
| 4 | Text | Switches to text mode. |
| 5 | Clear | Empties the definition — both views at once, without confirmation. |
| 6 | Del | Removes the selected row. It only exists in list mode. |
| 7, 8 | ▲ and ▼ | Swap the selected row with the one above or below. They only exist in list mode. |
| 9 | Add definition / Update definition | Composes the line of the tab in front and appends it to the definition — or replaces the line being edited. A tab without its required field (layer on Faixa, code on Placa, block on Bloco, measure on Transv, name on Var) produces no line and the click does nothing. |
| 10 | ✦ | New: abandons the line being edited, clears the five tabs and puts button 9 back to Add definition. |
| 11 | Save | Saves the definition to a file (.txt or .dctext), opening in the project's DesenhaConjunto folder. After saving, the file joins the preset list (26). The file is written in cp1252. |
Testing in the drawing
| # | Control | What it does |
|---|---|---|
| 12 | extra offset | A lateral offset applied to the test's base line before the definition is drawn — positive to the left of the walking direction. It only applies to button 13; the dynamic test always uses zero. |
| 13 | Test in dwg | Asks for confirmation and then: erases every entity in model space, draws a 3000-unit straight at 45° from 0,0 on the active style's auxiliary layer, marks with two points the 200-unit stretch in the middle of it (half ± 100), draws the definition on that stretch, and frames the straight if it does not fit on screen. The window title shows the result. |
| 14 | Dynamic | Redoes the test on every edit of the definition, 0.4 s after the last keystroke, with no extra offset and no dimensions. Because every pass erases the model, the confirmation is asked once per session when you tick the box; refusing unticks it. |
| 15 | Logarithic values | Not available in this version. |
| 16 | ? | Explains that 15 is reserved. |
| 17 | Add dimensions | On by default. Not available in this version: the window title adds dimensions not ported when the box is ticked and the test runs from button 13. |
Reference and help
| # | Control | What it does |
|---|---|---|
| 18 | specs | Opens the CapScript specification in a text viewer. |
| 19 | Quick reference | Read-only. The field order of each line type and the list of reserved words and directives; it calls the 4th and 5th fields of an F line distancia and segmento (boxes 37 and 38). |
| 20 | System variables | linearset.length and linearset.width — the values worked out at drawing time. |
| 21 | → | Inserts the variable chosen in 20 at the cursor in the definition box (switching to text mode if needed). |
| 22 | Directives | Inserts the chosen directive as the first line of the definition, once only. The only one on the list is pontual, which marks the definition as point-based rather than linear. |
| 23 | Layers general | Runs CAPCAD_LAYER_ASSISTANT_GENERAL, the layer assistant, to check or create the layers the definition names. |
Image and AI
| # | Control | What it does |
|---|---|---|
| 24 | Load image and AI analyze [Beta] | Asks for a .jpg / .png file (opening in the Samples\capscript_images_ai\ folder), writes Thinking... into the definition box and sends the image to the model with the prompt of the mode chosen in 25. The answer replaces the whole definition. With no answer, the definition goes back to empty and the error is shown. |
| 25 | AI mode | Signs (default) uses the full prompt; GenericSigns uses the generic one. Both prompts are embedded in CapCad. |
Presets
| # | Control | What it does |
|---|---|---|
| 26 | presets | Seven fixed names — Faixa azul folga 0.05, Faixa azul folga 0.1, Simple, Doble contínua, Doble mixta, Bordes, Ciclovía — followed by every file in the project's DesenhaConjunto folder that is at most 1000 bytes and has no b, or p, line (the files appear by full path). Choosing one replaces the current definition. Simple has no body: choosing it empties the definition. |
| 27 | Save | The same as 11. |
| 28 | Del... | Deletes the selected preset's file, with confirmation. The seven fixed names cannot be deleted. |
Faixa tab — the F line
The tab builds the layer name from the combos and writes F, <layer>, <offset>, <width>[, <surplus>][, <gap>][, <startAt>].
| # | Control | What it does |
|---|---|---|
| 29 | espacios línea (cadence) | The line's cadence: continuo (no token in the layer) or a LxG pair — 0.5x1, 1x1, 1.5x1.5, 1x2, 1x3, 2x2, 2x4, 2x6, 3x6, 3x9, 4x4, 4x8, 4x12. The label is in Spanish; it is the cadence box. |
| 30 | color | Yellow, white, black, red, green, blue → the layer's AM, BR, PR, VM, VD, AZ tokens (the list itself is in Portuguese). |
| 31 | Width (optional) | 0.10, 0.15, 0.20. Used as the line's width only when box 36 is empty; it never enters the layer name. |
| 32 | Road stud (device) | tacha (TA), tachao (TO), balizador (BA), or sem dispositivos (no devices). Choosing sem dispositivos disables 33 and 34. |
| 33 | segment (device cadence) | The spacing of the devices along the line: 1, 2, 3, 4, 5, 6, 8, 10 or 12. With an LxG cadence it comes out _2x4TA; with no cadence it comes out _CTA4 (a continuous line with spaced devices); with a numeric cadence it comes out _TA4. |
| 34 | posición (device side) | esq, dir, ambas, centro (left, right, both, centre). Not available in this version: the side does not enter the layer name. The label is in Spanish. |
| 35 | Alignment offset | The statement's third field: the line's offset from the base, positive to the right of the walking direction. 0 by default. It accepts expressions using the variables declared on the Var tab. |
| 36 | width | The line's width. Empty, the value from 31 is used; if both are empty, it comes out 0. |
| 37 | surplus | Fifth field. Written only when filled in (or when 38 or 39 are). It is not drawn in this version — see Notes. |
| 38 | gap | Sixth field. Same caveat as 37. |
| 39 | startAt | Seventh field, the station at which the line starts. Same caveat as 37. |
Placa tab — the P line
| # | Control | What it does |
|---|---|---|
| 40 | Placa (código) (sign code) | The sign's code. The list is pre-filled with the codes of the Brazilian sign catalogue (listed on the Portuguese page) plus seven generic SIGN_1…SIGN_7, but the field is typable: any code in your own library works. With no code, nothing is composed. |
| 41 | offset | auto (default), central or rente (flush) — or a number. auto leaves the offset to be decided automatically. |
| 42 | distance | The station at which the sign goes in, measured from the end of the stretch. A leading - anchors it at the start of the stretch (the -0 idiom). Empty becomes 0. |
| 43 | sentido crescente (increasing direction) | Ticked by default. The line's fifth field. |
| 44 | bordo_esq (left edge) | Places the sign from the left edge. |
| 45 | extra | A free field at the end of the line. When there is an extra without bordo_esq, the line comes out with two empty fields between them (P, R-1, auto, 0, True, , , text) — that is how the grammar numbers the positions. |
Bloco tab — the B line
| # | Control | What it does |
|---|---|---|
| 46 | Item (bloco) | The block name. The list carries LOMBADA_PISTA_SIMPLES, BONECO_SINALIZADOR, BONECO_PARE, BARREIRA_NEW_JERSEY, TACHA and TACHAO; the field is typable. With no name, nothing is composed. |
| 47 | offset | The block's lateral offset. 0 by default. |
| 48 | distance | The spacing between blocks along the stretch. 0 by default. |
| 49 | sentido_decres (decreasing direction) | Distributes in the decreasing direction. |
| 50 | angle_to_add | An angle added to the block's rotation, in degrees. 0 by default. |
| 51 | explode | Explodes the block after inserting it. It is only written into the line when ticked, or when the scales force it. |
| 52, 53 | scale X and scale Y | 1 by default. Written only when one of the two differs from 1 — and in that case the explode field starts being written too. |
Transv tab — the T line
| # | Control | What it does |
|---|---|---|
| 54 | measure | The length of the transverse element. With no measure, nothing is composed. |
| 55 | offset | Lateral offset. 0 by default. |
| 56 | distance | Spacing along the stretch. 0 by default. |
| 57 | sentido_decres | Distributes in the decreasing direction. |
| 58 | thickness | The element's thickness. 0 by default. |
| 59 | layer | The element's layer. The list suggests SINA_HOR_BR_TA9, SINA_HOR_AM_2x2, AREA_OBRA and CONES; the field is typable. It is the only optional field of a T line. |
Var tab — the declarations
| # | Control | What it does |
|---|---|---|
| 60 | name | The variable's name. It must start with a letter or _ and contain only letters, digits and _; otherwise the Compositor refuses with Nome de variável inválido (invalid variable name). |
| 61 | value | The value or the expression. It may quote variables declared earlier. |
| 62 | const (instead of var) | Writes const name = value instead of var name = value. |
Adding a variable whose name already exists makes the Compositor say which line it is already on and ask whether to add it anyway — the last declaration is always used.
The Compositor's proof drawing
Test in dwg does not draw over your project: it builds a test bench in the current drawing.
- Every entity in model space is erased.
- A 3000-unit straight runs from 0,0 at 45°, on the active style's auxiliary layer (in the factory style it is
AUX; the layer is created if it does not exist). - Two points mark the test stretch: half the straight minus 100 and half plus 100 — 200 units in the middle.
- The definition is drawn over that stretch, with the extra offset (12) applied to the straight beforehand.
- If the two ends of the straight are not on screen, the view is framed on it.
The window title becomes the status line: Conjunto Linear: Compositor — 4 line(s), with , N placa(s) when there were signs, , N statement(s) not rendered when some statement could not be drawn, the reasons in brackets, — pontual: rendered over the 200 m stretch when the definition carries the pontual directive, and — dimensions not ported when Add dimensions is ticked.
Remembered between sessions
- Compositor: almost every control is written to the user preferences and restored the next time it opens. Left out are the definition box, the quick reference and the preset, directive and system-variable combos: the form always opens with an empty definition. It also reads three preferences shared with the Draw Set form (alignment offset, cadence and device), but the values the Compositor itself wrote win.
- Draw Set: only the favourites live on disk; the rest lasts as long as the CAD session. See Marking Strip.
-CAPCAD_ROAD_SET: keeps nothing — not even the last path you gave it.
Notes
- The Compositor's test erases the drawing. Test in dwg and Dynamic mode empty model space before drawing. The confirmation exists precisely for that, and Dynamic only asks once per session. Work in a scratch dwg.
-CAPCAD_ROAD_SETneeds the active alignment. It does not ask for a curve: the base line is always the stretch of the project alignment between the two clicked points. With no alignment, it stops immediately.- The two points of
-CAPCAD_ROAD_SETare points. The prompt texts offer "a point OR a numeric station value", but the command uses a plain point prompt: typing a station does not work. Click in the drawing. - A
pontualdefinition does not run from the command line. If the text contains the wordpontual,-CAPCAD_ROAD_SETanswers that it is not available in the command-line version and stops. In the Compositor the directive is accepted, and the test draws the definition along the 200-unit stretch as though it were linear, saying so in the title. - Only
FandPlines are drawn.Flines (marking lines) andPlines (signs) are drawn.Blines (blocks) are counted and reported as not drawn;Tlines (transverse) and lines written withLinstead ofFstay in the text and are ignored silently, without entering the count. This holds for the Compositor, for the Draw Set and for the command line — the Bloco and Transv tabs compose lines that are correct for the grammar but are not drawn in this version. - An
Fline with surplus, gap or startAt is not drawn. It is counted as skipped and reported asGapExcedenteDeferred. The same holds for offsetauto(AutoFaixaOffsetDeferred) and for@…references to criteria (CapvarDeferred). - Some Compositor labels are not translated. The five tab names (Faixa, Placa, Bloco, Transv, Var) are Portuguese in every language, and espacios línea (29) and posición (34) are in Spanish. The window's status messages come out in English.
- The Compositor does not talk to the Draw Set. There is no button that sends the definition from one to the other: the route is to save a file in the project's
DesenhaConjuntofolder (11 or 27) and open it afterwards through the Draw Set's Local source. The Draw Set's Editor button opens a smaller dialog of its own, not this form. - The layers follow the active style. The test's auxiliary layer and the definition's
SINA_HOR_…layers are named by the style, which may add a prefix, change the colour and translate the stem (ROAD_MARK_…in English,SENA_HOR_…in Spanish). Missing layers are created. - The ribbon button leads to the same form as the Marking Strip. Roadway › Templates › Linear Set and Traffic Control › Markings › Longitudinal both open
DesenhaConjuntoForm; reopening it from either brings back the same window, with whatever was filled in.