This page covers the seven tabs of the CapAero form that deal with the land side of the airport: taxiway markings, guidance signs, parking labels, apron, reports, tools and learning. The runway and the pre-threshold are in Airports — Runway and Pre-Threshold.
| Commands | CAPCAD_AERO (opens the form on whichever tab it was left) · CAPCAD_AERO_TAXIWAY (Taxiway: markings tab) · CAPCAD_AERO_SIGN (Taxiway: Signage tab) · CAPCAD_AERO_APRON (Apron tab) |
| Shortcut | none |
| Ribbon | CapCad tab › Roadway panel › Templates split button › Airport, which fires CAPCAD_AERO. The three commands that open on a specific tab have no button on the CapCad tab — only the airport profile reaches them from the ribbon, on the CapAero panel of its CapAero tab |
| Category | CAPCAD_AERO: CAD Utils: Segment · the rest: none |
| Form | AirportForm "CapAero — Airport", nine tabs, modeless. One instance per session |
| Hosts | AutoCAD, BricsCAD, GstarCAD, ZWCAD, ARES Commander — with an important caveat about the buttons that open other commands, in the Notes |
| Also opened by | CAPCAD_AERO_RUNWAY |
CapAero does not reinvent surface marking: it brings the commands you already use into the vocabulary of the airport.
- Every marking button opens a command you know, already configured for airport work — the zipper edge line, the island, the linear repetitions, the pedestrian crossing.
- Guidance signs, module by module. You build the message one module at a time — text, colour scheme, arrow, side — reorder the list, and CapAero composes the whole sign with the right colours, straight into the drawing or as a block.
- Block plus post, in one gesture. Tick the option and CapAero inserts the support, draws the leader and lands the sign at its end, all aligned to the post's rotation.
- Parking labels with a shape. Arrow up, arrow right or plain rectangle, with a contrast outline, snapped to the end of a line or repeated along it.
- Trim the marking under a label, so the legend does not sit on existing paint.
- Contrast painting goes to the back of the draw order in one click, and the linetype variables are set for plotting in another.
What it does
The CapAero form is a shell: nearly everything it offers on the taxiway and apron tabs is an existing CapCad command, opened with an airport preset. The two exceptions, where CapAero does the work itself, are the guidance signs (Taxiway: Signage tab) and the parking labels (Taxiway: parking labels tab).
Guidance signs
A taxiway guidance sign is a horizontal strip of abutted modules, each with its own background colour, its own text and, where applicable, an arrow. You build the list of modules, set the letter height, and CapAero composes the whole sign and either draws it or turns it into a block.
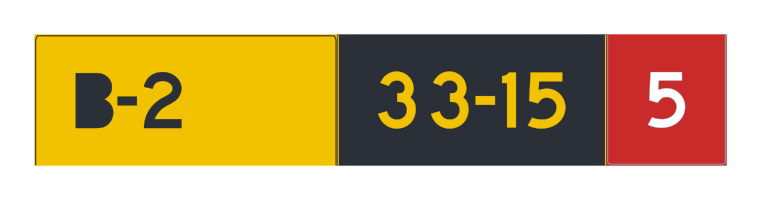
A three-module sign generated by the engine: B-2 yellow/black, 33-15 black/yellow and 5 white/red, letter height 1 000 mm.
The three colour schemes are:
| Scheme | Background | Text |
|---|---|---|
| Yellow/black | yellow | black |
| Black/yellow | black | yellow |
| White/red | red | white |
The block name is assembled from the content: capsignaero_ followed, per module, by the first line of text, the two-letter scheme code, the arrow code and the side, and finally the letter height in millimetres. Signs with the same content share the same block definition.
Parking labels
An apron legend — MAX SPAN 36M, NO ENTRY — drawn as a coloured rectangle with the text knocked out of it, optionally with an arrow head.
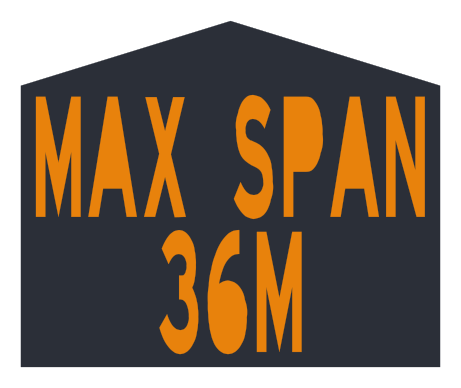
Shape Arrow up, text 4 000 mm, letters in yellow (index 40) on a black background (index 250).
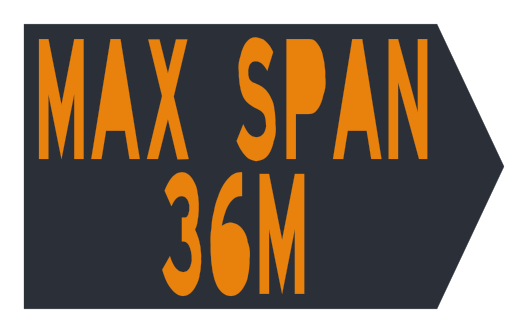
Shape Arrow right, the same legend.
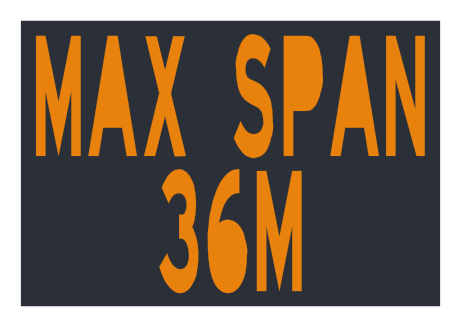
Shape Rectangular, no head.
The label can be drawn straight into the current drawing or turned into a block and inserted in one of four ways — free point, end of a line, repeated along a line, or simply drawn.
Workflow
A guidance sign
- Run
CAPCAD_AERO_SIGN, orCAPCAD_AEROand pick the Taxiway: Signage tab. - Type the first module's message (13). For several lines inside one module, break the line in the box.
- Choose the colour scheme (14) — without it CapAero refuses the add — the arrow (15) and its side (16/17).
- Click add > (18). The module joins the list (22).
- Repeat for the other modules; use ↑ (19), ↓ (20) and del (21) to reorder and remove.
- Set the Letter size (24), in millimetres.
- Choose the output: In drawing (28) draws the sign at the origin, as a preview; Generate block (23) creates the block definition, and the two boxes below decide whether it is inserted (26) and whether the post comes with it (27).
- Click the button (25), whose caption follows the choice. The block name appears in 29.
A parking label
- Run
CAPCAD_AEROand go to the Taxiway: parking labels tab. - Pick a Preset (52) — MAX SPAN or NO ENTRY — or type the text in 30.
- Pick the Color text/bkg preset (31), which fills 33 and 34, or type the colour indices by hand.
- Pick the Shape (35 to 37) and the Text height mm (32).
- Pick the insertion mode (38 to 46) and click Insert (50).
- If the label landed over existing marking, click Trim block (51).
The form
The numbers below apply to this whole page; the runway page has its own numbering.
The screenshots on this page were captured in a Portuguese session; the control numbering is the same in every language, and the tables quote the English captions the form shows in an English session.
Taxiway: markings tab
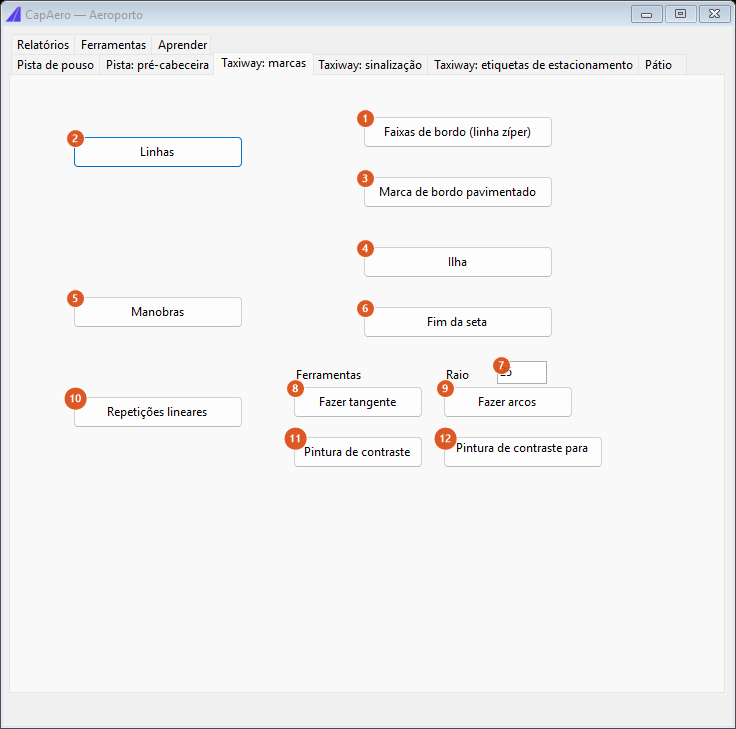
Buttons 1, 3, 6 and 12 have behaviour of their own inside CapAero; the rest simply run another CapCad command. Field 7 is saved with the form; not used by this version.
| # | Control | What it does |
|---|---|---|
| 1 | Roadway Edge Stripes (Zipper line) | Opens the Divider Rectangle Assistant with the ZIPPER preset applied. |
| 2 | Lines | Runs CAPCAD_LINEARSET, the linear-set editor. |
| 3 | Paved Edge Marking | Opens the one-side chevron with the AIRPORT preset already applied: distance 5, width 0.4, channelisation 0.4, angle 90°, arc 2 with arc line and no studs. |
| 4 | Island | Runs CAPCAD_MARKING_AREA_2FLOW (two-flow chevron). |
| 5 | Manouvers | Runs CAPCAD_DIVIDER, the Divider Assistant, with no preset. |
| 6 | Arrow end | Hides the form, asks you to select a line near one of its ends, and draws the three-stroke arrow there, turned to that end's angle. |
| 7 | Radius | A text box holding 25 by default. Saved with the form; not used by this version. |
| 8 | Make tangent | Runs CAPCAD_CURVE_TANGENCY. |
| 9 | Make arcs | Runs CAPCAD_CURVE_TANGENCY — the same command as 8. |
| 10 | Linear repetitions | Runs CAPCAD_MARKING_AREA_LINEAR (linear chevron). |
| 11 | Contrast painting | Runs CAPCAD_MARKING_CONTRAST_BACKING. |
| 12 | Contrast painting to bottom | Sends to the back of the draw order every model-space entity whose layer name starts with the contrast layer name of the active catalogue (including the hatch and cadence variants). The status bar reports how many were moved. |
Taxiway: Signage tab
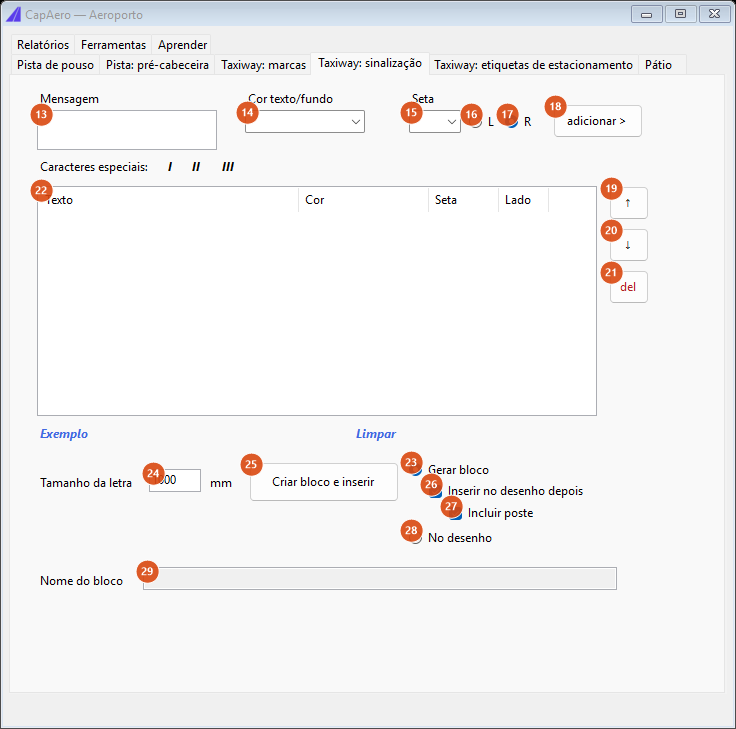
| # | Control | What it does |
|---|---|---|
| 13 | Message | The module's text. Line breaks become separate lines inside the same module. |
| 14 | Color text/bkg | The colour scheme: Yellow/black, Black/yellow or White/red. With no choice, add refuses and warns in the status bar. |
| 15 | Arrow | The arrow direction: empty (none), →, ←, ↑, ↓, ↗, ↖, ↙, ↘. |
| 16 | L | The arrow sits to the left of the text. |
| 17 | R | The arrow sits to the right. This is the default. |
| 18 | add > | Appends the module to the list (22), with the current text, colour, arrow and side. |
| 19 | ↑ | Moves the selected module up one position. |
| 20 | ↓ | Moves it down one position. |
| 21 | del | Removes every selected module. |
| 22 | (module list) | The modules, in the order they will be drawn left to right, with the columns Text, Colour, Arrow and Side. |
| 23 | Generate block | The sign becomes a block definition. Enables 26. |
| 24 | Letter size | Letter height, in millimetres. The whole sign is dimensioned from it: each module's side clearance is 75 % of the letter height. |
| 25 | Create… | Composes and draws. The caption follows the chosen output: In drawing, Create block or Create block and insert. With an empty list it warns in the status bar and draws nothing. |
| 26 | Insert in drawing after | After creating the block, asks for the insertion point with rotation. Only enabled with 23. Enables 27. |
| 27 | Include post | Inserts the support block first, at the requested point, with rotation; draws a 10-unit leader from it and places the sign at the end, with the same rotation as the post. |
| 28 | In drawing | The sign is drawn straight into the drawing, as a preview: the previous composition is erased first, so clicking again does not stack signs. |
| 29 | Block name | Read-only. Shows the computed definition name, whichever output is chosen. |
Two links complete the tab: Sample fills the list with three demonstration modules (B-2 yellow/black with an arrow on the right, 33-15 black/yellow and 5 white/red), and Clear empties the list. The three Special chars shortcuts — I, II, III — append <I>, <II> and <III> to the message text.
Taxiway: parking labels tab
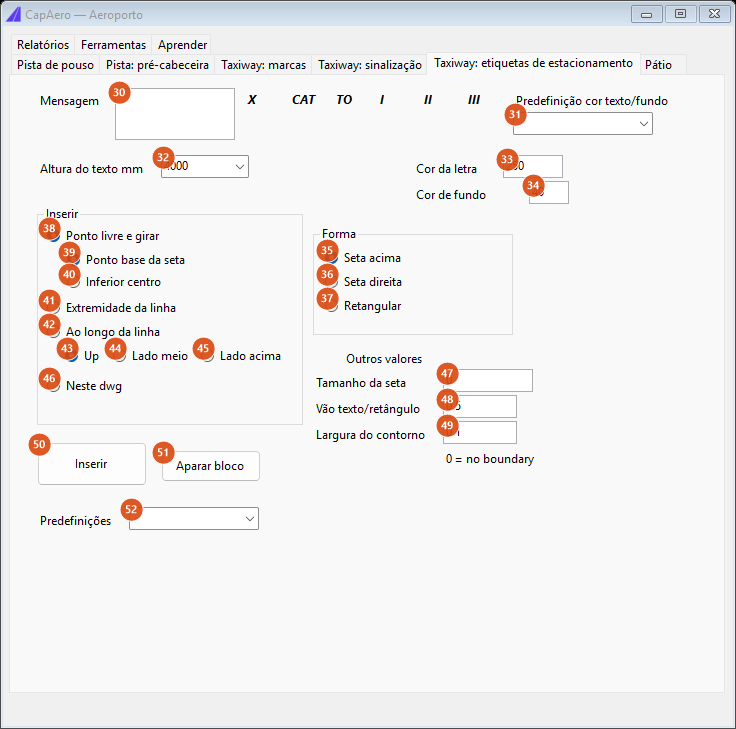
| # | Control | What it does |
|---|---|---|
| 30 | Message | The label text. More than one line is accepted. |
| 31 | Color text/bkg preset | Writes the index pair into 33 and 34: Yellow/black → 40 and 250; Black/yellow → 250 and 40; White/red → 255 and 10. |
| 32 | Text height mm | 3000 or 4000. It also decides the default head size when 47 is zero: 2 for 4000, 1.5 otherwise. |
| 33 | Color letter | CAD colour index of the text. |
| 34 | Color background | CAD colour index of the rectangle. |
| 35 | Arrow up | The label gains a triangular head at the top. |
| 36 | Arrow right | The head sits on the right. |
| 37 | Rectangular | No head. |
| 38 | Free point and rotate | Inserts the block at a clicked point, with rotation. |
| 39 | Base arrow point | Anchors the insertion at the arrow tip (top, or mid-right depending on the shape). Only meaningful with 38. |
| 40 | Bottom center | Anchors at the bottom middle. |
| 41 | Line extremity | Asks for a line and inserts the label at the end nearest your click, across it. |
| 42 | Along line | Repeating mode: on every click CapAero finds the foot of the perpendicular on the line, computes the position at a distance equal to the label's length (side arrows) or height (arrow up), erases the previous insertion and inserts the new one. It ends when you stop clicking. |
| 43 | Up | In the repeating mode, turns the label 90° upwards. |
| 44 | Side mid | Anchors the label by the middle of its side, on the side of the line you clicked. |
| 45 | Side up | Anchors by the base of the side. |
| 46 | In this dwg | Draws the label straight into the drawing, without creating a block or asking for a point. |
| 47 | Arrow size | Length of the head, in metres. Zero lets CapAero decide from the text height (32). |
| 48 | Gap text/rectangle | Clearance between the text and the rectangle, in metres. Default 0.5. |
| 49 | Boundary width | A field holding 0.1 by default, with the label "0 = no boundary" beside it. Saved with the form; not used by this version. |
| 50 | Insert | Builds the label and inserts it by the chosen mode. With an empty message it warns and inserts nothing. |
| 51 | Trim block | Trims the marking running under the last label inserted in this session, using the block envelope grown by 0.5 m as the boundary. With no previous insertion it warns in the status bar. |
| 52 | Presets | MAX SPAN writes the text MAX SPAN / XXM, colour Yellow/black and rectangular shape; NO ENTRY writes NO ENTRY, colour White/red and rectangular shape. |
The six shortcuts beside the message box append fragments to the text: X, CAT, a line break with TO, and the markers <I>, <II> and <III>.
Apron tab
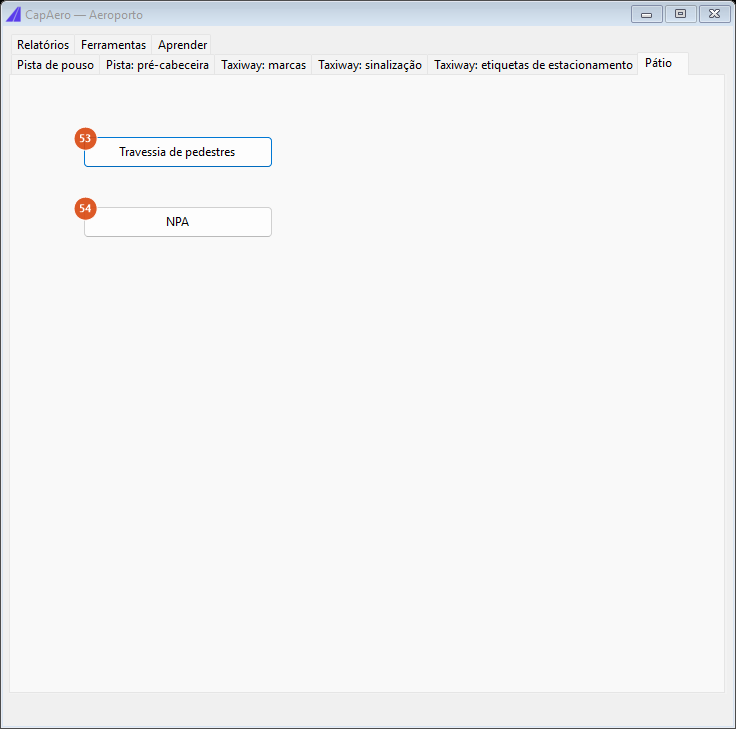
| # | Control | What it does |
|---|---|---|
| 53 | Pedestrian crossing | Runs CAPCAD_MARKING_CROSSING_TSRGD, the simplified crossing. |
| 54 | NPA | Runs CAPCAD_MARKING_AREA_FILL, the area fill. |
Reports tab
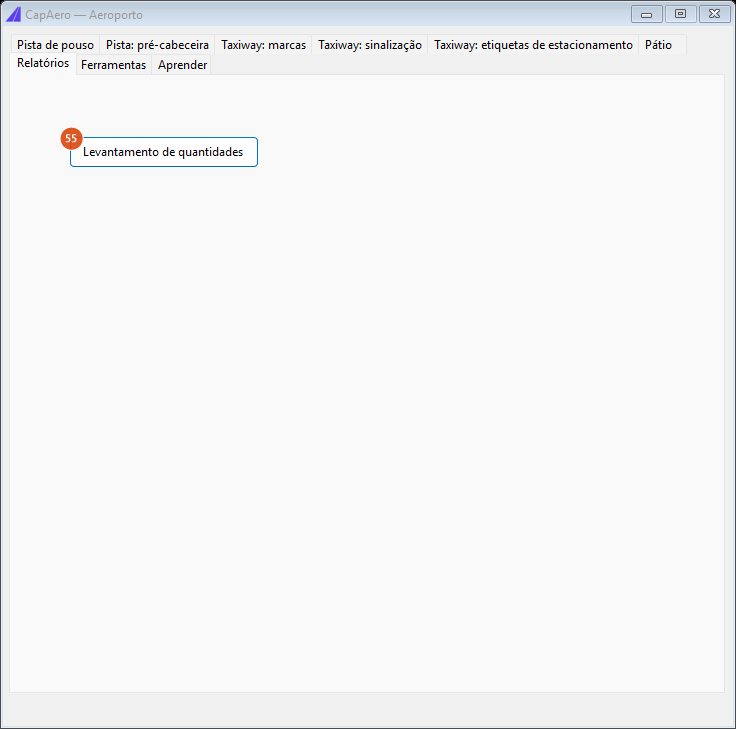
| # | Control | What it does |
|---|---|---|
| 55 | Quantity takeoff | Runs CAPCAD_REPORT_ENTITY, the entity report. |
Tools tab
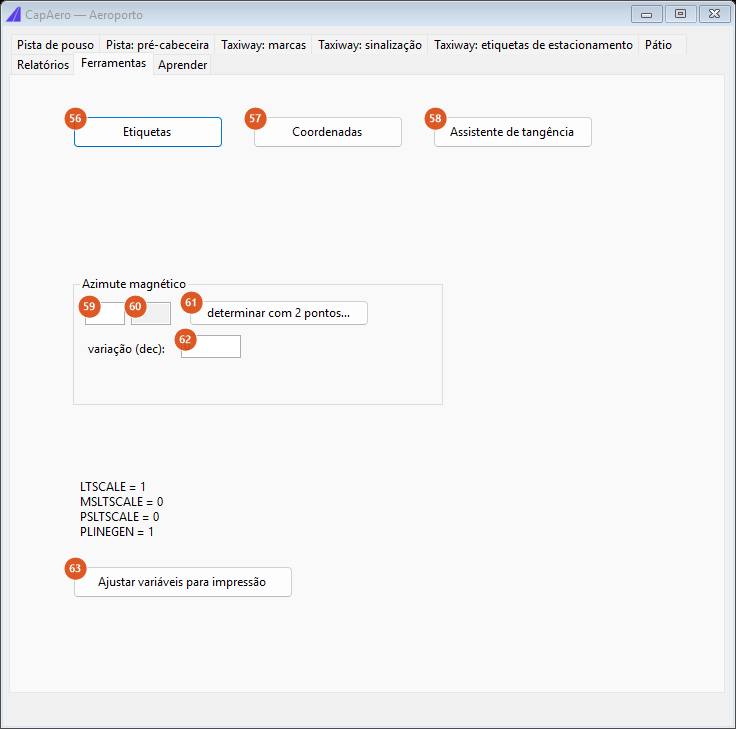
| # | Control | What it does |
|---|---|---|
| 56 | Labels | Not available in this version. Clicking it says so in the status bar. |
| 57 | Coordinates | Runs CAPCAD_GEO_CONVERT_ENTITY, the entity coordinate conversion. |
| 58 | Tangency assistant | Runs CAPCAD_CURVE_TANGENCY — the same command as buttons 8 and 9. |
| 59 | (designation) | Read-only. Receives the number computed by button 61. |
| 60 | (opposite designation) | Read-only. Receives the opposite threshold's number. |
| 61 | determine with 2 points… | Hides the form, asks for two points (the second rubber-banded), converts them to latitude/longitude and computes the designation pair under the variation in 62. Needs the project coordinate system; without it, it warns in the status bar. |
| 62 | variation (dec) | The magnetic variation used by 61, in decimal degrees. |
| 63 | Adjust variables for printing | Sets LTSCALE 1, MSLTSCALE 0, PSLTSCALE 0 and PLINEGEN 1 — the values listed above the button. |
Learn tab
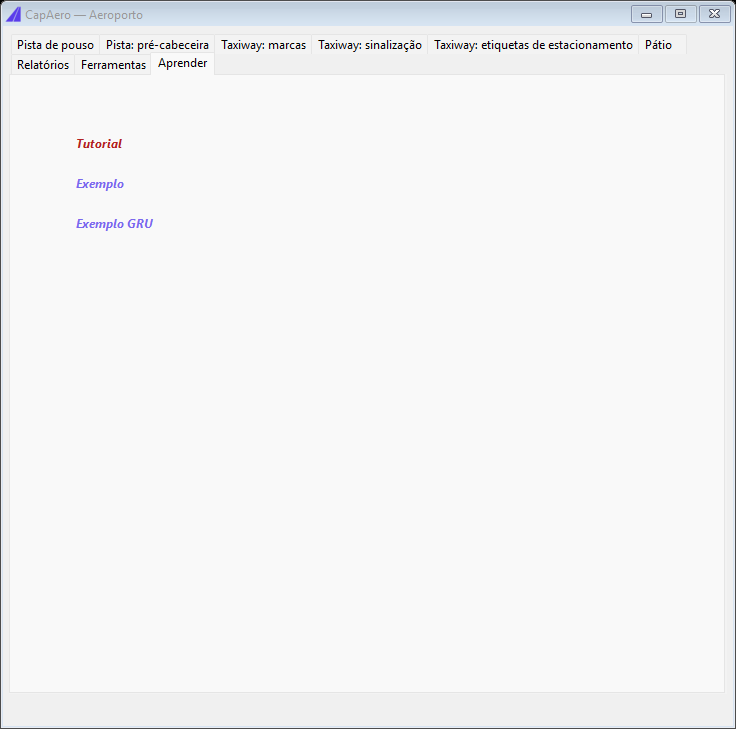
The tab carries three links and no numbered controls:
- Tutorial — opens the CapCad channel on YouTube, in the browser.
- Sample and Sample GRU — not available in this version; the status bar says so.
Remembered between sessions
On closing the form, CapAero saves the contents of the text fields and reloads them the next time it opens. From this page that covers the sign letter size (24), the two label colours (33 and 34), the arrow size (47), the gap (48), the boundary width (49), the markings-tab radius (7) and the tools-tab magnetic variation (62).
Not remembered: the sign's module list, the message texts, the combos, the tick boxes and the radio buttons. Reopening CapAero brings an empty module list.
Notes
- The arrow chosen on a sign module is not drawn in this version. Its space is reserved in the module — a module with an arrow is visibly wider than the same module without — but only the text and the frame are drawn. This applies to the In drawing output and to the block alike. Build the arrow as a separate block.
- Controls 7 (Radius) and 49 (Boundary width) are saved with the form; not used by this version.
- The Labels button (56) is not available in this version; CapAero says so in the status bar.
- Three different buttons — Make tangent (8), Make arcs (9) and Tangency assistant (58) — run the same
CAPCAD_CURVE_TANGENCY. - A sign module with more than one line and no side arrow gets no stacking: the lines overlap. With an arrow on the left or the right, the lines are aligned to that side.
- In Along line mode (42) the previous label is erased on every new click: the mode positions one label, not a series. To leave several, exit and re-enter the mode for each.
- On BricsCAD, GstarCAD and ZWCAD most of the buttons that open another command are not available in this version. On those three platforms only the NPA button (54) opens its command; Island, Manouvers, Linear repetitions, Lines, Contrast painting, Pedestrian crossing, Quantity takeoff, Coordinates and the three tangency buttons are not available. The buttons that do their work inside CapAero — Arrow end, Roadway Edge Stripes, Paved Edge Marking, Contrast painting to bottom, the signs, the labels and the tools — work on all five platforms. On AutoCAD and ARES Commander every button is available.
- Pressing Enter in the text fields on this page fires the runway redraw again, if a centreline has been acquired.