| Commands | CAPCAD_CURVE_TANGENCY (Curve Assistant) · CAPCAD_ANGLE_QUERY (Get Angle) |
| Shortcuts | neither has an alias in the shipped acad.pgp |
| Ribbon | CAPCAD_CURVE_TANGENCY: CapCad tab › CAD Utilities panel › Geometry split button › Polyline Tangency Editor (the tooltip reads Curve Assistant) · CAPCAD_ANGLE_QUERY: the same panel, Draw & Modify split button › the unlabelled button whose tooltip reads Get Angle |
| Category | CAPCAD_CURVE_TANGENCY: CAD Utils: Segment. CAPCAD_ANGLE_QUERY: Horizontal |
| Form | CurveAssistantForm — Single Curve Assistant, modeless. CAPCAD_ANGLE_QUERY has no form |
| Hosts | AutoCAD, BricsCAD, GstarCAD, ZWCAD and ARES Commander — both commands, with the same behaviour |
| Also opened by | three buttons of the Taxiway assistant: Make tangent, Make arcs and Tangency assistant; and the Single Curve Editor… button of the segment-edit dialog in the Alignment Manager |
The fillet editor that works vertex by vertex and tells you, for each one, whether the arc is tangent or not. It is the tool for turning a freehand line into an alignment with real fillets.
- One diagnosis per vertex. Line, Tangent arc in green, Not tangent arc in red — and the button that fixes it only enables when it makes sense.
- A live radius, with a step you choose. The − and + buttons move by 1, by 10 or by 100, and every press redraws the curve in the drawing.
- Make it tangent without losing the radius. Make tg re-fits the arc keeping the radius it already has: the drawing closes up, and the geometry is still the one the design asked for.
- Zoom or pan following the vertex. The window can drive the view while you walk the vertices.
- Utilities for the whole curve. Fillet every corner, chamfer every corner, make every arc tangent, undo every arc, clean coincident vertices and reverse — in one click.
- Reset is always there. The original curve is kept from the moment of selection; one click brings it all back.
Single Curve Assistant — CAPCAD_CURVE_TANGENCY
What it does
It works on one curve at a time. When you pick the curve, the assistant takes it over: every edit deletes the entity in the drawing and draws the new result in its place. There is no separate preview — what you see in the drawing already is the result.
A red round marker follows the current vertex. It is erased when the window closes.
Workflow
- Run
CAPCAD_CURVE_TANGENCY. The window opens with no curve; the fields are empty. - Select curve (1). The window hides, the CAD asks Select the curve: and accepts a line, polyline or arc. The footer reports how many vertices the curve has.
- Walk the vertices with the counter (4) or grab one in the drawing with Get (5). The Segment ahead frame then describes the segment that starts at that vertex.
- Fix it: type a radius and press Enter, or use − and + (13, 14); or click Make tg (18), Remove arc (19) or To chamfer (20).
- For the whole curve, tick one of the Utilities and click Apply (30).
- Reset (2) undoes everything at once, back to the curve as it was when it was selected.
The form
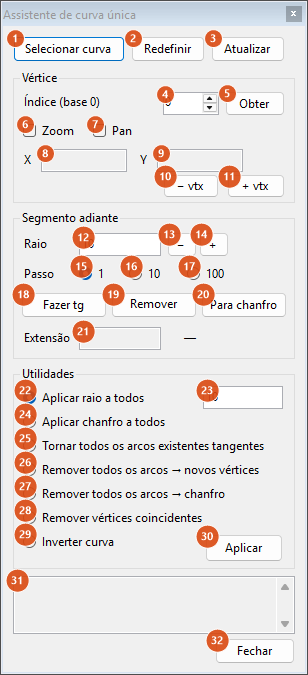
The window as freshly opened, before any curve is picked. The capture is of a Portuguese session; the numbering is the same in both editions, and the table gives the English captions.
| # | Control | What it does |
|---|---|---|
| 1 | Select curve | Hides the window and asks for the curve. The entity picked becomes the managed curve, and a copy of it is kept for the Reset. |
| 2 | Reset | Returns the curve to the state it was in when it was selected, redrawing it. |
| 3 | Update | Re-reads the managed entity from the drawing. It is what to use after editing the polyline directly in the CAD (with grips, for instance) without closing the window. |
| 4 | Index (0-based) | The current vertex. It starts at 0 and goes up to the number of vertices minus one. Changing the value moves the marker and, if ticked, the zoom or the pan. |
| 5 | Get | Hides the window, asks for a point (Pick near a vertex:) and moves the index to the vertex nearest it. |
| 6 | Zoom | The view centres on the current vertex and zooms in on it. |
| 7 | Pan | The view only centres on the vertex, keeping the scale. |
| 8 | X | The abscissa of the current vertex. Read-only: typing here does not move the vertex (see Notes). |
| 9 | Y | The ordinate, on the same terms. |
| 10 | − vtx | Removes the current vertex and redraws the curve. |
| 11 | + vtx | Asks for a point and inserts a vertex on the segment nearest to it. |
| 12 | Radius | The radius of the arc on the segment ahead. It shows - when the segment is straight, and the radius to three decimals when it is an arc. Typing a value and pressing Enter fillets the vertex with that radius; a value of zero removes the arc. |
| 13 | − | Decreases the radius by the chosen step and reapplies at once. |
| 14 | + | Increases the radius by the step and reapplies. |
| 15 | Step 1 | Selected by default. The increment of buttons 13 and 14. |
| 16 | Step 10 | An increment of 10. |
| 17 | Step 100 | An increment of 100. |
| 18 | Make tg | Re-fits the arc at the current vertex so that it is tangent to the two neighbouring straights, keeping the current radius. It only enables when the segment is a non-tangent arc. |
| 19 | Remove arc | Undoes the arc: the two tangent points go back to being the sharp corner where the two straights cross. It only enables when there is an arc. |
| 20 | To chamfer | Zeroes the curvature without moving the vertices: the arc becomes the chamfer joining its two ends. It only enables when there is an arc. |
| 21 | Length | The length of the segment ahead — the chord, if straight; the arc length, if curved. Read-only. |
| 22 | Apply radius to all | Selected by default. Fillets every sharp corner of the curve with the radius in box 23. On a closed curve there is an extra pass at the seam. |
| 23 | (utilities radius) | 10 by default. It feeds utilities 22 and 24; clicking into this box selects utility 22 on its own. A zero or negative value is refused. |
| 24 | Apply chamfer to all | The same, but the corner becomes a straight chamfer between the two tangent points instead of an arc. |
| 25 | Make all existing arcs tangent | Corrects the tangency of every arc of the curve, keeping each one's radius. It removes coincident vertices first, since they spoil the angle calculation. |
| 26 | Remove all arcs → new vertices | Every arc goes back to being a sharp corner, at the crossing of the straights. |
| 27 | Remove all arcs → chamfer | Every arc becomes a chamfer: the vertices stay where they are and only the curvature is zeroed. |
| 28 | Remove coincident vertices | Removes repeated vertices and reports how many went. |
| 29 | Reverse curve | Reverses the walking direction. |
| 30 | Apply | Runs the ticked utility (22 to 29) and reports the result — for example Filleted 7/9 corners. |
| 31 | (information frame) | Shows the number of vertices and the length of the curve, and the last message from the utilities. |
| 32 | Close | Closes the window and erases the red marker. The curve stays in the drawing as it is. |
The status label, to the right of the Length box (21) and showing — while there is no curve, is the diagnosis of the segment ahead:
| Text | Colour | Meaning |
|---|---|---|
| Line | grey | a straight segment |
| Line ext 0! | red | a straight segment of zero length — two vertices on top of each other |
| Tangent arc | green | an arc tangent to both neighbouring straights |
| Not tangent arc | red | an arc that does not close with its neighbours; Make tg enables |
| Arc ext 0! | red | an arc of zero length |
| — | grey | the current vertex is the last one: there is no segment ahead |
When the radius will not go in
The Enter in the radius box (12) only works on an interior vertex — neither the first nor the last. At the ends the message is Radius needs an interior vertex (not first/last).
A radius that is too large is refused as well (Radius … not possible at vertex …): the tangent points would fall outside the neighbouring straights, and no fillet is possible. Reduce the radius, or use + vtx to lengthen the short leg.
Remembered between sessions
Nothing. Every CAPCAD_CURVE_TANGENCY opens the window blank, with radius 10, step 1, Apply radius to all selected and Zoom and Pan unticked. The window is also not single instance: running the command again opens a second window, with its own managed curve.
Angle at a point — CAPCAD_ANGLE_QUERY
What it does
It reports the direction of the tangent of the curve at the point you clicked, and along with it the distance travelled along the curve to get there. It draws nothing, selects nothing and changes nothing.
- Run
CAPCAD_ANGLE_QUERY. - Select a curve (click at the point of interest): — click on the stretch whose direction interests you. Lines, polylines and arcs are accepted, as are circles, ellipses, splines and 3D polylines; anything else is refused with Must be a line, polyline or arc., and a curve CapCad cannot read fails with Could not read the curve.
- The command line answers, for example:
Angle at point: 87.412° (station 143.905).
The angle is measured from the positive X axis, counter-clockwise, and normalised into the range 0° to 360°. The station is the length along the curve from its start to the foot of the perpendicular of your click — not the straight-line distance.
The click point is projected perpendicularly onto the curve. When that projection does not exist — a click well beyond one of the ends, for instance — the answer is Angle at point not found.
Use it to set the rotation of a block or a text that has to follow the road. To copy the angle straight from one entity to another, without typing, the command is CAPCAD_ROTATION_MATCH of Draw and modify.
Notes
- The assistant's X and Y boxes do not move the vertex. They show the position of the current vertex and are rewritten on every change of index; what you type into them is not used. To move a vertex, use the CAD's grips and then Update (3).
- Each edit is one undo step. The assistant does not group the edits: one Ctrl+Z undoes only the last delete-and-redraw, not the whole working session — and the first Ctrl+Z may well undo the red marker rather than the edit. To go back to the start, use Reset (2), which is what exists for that.
- The entity changes identity on every edit. Since every edit deletes and redraws, the polyline's handle in the drawing is not the one it started with. External references to that handle — data attached by other commands, for example — do not survive an editing session.
- "To chamfer" (20) and "Apply chamfer to all" (24) are different things. Button 20 only zeroes the curvature of an arc that already exists, leaving a chamfer between the tangent points that were already there. Utility 24 creates the chamfer at a sharp corner, from the radius in box 23 — as if filleting, but with a straight line instead of the arc.
- The command is not single instance. Unlike almost every other CapCad window, running it twice opens two windows. Each manages its own curve, and both write into the same drawing.
- The prompts and messages are in English on every profile — Select the curve:, Pick near a vertex:, Angle at point:, Filleted 7/9 corners.
- Three buttons of the taxiway assistant open this same window. Make tangent, Make arcs and Tangency assistant, in the Taxiway assistant, all run
CAPCAD_CURVE_TANGENCY— there are not three different behaviours behind them.
See also
- Curve Utilities — the Fillet conditional and the tangency utilities applied to a whole selection instead of one curve.
- Polyline and segment tools — adding, removing and cycling vertices from the command line.
- Draw and modify —
CAPCAD_ROTATION_MATCHandCAPCAD_ROTATION_ADD, which use the same tangent angle. - Offsets — the neighbour on the Geometry split button.