| Commands | CAPCAD_ALIGNMENT_ZOOM (zoom to the alignment), CAPCAD_ALIGNMENT_PROFILE_ZOOM (alignment and profile side by side), CAPCAD_ALIGNMENT_PROFILE_POINT and CAPCAD_ALIGNMENT_PROFILE_INTERLOCATE (interlocate), CAPCAD_ALIGNMENT_DRIVE (drive the stretch) |
| Shortcut | EZ for CAPCAD_ALIGNMENT_ZOOM; PZ for the sibling command CAPCAD_PROFILE_ZOOM |
| Ribbon | CapCad tab › Manage panel › Alignments split button › Eixo Zoom, Perfil Zoom, Eixo e Perfil Lado a Lado, Eixo e Perfil Pontos, Eixo e Perfil Interlocalizar and Percorre trecho |
| Category | Manage: Alignment |
| Form | ViajandoForm — Travelling, modeless, one instance (only CAPCAD_ALIGNMENT_DRIVE). The others have no form |
| Hosts | CAPCAD_ALIGNMENT_ZOOM and CAPCAD_ALIGNMENT_PROFILE_ZOOM: AutoCAD, BricsCAD, GstarCAD, ZWCAD, ARES Commander. The others: AutoCAD |
| Also triggered by | The Zoom alignment, Side by side and Interlocate buttons of Alignment Tools; the Drive button of the Street View palette opens Travelling ready to go |
A road project has two views of the same stretch — the plan and the profile — and they are rarely on the same part of the screen. These commands put them side by side, link a click in one to the matching position in the other, and then drive the road frame by frame as if you were behind the wheel.
- Two viewports in one command. The model is split in two, one framing the alignment and the other the profile; the same command undoes the split.
- One click, both sides. Click in plan and the profile goes to the station; click in the profile and the plan goes to the point. CapCad works out which side you clicked on.
- With or without marks. One variant leaves an X on both sides of each pair, a colour per click, and asks at the end whether you want to keep them.
- Drive the road. Travelling cuts the stretch into fixed-length samples and walks through them, framing the view, showing the station and an arrow in the direction of travel.
- Turning with the road. The view can rotate at every step so that the direction of travel always points up the screen — and goes back to normal when you leave.
- Next to Street View. With a coordinate system defined, every step takes the Street View palette to the matching latitude, longitude and heading.
What it does
All these commands work on the drawing's active alignment; the three in the middle also need the vertical profile, which is a curve stored in the alignment's properties and paired with it by name.
| Command | What it is for |
|---|---|
CAPCAD_ALIGNMENT_ZOOM |
Frames the active alignment. Shortcut EZ. |
CAPCAD_ALIGNMENT_PROFILE_ZOOM |
Splits the model into two viewports, one on the alignment and one on the profile — and, when it is already split, goes back to one. |
CAPCAD_ALIGNMENT_PROFILE_POINT |
Interlocates points between alignment and profile, drawing an X at each pair. |
CAPCAD_ALIGNMENT_PROFILE_INTERLOCATE |
The same, without drawing — it only navigates. |
CAPCAD_ALIGNMENT_DRIVE |
Drives a stretch of the road frame by frame, with an optional direction arrow and Street View. |
To go to a known station or read the data at a point, see the Station Navigator, which is the command dedicated to that.
Zoom to the alignment
CAPCAD_ALIGNMENT_ZOOM (shortcut EZ) frames the whole active alignment. With no alignment defined, it asks Não há um eixo definido ou o mesmo é inválido. Favor checar em Gerenciador de Eixos. and offers to open the Alignment Manager there and then; with an alignment that has no geometry, it reports on the command line that there is nothing to frame.
The sibling command CAPCAD_PROFILE_ZOOM (shortcut PZ) does the same for the profile. It requires the alignment (É necessário um eixo definido para este comando) and then the profile (Perfil CapCad não definido).
Alignment and profile side by side
CAPCAD_ALIGNMENT_PROFILE_ZOOM only works in model space — in paper space it warns Use in Model Space. It behaves like a switch:
- Model with one viewport, alignment and profile defined: it goes back to one viewport, frames the alignment, splits the model vertically in two and frames the profile in whichever half the split left current. At the end it re-applies the alignment layers. The framing leaves 5% of slack on each side.
- Model already split in two: it goes back to a single viewport.
- No alignment or no profile: if the model is split in two, it goes back to one; and it warns Necessário tanto eixo como perfil definidos para este comando.
Which half gets the profile depends on which viewport the CAD leaves current after the vertical split.
Interlocate
CAPCAD_ALIGNMENT_PROFILE_POINT and CAPCAD_ALIGNMENT_PROFILE_INTERLOCATE are the same command with one difference: the first draws the marks, the second does not.
Both require an alignment and a profile (otherwise: Necessário tanto eixo como perfil definidos para este comando.), guarantee the two viewports — splitting the model if it is not split yet — and enter a click loop. For each point:
- CapCad measures the distance from the point to the alignment and to the profile, and decides which side you clicked on: the nearer one wins.
- Clicked in plan: it finds the perpendicular foot on the alignment, reads the station there and computes the matching point on the profile. A point with no match on the profile: Ponto não encontrado.
- Clicked on the profile: it converts the click's X into a station (subtracting the station and the initial length stored on the profile) and computes the matching point on the alignment.
- The other viewport is centred on the matching point, with the zoom unchanged.
- With
CAPCAD_ALIGNMENT_PROFILE_POINT, an X is drawn on both sides — sized by each viewport's view height, and in a different colour at every click.
At the end, if anything was drawn, CapCad asks Deseja manter pontos desenhados? Ou use CapSelections posteriormente para apagá-los de uma vez a qualquer momento. Answering no erases the marks.
These two functions are also on Alignment Tools: the Interlocate button with Include points ticked is the same as CAPCAD_ALIGNMENT_PROFILE_POINT, and unticked, the same as CAPCAD_ALIGNMENT_PROFILE_INTERLOCATE.
Where the marks land. The layers
PROFILE_ANNO_PONTOSandEIXO_ANNO_PONTOSare created by the command, but the X marks are drawn on the current layer.
Driving the stretch
CAPCAD_ALIGNMENT_DRIVE opens Travelling: a viewer that cuts the stretch into fixed-length samples and walks through them, one per time interval, framing the view at each.
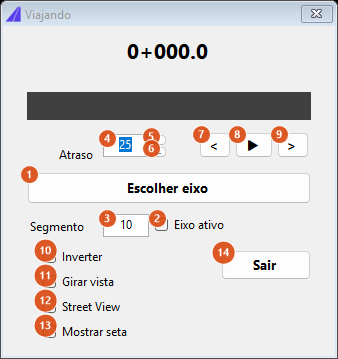
The form (Portuguese render; the layout is identical in every language): the current station in large type, the progress bar, the playback controls and the drive options. Clicking the body of the form, the station or the bar collapses and reopens the lower half.
| # | Control | What it does |
|---|---|---|
| 1 | Pick alignment | Sets the stretch to drive. With Active alignment (2) unticked, you pick any curve, and the clicked point is where the drive starts. With (2) ticked, you click a point and CapCad finds the nearest segment of the active alignment — with no success it warns Valid alignment not found. Once the choice ends (even cancelled), the drive is rebuilt and starts running. The caption changes to Pick point in alignment when (2) is ticked. |
| 2 | Active alignment | Drives the project alignment instead of a picked curve. It is disabled when the drawing has no alignment; when it has one, it is always ticked on opening, whatever was saved from the previous session. Ticking it swaps the caption of button (1). |
| 3 | Segment | Length of each sample, in drawing units (default 10). It is the drive's "step": the smaller it is, the smoother and the slower. Read when the drive is built. |
| 4 | Delay | Time between two steps, in milliseconds (default 25). It is re-read at every step, so you can speed up or slow down with the drive running. Values below 1 become 1; above 600 000, 600 000. |
| 5, 6 | ▲ ▼ | Increase and decrease the delay (4) in steps of 25, never below zero. |
| 7 | < | One step back. Visible only with the drive paused. |
| 8 | ▶ / ❚❚ | Starts and pauses the drive. With the drive running, the step buttons disappear. |
| 9 | > | One step forward. Visible only with the drive paused. |
| 10 | Reverse | Drives the other way: the index walks backwards and the direction arrow points the other way. The heading sent to Street View is not reversed. |
| 11 | Rotate view | At every step the view is rotated so that the direction of travel points up the screen. The original rotation is stored the first time and restored when the form closes. |
| 12 | Street View | At every step, converts the position to latitude and longitude through the project's coordinate system and takes the Street View palette there, with the tangent's heading. With no coordinate system defined, nothing is sent. |
| 13 | Show arrow | Draws, over the current position, a red arrow in the direction of travel. It is a transient graphic, not a drawing entity: it does not join selections, is not plotted, and disappears when the drive ends. Its size follows the zoom (the shaft is a tenth of the view height). |
| 14 | Exit | Closes the form, erases the arrow, restores the view rotation and ends the Street View palette's drive state. |
| — | station (large) | The station of the current sample, in the format 0+000.0. While the drive is being built it shows Processing.... |
| — | length range | The stretch's initial and final stations, as <initial> to <final>. |
| — | progress bar | The position in the stretch, as a percentage. The colour is drawn from a palette at every drive. |
How the drive is built
- The starting point is projected on the chosen alignment.
- The stretch is cut into samples of Segment (3) units from the start of the curve.
- The drive begins at the first sample after the starting point.
- At every step the current view is re-centred on the sample (the zoom does not change), the arrow is redrawn, the station is updated and, if ticked, Street View is taken along.
- On reaching the end, the drive pauses by itself and the position stays where it stopped — the step buttons keep working.
Switching drawings during the drive freezes it; going back to the source drawing resumes it.
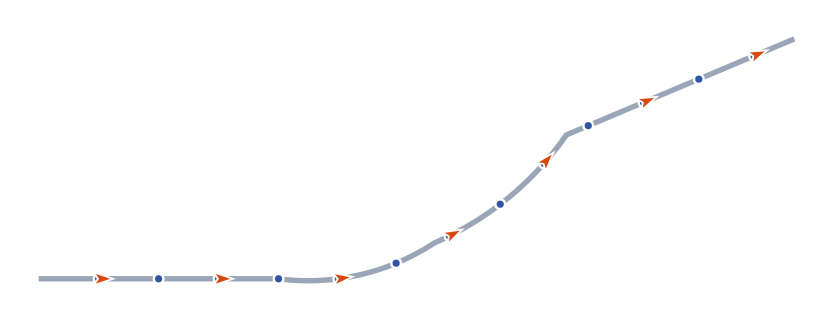
The samples of a 137-unit stretch with Segment = 10: thirteen evenly spaced points along the curve, each with the tangent direction there — that direction is what orients the arrow, the view rotation and the heading sent to Street View.
Remembered between sessions
- Travelling saves its options on close: delay, segment, Reverse, Rotate view, Street View and Show arrow come back as you left them.
- The exception is Active alignment (2): it always reflects whether the drawing has an alignment, not what was saved.
- The other commands on this page have no preferences.
Notes
- The length range uses the word to between the two stations, and the station readout the fixed format
0+000.0, in every language. - Travelling switches off the CAD's smooth view transition when the drive starts, so that the steps are instantaneous. It is not switched back on when you leave.
- The arrow is a transient graphic: if the drawing is regenerated by another command while the drive is paused, it may disappear until the next step.
- Every command on this page works in model space with the active alignment; none of them asks for a selection.
- The command prompts and refusals quoted above (Não há um eixo definido…, É necessário um eixo definido para este comando, Perfil CapCad não definido, Necessário tanto eixo como perfil definidos para este comando., Ponto não encontrado., Use in Model Space, Valid alignment not found, Deseja manter pontos desenhados?…) read the same in every language.
- Automatic acquisition of the profile from Civil 3D is not available in this version: with no profile on the alignment, the profile commands simply warn.
See also
- Station Navigator — go to a station and identify a point on the alignment.
- Alignment Tools — the same profile commands, from buttons.
- Alignment Manager — create and maintain the alignment.
- Draw and edit the alignment — draw the alignment and the auxiliary alignments.
- Vertical profile and terrain surface — where the profile comes from.