This page covers the four commands that fill a closed area you have already drawn. Three of them open the same form in different presets; the fourth has no form.
| Commands | CAPCAD_MARKING_AREA_FILL (boundary hatch area) · CAPCAD_MARKING_YELLOW_BOX (yellow box, by hatch) · CAPCAD_MARKING_AREA_CHECKER (checker pattern) · CAPCAD_MARKING_YELLOW_BOX_SIMPLE (yellow box by vertices) |
| Shortcuts | ZA (boundary hatch area) · YB and MAC (yellow box). The other two have none |
| Ribbon | CapCad tab › Traffic Control panel › Area Marking split button › By Area, Yellow Box, Yellow Box [by vertices] and Checker Pattern |
| Category | CAPCAD_MARKING_AREA_FILL and CAPCAD_MARKING_AREA_CHECKER: NEW · CAPCAD_MARKING_YELLOW_BOX and CAPCAD_MARKING_YELLOW_BOX_SIMPLE: Horizontal: specials |
| Form | HatchForm — title "Boundary Hatch Area", "Yellow Box" or "Checkers pattern", according to the command that opened it. Modeless: the drawing stays live while it is open. CAPCAD_MARKING_YELLOW_BOX_SIMPLE has no form: it asks everything on the command line |
| Hosts | CAPCAD_MARKING_AREA_FILL and CAPCAD_MARKING_YELLOW_BOX: AutoCAD, BricsCAD, GstarCAD, ZWCAD, ARES Commander. CAPCAD_MARKING_AREA_CHECKER and CAPCAD_MARKING_YELLOW_BOX_SIMPLE: AutoCAD (in ARES Commander the command exists and says it is not available yet; not available on BricsCAD, GstarCAD and ZWCAD) |
| Also | none |
A closed outline becomes a hatched area, a yellow box or a checker grid in one click, and you keep changing the numbers while you watch the drawing. The CAD's own HATCH gives you an associative hatch that is not the marking: it has no strip width, no marking layer, it never reaches a take-off and it does not know how to stand off the edge.
- Live preview. Every value you change erases the previous fill and redraws it. Accept keeps it, Reset erases it, Update redoes it.
- Three patterns, one engine. Single line, cross-hatch and a grid of rectangles, with the chequered option, all with the same spacing, angle and offset.
- The spacing is the norm's. You choose whether the distance you type is the clear gap between strips or axis to axis — which is the difference between typing the norm's dimension and typing something else.
- The outline closes itself. A selection of several segments is joined and closed automatically; without that, an open outline would produce nothing.
- The angle from a bisector. Instead of working the angle out, point at the vertex: the form reads the area's bisector and writes the angle.
- A hole (island). An obstacle inside the area cuts the fill out, and keeps cutting it on every change.
- Ready for the project. A road-marking layer with the action suffix, the channelising line redrawn with the right width, optional studs and a group mark so you can reselect the whole thing later.
What it does
All four commands start from the same idea: you already have the outline of the area (the island, the diverging triangle, the box at a junction) and you want CapCad to fill it with the right marking.
CAPCAD_MARKING_AREA_FILL— boundary hatch area. Parallel single-line strips inside the outline. It is the fill of an unusable-pavement area under the norm of the active country profile.CAPCAD_MARKING_YELLOW_BOX— yellow box. The same form opened in cross-hatch: two perpendicular passes, which is the drawing of a box-junction marking, with the outer edge line drawn over the outline.CAPCAD_MARKING_AREA_CHECKER— checker pattern. The same form in rectangle mode: a grid of cells inside the outline, optionally chequered (only half the cells).CAPCAD_MARKING_YELLOW_BOX_SIMPLE— yellow box by vertices. No form. You select a closed polyline with exactly four corners and give the spacing; CapCad hatches the quadrilateral along its two diagonals, on the yellow box layer with a width of 0.15, and draws the outline on the yellow channelisation layer with a width of 0.20.
In the first three the result is a live preview: every change erases the previous drawing and redoes it. Closing the form does not erase anything — only the Reset button does.
The geometry is a sweep fill: a construction line passes through the origin (the first vertex of the outline), at the chosen angle, and sweeps across the area; the internal stretches at each position become the strips. That is why an open outline would produce nothing — and why the command closes any open outline you select.
Workflow
- Draw the outline of the area (a polyline, or several segments that touch).
- Run the command (
ZA,YB/MAC, or from the ribbon). The form opens beside the drawing, already in that command's preset. - Click Select (2) and select the outline. You may select several segments: they are joined, and if they come out open they are closed with a straight. The starting angle comes from the bisector of the first vertex.
- Set Inner distance (6), Inner width (12) and the Angle (14). Each Enter redraws.
- If you need to, use Vertex (bisector) (16) to read the angle from another corner of the area, or +45 (15).
- To take an obstacle out of the fill, click Select hole (24) and choose the closed curve; Clear (25) undoes it.
- Check the layer (30) and the Action (32), and click Accept (4).
CAPCAD_MARKING_YELLOW_BOX_SIMPLEworks differently: outside a Brazilian profile it does not ask for the spacing at all. The spacing stays at zero and the result is just the two bare diagonals of the quadrilateral, with no hatch. The command asks for the closed four-corner polyline (the prompt is in Portuguese, Selecione a polilinha fechada (4 cantos)), and refuses without drawing if the polyline is open or does not have exactly four corners. At the end the command line reports how many elements were drawn and the linear area of the fill.
The form
Numbers are the same in every capture on this page. Two controls appear on none of them and keep their numbers where they show: Square diagonal (9), which is only shown when the form is opened by the yellow-box or checker commands, and the offset ! warning (11), which only appears when there is an offset in Simplified mode.
The screenshots below were captured in a Portuguese session, so the captions on them are in Portuguese. The control numbering is the same in both editions, and the tables quote the English captions.
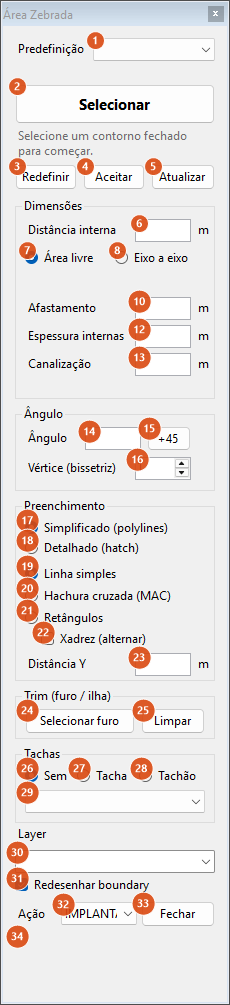
Opened by CAPCAD_MARKING_AREA_FILL: single line, "Clear area", the yellow strips layer. In an English session the title reads "Boundary Hatch Area" and the footer note (34) is empty.
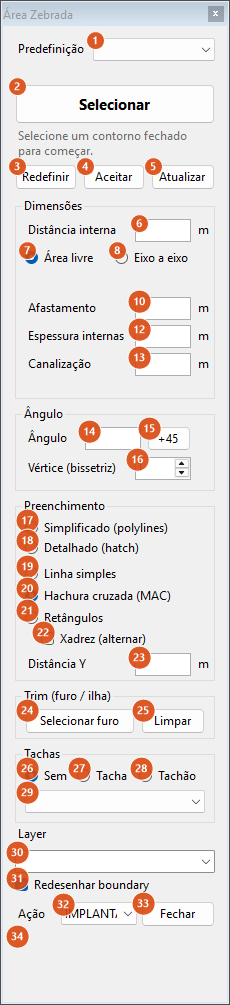
"Cross-hatch (MAC)" mode selected by hand. Opened by CAPCAD_MARKING_YELLOW_BOX the form arrives like this, but with spacing 2.50, inner width 0.15, "Axis to axis", the yellow box layer, the title "Yellow Box" and the Square diagonal box (9) in place of the Layer frame.
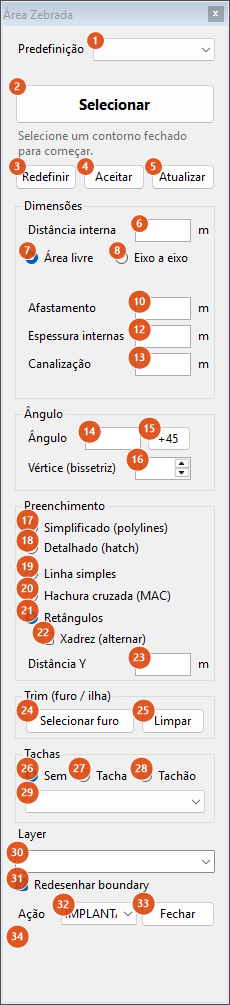
"Rectangles" mode: the "Y distance" box (23) starts to count and "Chequered (alternate)" (22) draws only half the cells. Opened by CAPCAD_MARKING_AREA_CHECKER the form arrives at 1 × 3, zero widths and the title "Checkers pattern".
Preset and selection
| # | Control | What it does |
|---|---|---|
| 1 | Preset | The list depends on the command that opened the form. Choosing one applies its values and redraws. There is no way to save presets of your own here. See the preset section below. |
| 2 | Select | Hides the form and asks for the outline. It accepts several objects: they are joined end to end; two curves that do not touch are joined by their nearest ends; an open outline is closed with a straight. A selection that comes out as a straight line is refused. On accepting the outline the form clears the hole, starts a new preview, limits Vertex to the number of vertices of the area, puts the origin at the first vertex and writes the angle read from that vertex. |
| 3 | Reset | Erases the current preview. It is the only thing that erases: closing the form leaves the drawing as it is. |
| 4 | Accept | Keeps what is drawn and lets go of the reference: the next Select starts from scratch. |
| 5 | Update | Redraws with the current values. |
| status line | "Select a closed boundary to begin." until an outline is picked. |
Dimensions
| # | Control | What it does |
|---|---|---|
| 6 | Inner distance | The spacing between strips, in metres. How it is measured depends on 7 and 8. |
| 7 | Clear area | The distance you type is the clear gap between strips: the real pitch becomes distance + strip width. |
| 8 | Axis to axis | The distance you type is the axis-to-axis pitch, without adding the width. |
| 9 | Square diagonal | Only in cross-hatch, and only when the form was opened by CAPCAD_MARKING_YELLOW_BOX or CAPCAD_MARKING_AREA_CHECKER. It multiplies the pitch by √2⁄2 — that is, the number you type is measured on the side of the square rather than along the lines, which run on its diagonal. It is ignored in single-line and rectangle modes. |
| 10 | Offset | Shortens each strip at both ends, standing it off the outline. |
| 11 | ! | A warning that only appears when there is an offset and the mode is Simplified. It explains that the offset does not come out exact there: the strip is a polyline with width, and its corner reaches half a width towards the edge, so the gap that gets drawn is smaller than the one typed — at 45°, with a 0.40 strip, an offset of 0.30 draws about 0.07. In Detailed mode the trim is made against the outline offset by that distance and the number comes out exact. |
| 12 | Inner width | The width of the strips. In Simplified mode it becomes the constant width of the polyline; in Detailed it becomes geometry. |
| 13 | Channelisation | The constant width applied to the redrawn outline (31). On a yellow box this is the outer edge line. |
Angle
| # | Control | What it does |
|---|---|---|
| 14 | Angle | Direction of the strips, in degrees. |
| 15 | +45 | Adds 45° to the angle (wrapping back to zero past 360) and redraws. |
| 16 | Vertex (bisector) | Choose a vertex of the outline by number: the sweep origin moves to that vertex and the angle is recomputed from it — the bisector of the vertex in cross-hatch, and the bisector + 90° in the other modes. The maximum is the number of vertices of the area. |
Fill
| # | Control | What it does |
|---|---|---|
| 17 | Simplified (polylines) | Each strip is its own centre line with a constant width. This is the default. |
| 18 | Detailed (hatch) | Each strip becomes a closed outline of the width asked for, trimmed against the area, and filled with a solid hatch. It changes where the paint ends, not just the entity type: a polyline with width has corners that reach outside the outline where the edge is not perpendicular to the strip; detailed mode cuts flush. It is ignored in rectangle mode, where the cells are already closed outlines. Only AutoCAD and ARES Commander draw the solid fill; on the other three CADs this mode would leave empty outlines. |
| 19 | Single line | One pass of strips. |
| 20 | Cross-hatch (MAC) | Two passes: the one at the chosen angle and another at 90°. The second uses the Y distance (23) when it has a value; empty, it repeats the first pass's distance. |
| 21 | Rectangles | A grid of cells inside the area, with the pitch of 6 in one direction and that of 23 in the other, turned by the angle. It takes precedence over cross-hatch. |
| 22 | Chequered (alternate) | Rectangle mode only: it skips every other cell. |
| 23 | Y distance | The pitch of the second direction, used by cross-hatch and by the rectangles. |
Trim (hole / island)
| # | Control | What it does |
|---|---|---|
| 24 | Select hole | Choose a closed curve inside the area — an obstacle, a planted island. The fill is cut out by it, and keeps being cut on every change, until you clear it. It needs an outline already selected. |
| 25 | Clear | Forgets the hole and redraws. |
Studs
| # | Control | What it does |
|---|---|---|
| 26 | None | No studs. This is the default. |
| 27 | Stud | Inserts the TACHA block along the outline. |
| 28 | Big stud | Inserts TACHAO. |
| 29 | (visibility) | The value written into each stud's dynamic property Visibility1 — MONO by default. It is always written, including when the value is "SEM". |
The studs sit on the same layer as the fill, set back 0.40 m from the outline, and only on the stretches of outline between 1 and 10 m long. The hole (24) does not cut the studs. On CADs where the blocks cannot be inserted, the studs are simply skipped.
Layer, action and footer
| # | Control | What it does |
|---|---|---|
| 30 | Layer | The layer of the fill. The list carries five names from the active layer catalogue — the yellow box layer, the white manual layer, the yellow and white strip layers and the red road-marking layer — under the real names the style in use gives them (ROAD_MARK_YE_MAC, ROAD_MARK_WH_MANUAL, ROAD_MARK_YE_ZPA, ROAD_MARK_WH_ZPA, ROAD_MARK_RD in an English session). It is not shown when the form is in the yellow-box or checker presets: box 9 takes its place. |
| 31 | Style external boundary | On by default. It erases the outline you selected and draws a copy of it on the fill's layer, with the constant width of Channelisation (13). This is how a yellow box gets its outer edge line. With the option off, the original outline is left as it is. |
| 32 | Action | Outside a Brazilian profile the list is NEW, EXISTENT and TO REMOVE (a Brazilian profile gets its own four-word list). Any value other than the first adds the action suffix to the layer name before drawing; layers that are not road-marking layers are left alone. |
| 33 | Close | Closes the form. What is drawn stays. |
| 34 | (footer) | The norm reminder text. It is filled only in a Brazilian profile (and shown in Portuguese); in every other profile the footer is empty. Where it is filled, clicking it opens the same text in a dialog. The text is reproduced on the Portuguese page. |
Every element drawn also gets a group mark, so CAPCAD_SELECT_GROUP can reselect the whole set afterwards. The type recorded is HatchedArea or YellowBox outside a Brazilian profile (ZEBRADO AREA / MAC inside one).
Presets by command
CAPCAD_MARKING_AREA_FILL lists four built-in entries — dimensioned by the norms of Brazil, listed and tabulated on the Portuguese page — followed by the country rules of the active profile. Those country rules are the same table documented on the Area Marking, 2 Flows page: each rule's clear gap, strip width and channelisation width are carried over into boxes 6, 12 and 13, and Clear area (7) is forced on, because a country rule always dimensions the clear gap between strips. The rule's angle has nowhere to land on this form — the hatch direction comes from the outline, not from the rule — so it is dropped. Entries the country catalogue lists without dimensions are skipped rather than offered as a preset that changes nothing.
CAPCAD_MARKING_YELLOW_BOX lists two built-in entries, both dimensioned by the norms of Brazil and both named on the Portuguese page. The command opens on the first of them: inner distance 2.50 Axis to axis, inner width 0.15, channelisation 0.20, no studs. The second is one click away in the same list. No country rules are added here: a box-junction marking is a different marking that happens to share this form.
CAPCAD_MARKING_AREA_CHECKER lists two entries, and the second is culture-gated:
| Preset | Distance | Y distance | Widths |
|---|---|---|---|
| RAMPA FRENADO (outside a Brazilian profile) | 1 | 3 | 0 |
| FERROVIA | — | — | — |
FERROVIA is on the list but is not available in this version: choosing it shows a notice saying so and changes nothing. A Brazilian profile gets a different second entry, listed on the Portuguese page.
How the options combine
All the figures below came from the command's own engine, run on the same sample island (22 × 9 m, with one chamfered corner).
Distance and how the spacing is measured
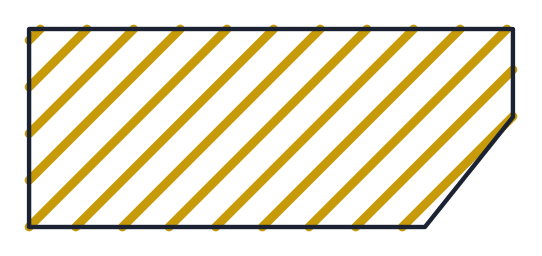
Distance 1.10 as a clear area, strip 0.40, 45°. The real pitch is 1.10 + 0.40 = 1.50.
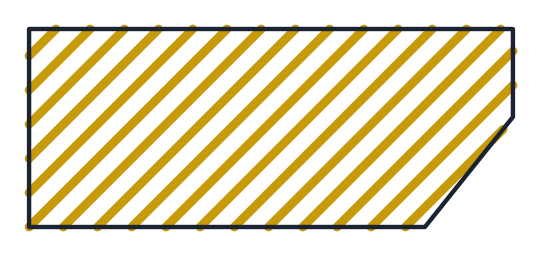
The same distance 1.10 with Axis to axis: the pitch is 1.10 and the strips are visibly closer. This is the difference between typing the norm's dimension and typing something else.
Angle
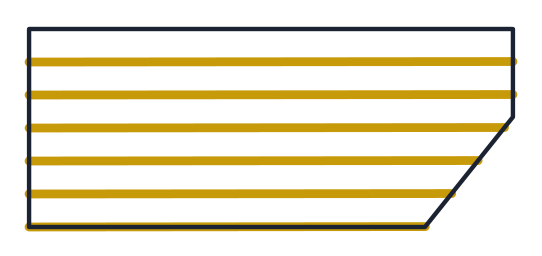
Angle 0 with the same values: the strips come out horizontal.
Offset
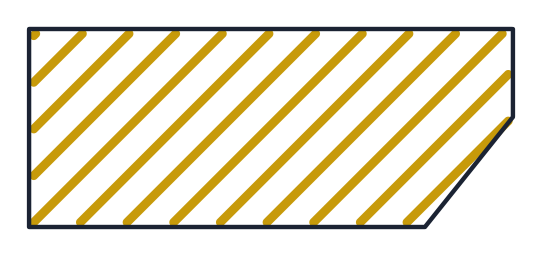
Offset 0.30 in Simplified mode: each strip is shortened at its ends, but the polyline's width gives part of the gap back.
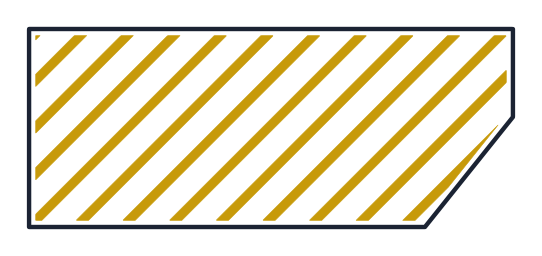
The same offset in Detailed mode: the trim is made against the outline offset by 0.30, and that is where the number comes out exact.
Cross-hatch
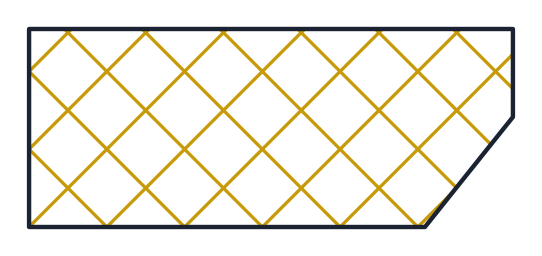
Cross-hatch: axis to axis 2.50, inner width 0.15, two passes at 45° and 135° — the opening values of the yellow-box command.
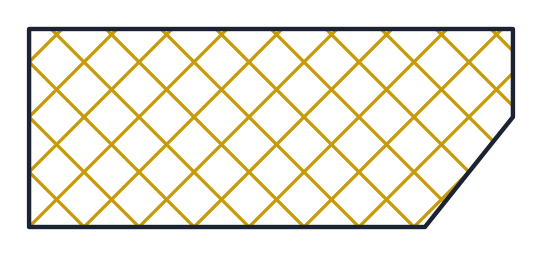
The same with Square diagonal on: the pitch drops to 2.50 × √2⁄2 ≈ 1.77, because the 2.50 is now measured on the side of the square formed by the two passes.
Rectangles
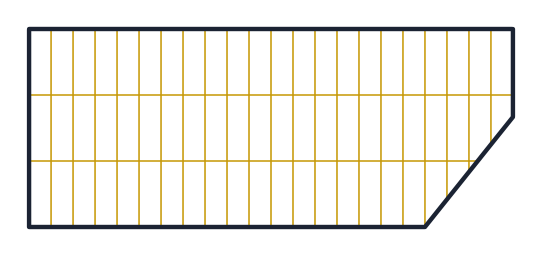
Rectangles 1 × 3 (the checker-pattern preset), with no strip width.
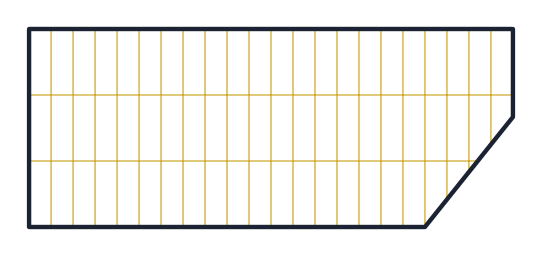
The same with Chequered (alternate): half the cells.
Hole
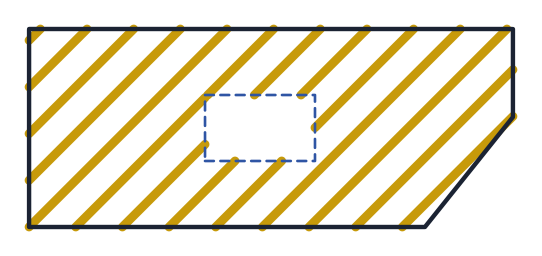
The same area with a rectangular hole (dashed): the fill is cut out by it, and keeps being cut on every change.
Yellow box by vertices
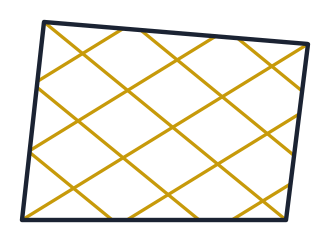
CAPCAD_MARKING_YELLOW_BOX_SIMPLE on a quadrilateral with a spacing of 2.50: the hatch runs on the two diagonals and the width is fixed at 0.15. Note that the spacing is only asked for in a Brazilian profile — elsewhere the command draws the two bare diagonals and no hatch.
Remembered between sessions
Inner width, channelisation, inner distance, offset and the state of Style external boundary are written when the form closes and restored the next time it opens. The key is the fill mode the form was in when it closed — not the command that opened it: closing in rectangle mode writes into the checker pattern's preferences. In rectangle mode the Y distance is also written, but it is not read back: that mode always reopens at 3.
Notes
- Closing the form erases nothing. Only Reset erases. That is deliberate: what is on screen is the product.
- Each redraw is one undo step, so
Uin the CAD removes only the last preview. - Switching the fill mode by hand (19, 20, 21) changes the drawing only: the form's title, the preset list and the swap between the Layer frame and the Square diagonal box stay as the command left them. Only the commands set those three things.
CAPCAD_MARKING_YELLOW_BOX_SIMPLEdraws differently outside Brazil. The command only asks for the spacing in a Brazilian profile; in every other culture it skips the question, the spacing stays at zero and the result is just the two bare diagonals of the quadrilateral, with no hatch.- The outline you select is consumed: with Style external boundary on it is erased and replaced by the styled copy. Ctrl+Z gives everything back.
- Matching the Layer frame's colour to the marking's colour is not automatic: the layer you choose is applied as it is, with the action suffix.
- Some texts are Portuguese in every language. The prompt of
CAPCAD_MARKING_YELLOW_BOX_SIMPLEand the footer note (34, in a Brazilian profile) are Portuguese; the form's own captions are translated.